Are you considering cancel Amazon Prime membership? What motivation strikes you? Maybe your free trial is ending, and you don’t want to get charged, or you’ve realized you’re not using the service enough to justify the expense.
Whatever your reason, canceling Amazon Prime is easy but it can feel a little confusing if you don’t know where to look. This article will mainly show you how to cancel Amazon Prime on different devices.
Why You Might Want to Cancel Amazon Prime
Before we jump into the steps, let’s talk about some common reasons people decide to cancel Amazon Prime. Understanding your own situation can help you decide if canceling is truly the right choice or if there’s an alternative that might work better for you.
- Cost concerns: At $139 per year (or $14.99 per month), the cost of Amazon Prime can add up, especially if you’re not using many of its benefits.
- Limited use: Some people sign up for Prime for specific reasons, like holiday shopping or a single exclusive deal, and then find they don’t use it much afterward.
- Free trial ending: If you signed up for a free trial and don’t want to transition into a paid membership, you’ll need to take action to avoid being charged.
- Switching services: Maybe you’ve decided to use a different streaming service or retailer that better fits your needs.
- Lifestyle changes: Changes in personal circumstances, like moving to a country where Amazon doesn’t offer Prime benefits, can also make it less useful.
If any of these reasons resonate with you, canceling might be the right decision. But don’t worry – you can always rejoin later if your situation changes.
Related: Best Movies on Amazon Prime Right Now (5 Different Genres)
Consider a VPN When Canceling Amazon Prime
If you’re traveling or living in a different country, you might find that Amazon Prime services vary by region.
A VPN like LightningX VPN allows you to access Amazon Prime content as if you were in your home country. This can be helpful if you’re canceling due to regional restrictions but still want access to Prime Video or shopping benefits in another country. It’s the best VPN for Amazon Prime Video.
Tips:
LightningX VPN ensures your online privacy, protects your data, and helps you bypass geo-blocks effortlessly. It now has free trials for new users and a 30-day money-back guarantee. If you share LigthningX VPN with your friends, you can get $3 cash back!
Click the button below to download LightningX VPN right now! Have a shot!

How to Cancel Amazon Prime: Step-by-Step Instructions
Amazon doesn’t make it difficult to cancel Prime, but they do tuck the option away in your account settings, which can make it a little tricky to find. Below, I’ll guide you through the process on both desktop and mobile platforms.
Cancelling Amazon Prime on Desktop
If you’re using a computer or laptop, follow these steps to cancel your Amazon Prime membership:
Step 1. Log In to Your Amazon Account
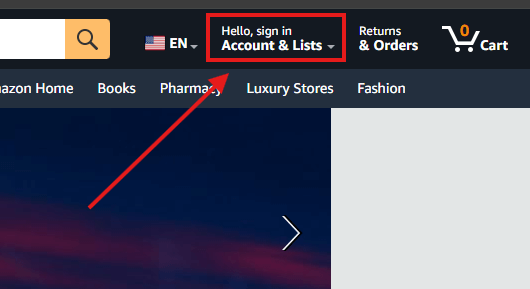
Start by visiting Amazon.com and signing in with the account associated with your Prime membership. You’ll find the “Sign In” button in the upper right corner of the homepage.

Step 2. Go to Your Account Settings
Once you’re logged in, hover over the “Accounts & Lists” dropdown menu in the top-right corner and click on “Your Account”. This will take you to a page with various account management options.
Step 3. Find the Prime Membership Section
On the “Your Account” page, look for the “Prime” section. It’s usually labeled as “Prime Membership” or something similar. Click on it to access your Prime membership details.

Step 4. Manage Your Membership
In the Prime membership section, you’ll see an overview of your benefits, payment information, and renewal date. Look for a button that says something like “Manage Membership” or “Update, Cancel, and More”. Click on it to proceed.
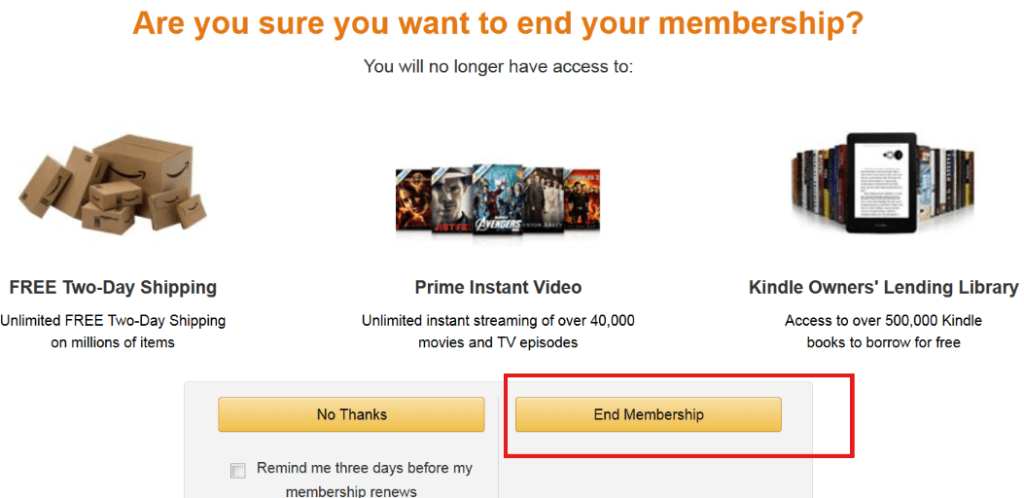
Step 5. Select “End Membership”
Amazon will show you several options for managing your membership. If you’re looking to cancel, click on something like “End Membership” or “Cancel My Benefits”. They might ask you to confirm your decision by showing you a summary of the benefits you’ll lose.

Step 6. Confirm Cancellation
Amazon doesn’t want you to leave easily, so they may offer alternatives like pausing your membership or switching to a different plan. If you’re sure about canceling, scroll down and click “Continue to Cancel” or a similar button. You may need to confirm your decision one last time.
Step 7. Check for Refunds
Depending on how much time is left in your billing cycle, Amazon might offer you a refund for the unused portion of your membership. For example, if you paid for the annual plan but have only used a few months, you might be eligible for a partial refund. Be sure to check your email for confirmation.
Cancelling Amazon Prime Using the Mobile App
If you prefer to manage your subscription on your phone, the Amazon app makes it easy to cancel your Prime membership. Here’s how you can do it:
Step 1. Open the Amazon App
Launch the Amazon app on your smartphone and make sure you’re signed in with the account linked to your Prime membership.
Step 2. Access Your Account Settings
Tap on the three horizontal lines (menu icon) in the bottom-right corner of the app. Scroll down and tap “Your Account” to open your account settings.
Step 3. Navigate to Prime Membership
In the account menu, look for the “Prime Membership” option. Tapping on it will take you to a page with details about your membership.
Step 4. Manage Your Membership
Once you’re in the Prime membership section, look for a link or button that says “Manage Membership” or “End Membership”. Tap on it to start the cancellation process.
Step 5. Follow the Prompts
Similar to the desktop process, Amazon will present you with a series of prompts, including reminders of the benefits you’ll lose and offers to pause instead of cancel. If you’re set on canceling, keep tapping through until you reach the final confirmation page.
Step 6. Confirm and Check for Refunds
Once you’ve confirmed your cancellation, you should receive an email from Amazon confirming that your membership has ended. Be sure to check your account for any potential refunds, especially if you’ve paid for a year in advance.
Special Cases: Canceling During a Free Trial
If you’re in the middle of an Amazon Prime video free trial, the process is slightly different but still easy. You can cancel at any time during the trial period without being charged. Follow the same steps as above, but when you confirm your cancellation, you’ll see a message saying your trial will end after the current period. This ensures you can continue enjoying Prime benefits until the trial expires.
What Happens After You Cancel?
Once you cancel your Amazon Prime membership, you’ll still have access to the benefits until the end of your current billing period. For example, if you cancel halfway through the month but have already paid, you can continue using Prime until the next billing date.
If you decide to rejoin later, Amazon makes it easy to reactivate your membership. Your account history, preferences, and settings will still be there, so you won’t have to start from scratch.
Final Thoughts
Canceling Amazon Prime doesn’t have to be a hassle. This article mainly shows you how to cancel Amazon Prime membership on different devices. Whether you’re doing it to save money, because you’re not using the service, or for any other reason, you can check the steps above to resolve your problem!


