


Struggling with “Disk Write Errors” or stuck updates on Steam? These issues are usually caused by corrupted temporary data. Learning how to clear Steam cache is the fastest way to reset your client and resolve performance issues. Follow this guide to remove files that cause the problem and get back to your games right now.
When Should You Clear Steam Cache?
You do not need to clear it every day. However, recognizing the symptoms of a corrupted cache can save you hours of fixing. If you encounter this situation, clear the Steam cache immediately.
This is the most common error. It occurs when Steam tries to save new data to a file but fails because the existing temporary file is unreadable. Clearing the Steam cache can remove the unreadable file, which allows the download to proceed.
2. Downloads or Updates Stuck at 0 Bytes
If your download manager says “Downloading” but the speed is always stuck at 0 bytes/s or 0%, and the disk usage is flat, then your cache is likely confused. The client thinks it is downloading, but it is actually stuck in a loop.
3. Missing File Privileges
This error sounds like a Windows permission issue, but it is also a cache issue. The truth is that the client has “locked” a temporary file and forgotten to unlock it. Clearing the Steam cache can solve this problem.
4. Library Sync Issues
Sometimes your library fails to sync with the cloud. While often a server issue, a local cache conflict can prevent your client from seeing the latest save files.
Step-by-Step Guide on How to Clear Cache on Steam
The most direct way to resolve these issues is through the built-in settings menu. Valve, the developer of Steam, has made this process easy. Follow these steps to reset your download settings:
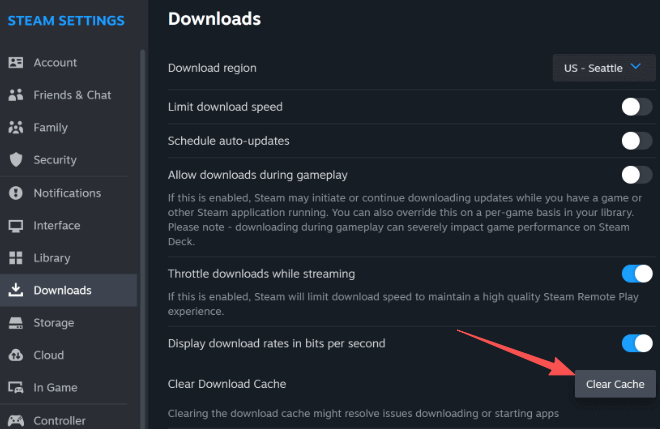
- Launch Steam and click Steam > Settings in the top-left corner.
- Select the Downloads tab from the left sidebar.
- Click the Clear Download Cache button.
- Click Confirm. Steam will restart, and you will need to log back in.
What happens next? Steam will close and restart automatically. You will need to log back in with your username and password.
Once you are back in, the client will verify your installed games. You should notice that your queued downloads will then be restarted at a much higher speed.
Tip:
Still seeing slow speeds after a cache clear? Your ISP might be limiting your bandwidth. Try LightningX VPN to get around these limits. It uses optimized servers to slash your ping and speed up your downloads, ensuring a seamless gaming experience.
How to Clear Steam Cache Manually on Windows
Sometimes, the client is so glitchy that you cannot even access the settings menu. In those cases, you need to manually delete the temporary files via Windows File Explorer. Here’s how:
The “flushconfig” Command
- Close Steam > Open Run: Press the Windows Key + R on your keyboard.
- Enter Command: Type “steam://flushconfig” and press Enter.
- Restart: A dialogue box may appear asking you to restart your computer. Just follow this to make sure the changes perform well.
Deleting the “Downloading” Folder
- Navigate to Steam Directory: By default, this is C:\Program Files (x86)\Steam.
- Open Steamapps.
- Locate “downloading”: You will see a folder named downloading. This folder contains the temporary data for games currently being updated.
- Delete Contents: Open the folder and delete everything inside it. Do not worry; this does not delete your installed games, only the partial, corrupted update files.
- Restart Steam: When you launch the client again, it will be forced to restart the update from scratch, bypassing the corrupted segment.
After removing these files, you are effectively performing a hard reset on the download process. This is often the only way to solve the “Content File Locked” error.
How to Clear Steam Cache on Mac and Linux
While Windows is the dominant platform for PC gaming, Mac and Linux users are also facing this problem.
For Mac Users:
The process is very similar to the Windows UI method, but the menu location differs slightly due to the macOS interface standards.
- Open Steam.
- Select Settings (or Preferences).
- Select the Downloads tab.
- Click the Clear Download Cache button.
If you need to do this manually on a Mac, you can navigate to “~/Library/Application Support/Steam/” via Finder and remove the appcache folder.
For Linux (and Steam Deck) Users:
Linux users often face permission issues that Windows users do not. If the UI button does not work, you can use the terminal.
- Open your Terminal.
- Navigate to the Steam directory (usually ~/.steam/steam/).
- Use the command: “rm -r appcache.”
- Additionally, navigate to ~/.steam/steam/steamapps/ and ensure the downloading folder is empty.
Does Clearing Steam Cache Delete My Games?
This is the most common question, and the answer is a definitive no. When you clear the Steam download cache, you are only removing temporary data.
- Safe: Your installed games (GTA V, Cyberpunk, etc.).
- Safe: Your save files (unless you deleted them manually).
- Safe: Your screenshots and recordings.
- Deleted: Pending updates, partial downloads, and your login session.
It is a maintenance task, not a destructive one. Just regard it like clearing the browser history on Chrome. It only deletes the cookies and temporary images, but it does not delete your bookmarks or your Google account.
Troubleshooting: Steam Download Still Cannot Work?
If you have followed the above steps, but the problem still persists, the issue might be deeper. Check these:
Check Region: Go to Settings > Downloads and change Download Region on Steam. Sometimes the server in your city is simply broken. Switching to a nearby city forces a connection to a different physical server.
Disable Antivirus: Sometimes, overzealous antivirus software flags game files as suspicious during the download process. Temporarily disable your firewall to see if the download resumes.
Verify Integrity: Right-click the specific game in your library, go to Properties > Installed Files, and select “Verify integrity of game files.” This checks the actual game installation, not just the temporary download cache.
Final Thought
Maintaining a healthy game client is essential for a frustration-free experience. By clearing the download cache on Steam and removing temporary files, you eliminate the most common cause of update failures and lag.
Make this simple process a regular part of your troubleshooting toolkit. Whenever an error halts your progress, a quick reset is usually all it takes to get you back into the game.


