


Discord has become a central hub for communication among gamers, creators, educators, and communities of all types. Whether you’re looking to create a space for friends to chat, build a professional network, or gather a like-minded community, creating a Discord server is a great way to stay connected.
In this guide, we’ll walk you through everything you need to know about how to make a Discord server, from setting it up to customizing it for your needs.
What Is a Discord Server?
A Discord server is essentially a virtual space where users can gather to communicate through text, voice, and video chat. Within a server, you can create different channels for various topics, set up roles with unique permissions, and invite other members to join. Discord servers can be public or private, and they offer a range of customization options that make it easy to manage your community.
There are several reasons you might want to create a Discord server:
- Gaming communities: Many gamers use Discord to find groups to play with, share strategies, and chat during game sessions.
- Content creators: You can use a server to connect with your fans, share updates, and build a community around your content.
- Study groups or educational purposes: Servers can be used by educators or study groups to collaborate on projects or lessons.
- General hangout spaces: If you’re looking to gather a group of friends or meet new people with similar interests, Discord is a great option.
How to Make a Discord Server: Step-by-Step Guide
Creating a Discord server is relatively simple, even for beginners. Let’s walk through the process.
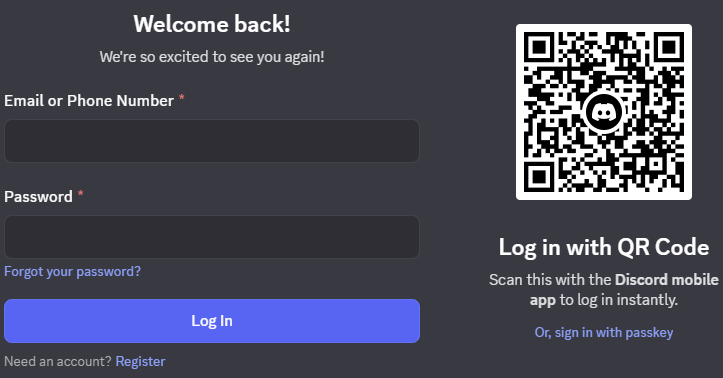
Step 1: Sign Up and Log in to Discord
Before creating a server, you need a Discord account. If you already have an account, just log in. If not, follow these steps:
- Open the Discord website.
- Click Log In if you already have an account. Or click Register to open the Discord sign-up page, and enter the required information to create a new account.
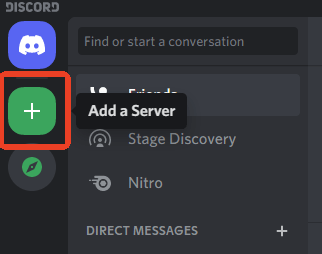
Step 2: Create Your Discord Server
Once logged in, here’s how you can create your own server:
- Open Discord: Open the Discord app (desktop or mobile) or use the web version.
- Click the “+” Button: On the left-hand sidebar, you’ll see a “+” symbol. This is the option to create a new server.
- Select “Create My Own”: Discord gives you the option to either create a server from scratch or use a template. For beginners, select “Create My Own” to make a custom server.
- Name Your Server: You’ll be prompted to give your server a name. This can be anything you like, as long as it’s unique. Choose something that reflects your server’s purpose, whether it’s a gaming group, a fan club, or a study group.
- Select a Region: Choose the server region that is geographically closest to you. This will help improve server performance and reduce latency for members.
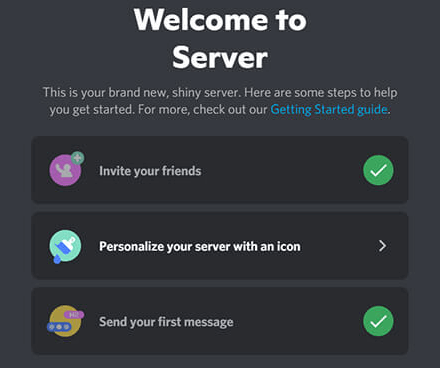
- Create the Server: After filling in these details, click Create to make your server. Congratulations! Your server is now live.
Tip: If you want to access Discord servers in other regions and get the best server performance, you may use a VPN. LightningX VPN offers 2000+ fast servers in 70+ countries, and is available on Windows, Mac, Android, iOS, Linux, TV, Chrome, Firefox, Edge, etc.
Step 3: Customize Your Server Settings
Now that your server is created, it’s time to customize it. Discord allows you to adjust several settings to suit your community’s needs.
Set Up Channels:
- Text Channels: These are for written communication. You can create as many as you like based on different topics (e.g., #general-chat, #memes, #announcements).
- Voice Channels: These are for real-time voice and video communication. You can create private voice channels or general ones for casual chats. (Related: Free Voice Changer for Discord)
- Category Channels: To keep things organized, you can group channels into categories (e.g., Gaming, Events).
Adjust Permissions: One of the most powerful features of Discord is the ability to set role-based permissions. You can assign roles to users (e.g., Admin, Moderator, Member) and control who can access specific channels, send messages, or manage the server.
Invite Members: To invite people to your server, click on the “Invite your friends” button. You can send the invitation link directly to others, or you can generate a permanent invite link to share.
Add Bots: Bots are automated tools that can help moderate your server, add fun features (like music), and manage tasks. Popular free Discord bots include MEE6, Dyno, and Carl-bot. To add a bot, go to the bot’s website, click “Add to Discord” to invite it to your server, and follow the instructions to configure it.

Step 4: Set Up Server Rules and Guidelines
A successful server isn’t just about having a place for people to chat. You also need to establish guidelines to create a positive environment. Here are some things to consider:
- Create a Rules Channel: Use a dedicated channel to post the server’s rules and guidelines. It’s crucial to let members know what is and isn’t acceptable.
- Set Clear Moderation Policies: Depending on the size of your server, you might need moderators to help enforce the rules. Choose reliable members for this role and set clear expectations for what is considered inappropriate behavior.
- Enforce a Code of Conduct: Consider establishing a set of behaviors or values that the server members should adhere to, such as mutual respect and no spamming.
Step 5: Personalize Your Server
To make your Discord server feel more personalized, you can:
- Upload a Server Icon: Add an image to represent your server. This can be a logo, mascot, or anything else that fits the server’s theme.
- Add Emojis: Customize your server’s emojis to reflect your community’s personality. You can upload custom emojis to use in chats, which adds a fun and personalized touch.
Also Read: How to Delete a Discord Server on Desktop or Mobile
Managing and Growing Your Discord Server
Once your Discord server is set up, the next step is to manage and grow it effectively. Here are some tips to keep your server active and engaged:
- Stay Active and Engaged: Keep the conversation flowing in your server by being an active participant. Share content, host events, or engage in regular chats to maintain momentum.
- Host Events and Giveaways: Hosting events like gaming nights, Q&A sessions, or giveaways can help keep members engaged and attract new users.
- Collaborate with Other Servers: Network with other Discord server owners and collaborate on events or cross-promotions to grow your community.
- Utilize Discord’s Community Features: If you want to expand your server’s reach, consider making it a public server. This allows anyone to discover and join your server, helping to grow the community organically.
Troubleshooting Common Discord Server Issues
While creating a Discord server is easy, you may run into some common issues. Here’s how to troubleshoot them:
- Can’t Add Bots?: Ensure that your server settings allow you to invite bots. You may need to adjust permissions or enable certain settings.
- Server is Too Quiet?: Encourage members to interact by regularly posting new content, hosting activities, or engaging in polls and discussions.
- Getting Too Many Spam Messages?: Consider using bots to help moderate content or setting up stricter permissions for new members.
Also Read: How to Leave a Discord Server on Desktop or Mobile
Conclusion
Learning how to make a Discord server is an essential skill for anyone looking to build an online community. Whether you’re setting up a gaming server, a fan community, or a study group, Discord provides all the tools you need to create a dynamic and engaging environment. By following the steps above, you can easily set up your server, customize it to suit your needs, and grow your community into a thriving space for discussion and interaction.


