


iOS 17.3 introduced the “Stolen Device Protection” security feature. This feature is designed to prevent unauthorized access to your iPhone if it is lost or stolen. When enabled, it’s beneficial for protecting your personal data. However, you may want to turn them off for various reasons, such as selling your iPhone or solving some issues.
This article will mainly show you how to turn off Stolen Device Protection on iPhone devices and give some solutions for possible issues.
What Is Stolen Device Protection on iPhone?
Stolen Device Protection was introduced to make it exceedingly harder for thieves to access and change important settings on a stolen iPhone.
- If you want to make some critical changes to this feature, it requires Face ID or Touch ID authentication.
- There’s a one-hour security delay when settings are modified, like Apple ID password, Face ID settings, and device passcode.
This feature is automatically enabled when Find My iPhone and Two-Factor Authentication are active on your Apple ID. It matters because it can ensure that a thief cannot easily wipe or reset the iPhone without proper authentication.
Where Is Stolen Device Protection on iPhone?
This Stolen Device Protection feature is part of the Find My iPhone and Face ID/Passcode settings. It helps add extra layers of security when your device is away from familiar locations.
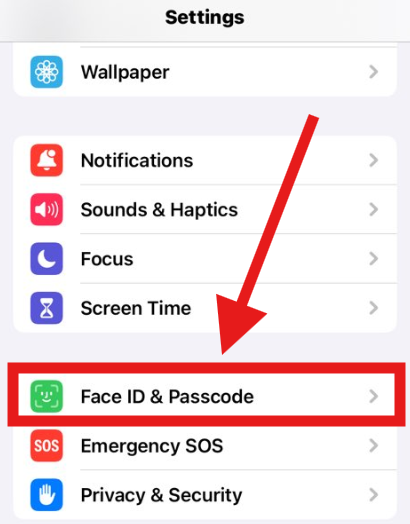
To Find This Feature on Your iPhone, Follow These Steps:
- Unlock your iPhone and go to the “Settings” app.
- Scroll down and click on “Face ID & Passcode”.
- Enter your passcode to proceed.
- Scroll down until you see the “Stolen Device Protection” section. Tap it and you can see the details.
- Or you can directly search for the “Stolen Device Protection” feature in the search bar. It will appear quickly.
Enhancing Security After Turning Off Stolen Device Protection
If you decide to turn off Stolen Device Protection, you might want to consider additional layers of security to protect your personal data. One such layer is using a VPN like LightningX VPN.
LightningX VPN helps to encrypt your internet connection with its advanced encryption protocols such as Shadowsocks, preventing your data from being decoded or intercepted. This ensures that your sensitive information remains private and secure – even if your device is more vulnerable without the Stolen Device Protection feature. Download LightningX VPN for more data security!
How to Turn Off Stolen Device Protection on iPhone?
If you need to turn off Stolen Device Protection on your iPhone now, follow this step-by-step guide carefully.
Step 1. Ensure You Have Access to Your Apple ID
Before making any changes, it’s important to verify that you have access to your Apple ID credentials. Without them, you won’t be able to proceed. Make sure you:
- Know your Apple ID and password
- Have Face ID or Touch ID set up
- Can access the trusted phone number or email linked to your Apple ID
How to turn off stolen device protection on an iPhone without a Face ID? You can use your passcode.
If you’ve forgotten your Apple ID credentials, don’t worry! You can reset your password by visiting Apple’s Account Recovery Page and following the instructions to create a new one.
Step 2. Back Up Your iPhone Data
Before making any major changes, it’s always a good idea to back up your iPhone. This ensures that your important files, photos, contacts, and settings are safe in case anything goes wrong during the process. You can back up your data using iCloud or a computer (Mac or Windows PC).
Related: How to Backup iPhone Data on Your Mac or iCloud?
Note: If anything goes wrong during the process, you can restore your data without losing important information.
Step 3. Disable Find My iPhone
Since Stolen Device Protection is linked to Find My iPhone, you’ll need to turn off this feature first.
Follow these steps to turn off Find My iPhone:
- Open the “Settings” app on your iPhone.
- Tap your Apple ID name at the top of the screen.
- Go to “Find My” > “Find My iPhone”.
- Toggle off “Find My iPhone”.
- Enter your Apple ID password when prompted to confirm your choice.
- Wait a few moments for the feature to be disabled.
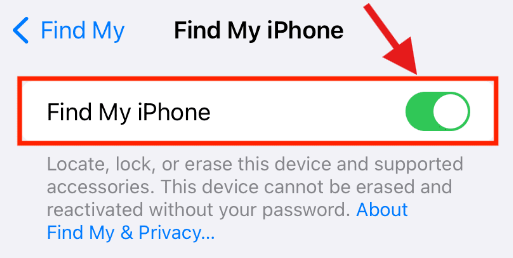
Tip: Stolen Device Protection works alongside Find My iPhone. By disabling Find My iPhone, you’re effectively reducing security restrictions tied to your Apple ID.
Step 4. Restart Your iPhone
After making these changes, restarting helps refresh your system, ensuring the changes take effect properly. Here’s how to do it:
- Press and hold the Power button and either Volume button until the slide to power off option appears.
- Swipe right to turn off your iPhone.
- Wait a few seconds, then press and hold the Power button again to turn your device back on.
Step 5. Verify If Stolen Device Protection Is Disabled
Now that you’ve followed all the steps, it’s time to confirm whether Stolen Device Protection has been successfully turned off. Here’s how you can check:
- Try changing your Apple ID password – If Stolen Device Protection is still enabled, it may require additional authentication or a delay before allowing the change.
- Attempt resetting your iPhone settings – If your device still prompts extra security measures, Stolen Device Protection might still be active.
- Check for delays when changing security settings – Normally, Stolen Device Protection enforces a one-hour waiting period for security changes when away from familiar locations. If this delay is gone, then the feature has been successfully disabled.
Final check: If you’re still experiencing delays or extra verification prompts, try repeating the steps above or checking for any overlooked settings.
Fixing Issue: “Stolen Device Protection Can’t Be Turned Off”
If you can’t turn off Stolen Device Protection, try these solutions:
- Operate from a trusted location – Make sure you are at home, work, or another familiar place. Apple may restrict changes in unknown locations.
- Wait for one hour – If you are in an unfamiliar location, Apple enforces a “1-hour security delay” before allowing changes. Be patient and try again later.
- Check your Apple ID and iCloud – Ensure your Apple ID is properly synced. Try “signing out and back into iCloud”, then attempt the process again.
- Update your iOS version – Go to “Settings > General > Software Update” and install any available updates. Restart your iPhone and try again.
- Contact Apple Support – If the issue persists, visit Apple Support or book an appointment at an Apple Store for further assistance.
FAQs – How to Turn Off Stolen Device Protection on iPhone?
Q1. Why Would People Want to Turn Off Stolen Device Protection?
Some people may want to turn off Stolen Device Protection when they are selling or giving away their device. Turning it makes it easier for the new owner to set up and use the device without any problems related to your Apple ID credentials.
Q2. What Are the Risks of Turning Off Stolen Device Protection?
While turning off Stolen Device Protection may be necessary in some cases, it significantly reduces your iPhone’s security. Turn it off with twice thought! Here are the risks:
- Easier for thieves to bypass security and reset your iPhone.
- Your Apple ID could be more vulnerable to unauthorized access.
- Loss of tracking abilities – If Find My iPhone is disabled, you won’t be able to locate your device if lost or stolen.
- Compromised sensitive information – If someone gains access to your iPhone, they can modify settings or steal data more easily.
Q3. Is It Safe to Turn Off Stolen Device Protection?
It depends. If you’re selling your device or getting it repaired, it’s fine to turn it off temporarily. But if you lose your phone, it will be easier for someone to bypass security measures.


