


As digital life expands, reliable Internet connectivity is crucial. The transition from IPv4 to IPv6 ensures seamless network performance for billions of devices.
If you’re wondering how to test IPv6 or curious about its benefits, understanding IPv6 testing is essential. This guide explores how to test IPv6 effectively, offering step-by-step insights to ensure your network is ready for the future.
How to Test IPv6 Performance?
Understanding how to test IPv6 ensures your device and network are ready for the future of the Internet. IPv6 test tools check if your setup supports IPv6, diagnose connection issues, and measure performance metrics like speed and latency. Here’s how to use the best IPv6 test tools to verify your IPv6 readiness:
Step 1: Verify Your IPv6 Address
First, confirm if your device has an IPv6 address. Unlike IPv4’s 32-bit addresses, IPv6 uses 128-bit addresses to support trillions of devices. Use free IPv6 test online tools like test-ipv6.com or check your network settings:
- Windows: Run ipconfig/all in Command Prompt and look for “IPv6 Address.”
- macOS/Linux: Use ifconfig in Terminal and find “inet6.”
If no IPv6 address appears, your device or ISP may not support IPv6. Learn how to enable IPv6.
Step 2: Check IPv6 Connectivity
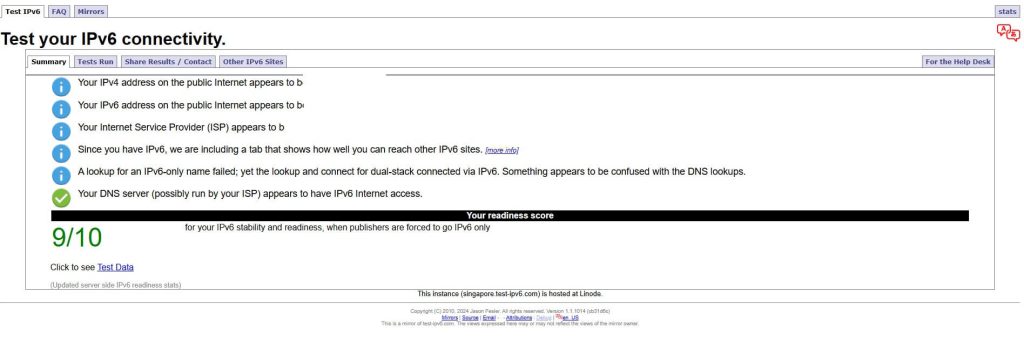
Next, test if your device can send and receive IPv6 data. IPv6 test tools perform a ping test by sending ICMP packets to an IPv6-enabled server (e.g., Google’s IPv6 server). If the server responds, your device and ISP support IPv6. For example, test-ipv6.com verifies both connectivity and ISP compatibility. If the test fails, contact your ISP or check your router’s IPv6 settings.
Step 3: Measure IPv6 Performance
Finally, evaluate your IPv6 connection’s performance using IPv6 test tools. These tools measure:
- Speed: Data transfer rates for IPv6 traffic.
- Latency: Response time (e.g., ping time in milliseconds).
- Packet Loss: Percentage of data lost during transmission.
Tools like ipv6-test.com provide detailed reports. If performance is poor, consider optimizing your router or using a VPN like LightningX VPN to enhance IPv6 routing.
Quick Tips for Successful IPv6 Testing
- Use trusted IPv6 test tools like test-ipv6.com for accurate results.
- Ensure your ISP supports IPv6; if not, contact them for setup guidance.
- Regularly test to catch configuration issues early.
Related: IPv4 vs IPv6 – Which One is Better and Faster?
How to Test IPv6 Connectivity: Step-by-Step Guide
Testing your IPv6 connectivity ensures your device, website, or network is ready for the future of the Internet. Here’s how to do it:
Use Online Tools
Visit trusted tools like test-ipv6.com or ipv6-test.com to check your IPv6 configuration, speed, and DNS leak protection. These tools provide a comprehensive report in seconds. A test-ipv6.com result shows your IPv6 address, latency, and ISP compatibility.
Using Command Line
On your computer, you can do an IPv6 test by using command lines. Follow the steps listed:
On Windows:
- Open your network configuration by following the command: ipconfig/all.
- Search for the entry titled “IPv6 Address” to verify whether ipv6 is enabled.
On macOS or Linux:
- Check the IPv6 configuration by using ipconfig.
- Find “inet6” to check if an IPv6 address is assigned to your network interface.
Testing the Website
The first two ways can be used by normal users. But if you are a website owner or developer, we provide another way to do it. You can perform an IPv6 test using a web-based tool to check if your website is accessible over IPv6.
Why Is IPv6 Test Important?
IPv6 is the latest Internet Protocol standard that defines how information is transmitted, typically consisting of 128 bits divided into 8 groups. The IPv6 provides you with several benefits, IPv6 test can help you avoid several issues you may encounter while using it.
IPv6 provides a larger address space to handle trillions of devices, built-in encryption, and authentication to improve security, and simplified routing to enhance connection speed.
However, before getting these benefits, you may also encounter these situations: your ISP hasn’t fully implemented IPv6; your devices are not compatible with IPv6; and your IPv6 malfunction.
Doing an IPv6 test can reduce the risk of these troubles, that’s why it’s an important online activity.
How LightningX VPN Supports: How to Test IPv6 Securely
LightningX VPN is among the best IPv6 test tools for ensuring secure and private IPv6 testing. With its dual-stack configuration, it seamlessly supports both IPv4 and IPv6 traffic, making it ideal for users transitioning to IPv6. Unlike traditional VPNs, where IPv6 traffic may bypass encryption and risk data leaks, LightningX VPN routes your IPv6 data through secure, encrypted tunnels, preventing IPv6 DNS leaks or real IP exposure.
To test IPv6 securely with LightningX VPN:
- Download the app from lightningxvpn.com.
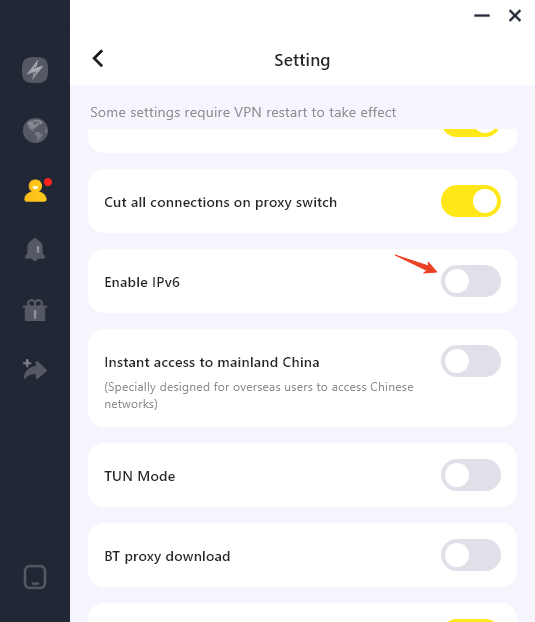
- Sign in, connect to any of its 2,000+ servers across 70+ countries, and enable the IPv6 feature in Settings > IPv6.
- Run an IPv6 test using trusted tools to verify your connection’s security and performance. For example, test-ipv6.com will confirm that no IPv6 DNS leaks occur.
By enabling IPv6 support, LightningX VPN optimizes your connection speed for IPv6-enabled networks, as it avoids fallback to slower IPv4 routing. Trusted by thousands for its compatibility with Windows, macOS, Linux, Android, iOS, and more, it also allows access to geo-restricted content by changing your IP address.
Conclusion
Although IPv6 has not yet completely replaced IPv4, in the future, IPv6 will be the primary means of network connectivity. Testing your IPv6 connection ensures that your network is ready for the transition. It can help avoid several potential issues too. With tools like LightningX VPN working with IPv6, you can enjoy a seamless and secure Internet experience.


