


Is your Windows 10 start menu not working? This could be caused by various factors such as corrupted files, malfunctioning Windows keys, or outdated system drivers. Don’t worry, we’ll introduce all the troubleshoots for the issue with your start menu.
Why Is the Start Menu Not Working on Windows 10?
Many possible factors can cause your Windows 10 start menu not to work. To precisely eliminate your issue, learn about the common causes below.
- Corrupted start menu cache.
- Outdated or buggy system updates.
- Corrupted system files.
- Corrupted user profile.
- Viruses or malware.
- Malfunctioning graphics driver.
- Firewall protection.
- Crashed Windows Explorer process.
First Check If Your Windows Key Is Working
If your Windows key is not working, it will not drag the start menu. To check if the Windows key has issues, press Win + Shift + S to see if screenshotting works.
If the screenshotting won’t work, it means the Windows key might not work. To fix it, repair the hardware and software of the Win key. You can use the methods below if you know how to adopt them or follow our detailed guide by clicking the anchor text above.
- Restart the PC.
- Use Registry Edit to enable the Win key.
- Turn off gaming mode.
- Delete the Xbox Live app.
- Use PowerShell to clear corrupted files.
- Disable the Filter Keys.
- Reinstall the keyboard drivers.
- Clean the debris inside the Windows keyboard.
Fix Windows 10 Start Menu Not Working
If you click on the start menu icon but it has no response or doesn’t work, try the solutions listed below.
1. Restart the Computer
Sometimes a simple restart can fix many problems with the Windows 10 start menu. It can clear the corrupted temporary files and cache that can cause the start menu not to work.
However, since the start menu can’t open or work, you can press and hold the power button on the computer case to shut it down.
If restarting the PC won’t fix the issue, try the next method.
2. Unhide the Taskbar
If you can’t see the start menu, it might be because the bottom taskbar is hidden. Go to your PC’s settings to let it show. Here’s how to do this on your Windows 10.
- Press Win + I to open Settings.
- Select “Personalization”.
- Select “Taskbar” on the left menu.
- Enable “Lock the taskbar”.
- Disable “Automatically hide the taskbar in desktop mode” and “Automatically hide the taskbar in tablet mode”.
Now your taskbar should appear at the bottom of your Windows screen. You can check if the start menu is working. If it doesn’t work, proceed with the next solution.

3. Restart the Windows Explorer Process
Windows Explorer is an important feature related to the start menu, search bar, taskbar, etc. If it doesn’t function properly, you may encounter the “Windows 10 start menu not working” issue. You can restart the Windows Explorer in Task Manager. Here are the detailed steps.
- Press Ctrl + Shift + Esc to open “Task Manager”.
- Find “Windows Explorer” and right-click on it.
- Choose “Restart” from the drop-down menu.

4. Download and Install a Third-party Antivirus Software
If the antivirus software is accidentally uninstalled from your PC, the firewall will automatically detect any suspicious activity. In the detection process, software that runs the start menu might be mistakenly attacked.
To stop the firewall protection and prevent your start menu’s software from being attacked, you can download and install reliable and well-known antivirus software onto your PC.
5. Log Out and into Your User Account
Resigning into your user account is an effective solution for the problems with the Windows 10 start menu. It can reload the missing or corrupted user profile. Here are the steps.
- Save all the processes on your PC and close them.
- Press Ctrl + Alt + Delete simultaneously.
- Select “Sign out”. Wait for a few seconds and the login screen will appear.
- Enter your password to log into your Windows profile.
- After logging in, check if the start menu works.
6. Update Graphics Driver
If your graphics driver is outdated, it might lead to the “Windows 10 start menu not working” issue. To fix the problem, you can update the graphic drivers. Here’s how to do it.
- Identify your motherboard model. Press Win + R, type msinfo32, and hit Enter.
- Go to your motherboard manufacturer’s website.
- Search for your motherboard model on the website and find the latest graphics driver.
- Open the driver file and install it.
- Restart your computer to apply the changes.
7. Update the Operating System
If you ignore the Windows updates many times, you may encounter problems with the Windows start menu. You can update the operating system to fix the issues.
- Press Win + I to open Settings.
- Go to “Windows Update” on the left menu.
- Click “Check for updates”.
- If updates are available, click “Download and install”.
- Restart your PC.
After restarting, check if the start menu works.
8. Roll Back the Windows Update
If the “Windows 10 start menu not working” issue happens after you update your Windows PC,
it might be caused by the Windows update. You can roll back the update to fix the issue. Here are the steps.
- Press Win + I to go to Settings.
- Go to “Update & Security”.
- Go to “Windows Update”.
- Find and select “View update history” on the page.
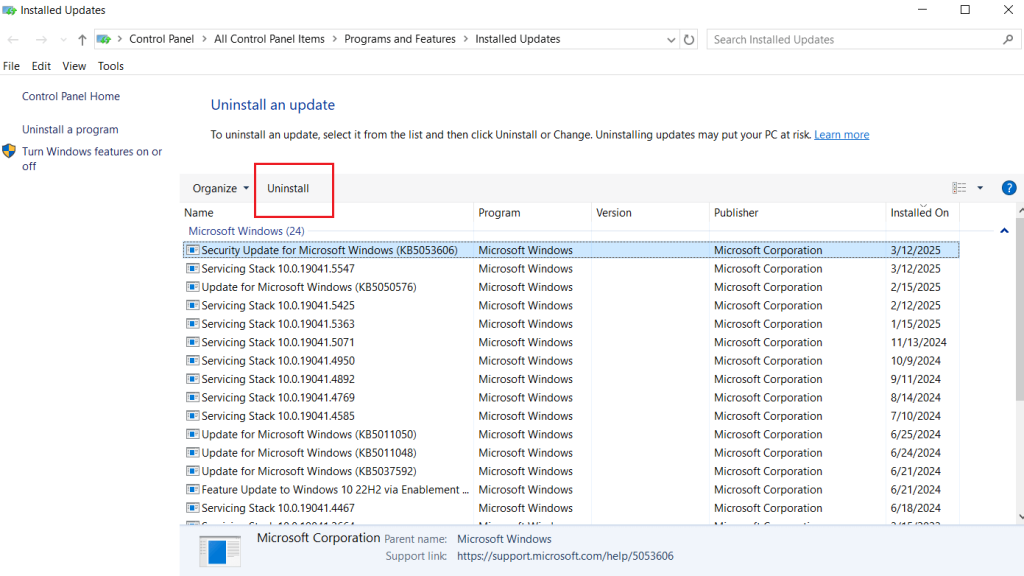
- Click “Uninstall updates” on the “View update history” page.
- Select the latest Windows update and click the “Uninstall” button.
- Restart the PC. Now your Windows PC is rolled back to the last version.
Note: Rolling back the Windows version to an older one may make it easy to attack.
9. Use Windows PowerShell
PowerShell is a critical tool for managing all Windows apps including the start menu. If your Windows 10 start menu or Windows search bar is not working, run a command in PowerShell to re-register it and fix the problem. Here are the steps.
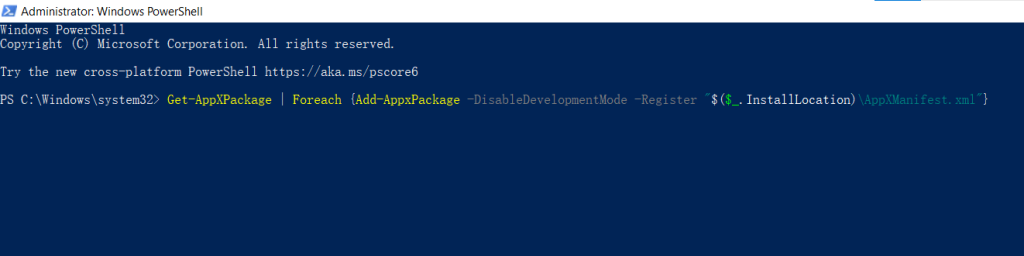
- Press Win + R and type “PowerShell”.
- Press Ctrl + Shift + Enter to run it as an administrator.
- Run the below command in PowerShell: Get-AppXPackage | Foreach {Add-AppxPackage -DisableDevelopmentMode -Register “$($_.InstallLocation)\AppXManifest.xml”}
- Wait until the process is done. Once it is finished, restart your PC.
Note: When running commands on PowerShell and Command Prompt, you should be careful because a wrong command might lead to data loss.
Use a VPN to Protect Your Windows PC
Sometimes if your Windows 10 has not been updated for a long time, it is easily attacked due to an outdated operating system. To add a layer to your PC’s security, using a reliable VPN (e.g., LightningX VPN) can help.
LightningX VPN is one of the best VPNs for Windows, macOS, Android, iOS, Apple TV, Android TV, and Linux.
It uses the best VPN protocol WireGuard based on algorithms like AES-256-GCM and ChaCha20-Poly1305. Your browsing history, IP address, and phone number will be highly encrypted.
It offers 2,000+ servers in 50+ countries including Japan, Canada, Australia, the US, etc. It doesn’t limit bandwidth so you can smoothly stream, browse, or play games online.
Conclusion
The “Windows 10 start menu not working” issue can be fixed by restarting the PC, updating the graphics driver, re-registering Windows apps, re-signing into the user profile, etc. However, if you still can’t fix the issue, try posting your question on YouTube, TikTok, or Reddit and discuss it with other users.


