This post provides a simple introduction to “chrome://net-internals/#dns” and explains how to use this URL to flush DNS on Chrome to fix your browser issues or site loading issues. The benefits of flushing Chrome DNS and tips to fix “chrome://net-internals/#dns” not working are also provided. Check the details below.
What Is “chrome://net-internals/#dns”?
“chrome://net-internals/#dns” is a special link in Google Chrome.
It allows users to access Chrome’s network internals. The “#dns” section of this page displays some information and features of DNS (Domain Name System). It stores the DNS cache of the domains that have been recently resolved and stores their corresponding IP addresses.
Here you can easily look up the DNS information of a specific domain name and flush the Chrome host cache with one click.
Clearing the DNS cache can fix some browser issues like site loading errors, outdated site information, and domain name resolution issues, and improve the browsing experience.
If you can’t access a website or the DNS entry of the website has been altered, you need to flush the DNS cache of your Chrome browser. It helps you fetch the latest DNS information of the website and lets you regain access to that website.
Learn how to flush the DNS cache on Chrome by using “chrome://net-internals/#dns” below.
Use “chrome://net-internals/#dns” to Flush DNS on Chrome
Step 1. Open “chrome://net-internals/#dns”.
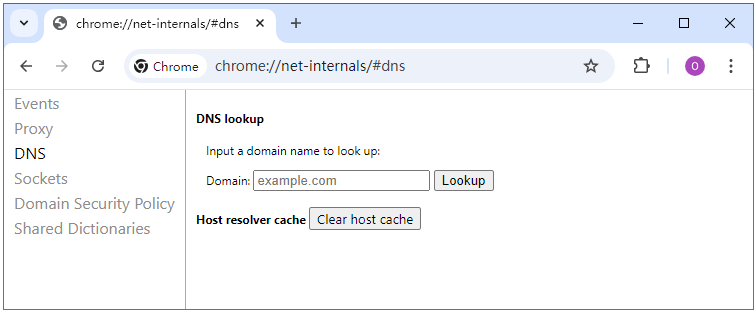
Open your Google Chrome browser, enter “chrome://net-internals/#dns” in the address bar, and press Enter to open the Chrome DNS settings page.
Step 2. Flush DNS on Chrome.
Click the “Clear host cache” button next to “Host resolver cache” to start flushing the DNS cache on your Google Chrome browser.
Step 3 (Optional). Flush Socket Pools on Chrome.
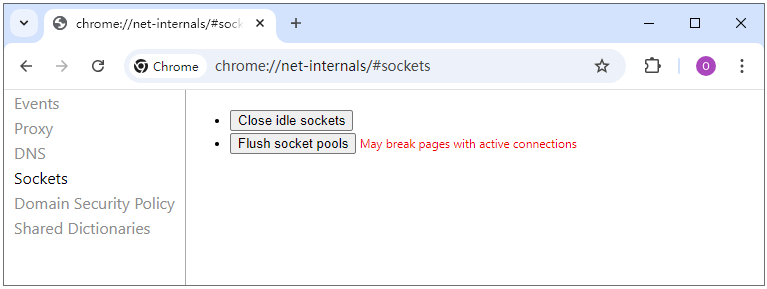
If you still have issues with visiting websites, you may also flush the socket pools.
Click the “Sockets” tab in the left panel. Click the “Flush socket pools” button.
After it finishes, you can refresh the website that you couldn’t open previously to see if it can smoothly open.
If you want to flush the DNS cache of Chrome on your Android or iOS mobile devices, you can follow the same operation listed above.
Tip:
Can’t access or use Google Chrome browser or app in your region/country? Try LightningX VPN!
LightningX VPN is the best VPN for Windows, Mac, Android, iOS, TV, Linux, Chrome, Firefox, Edge. It offers 2000+ global servers in 70+ countries. You can connect to any server you like with one click. Fast, stable, secure, and reliable.
With this VPN, you can unblock websites, apps, and services from all over the world, including Google Chrome, YouTube, TikTok, Disney+, Netflix, HBO, Hulu, Instagram, Facebook, Twitter, Steam, Discord, and more.
Benefits of Flushing DNS on Chrome
Fix Site Loading Issues
Flushing DNS helps you fix the issues with websites that won’t load or display outdated content. It allows you to access the latest version of a site.
Speed up Browsing
Clearing outdated or corrupted DNS cache makes your browser resolve domain names more efficiently and may speed up the loading times of sites.
Eliminate IP Address Conflicts
If a website changes its IP address but your browser still stores the old information of that website, you can flush the Chrome DNS to make your browser connect to the correct server and resolve potential IP conflicts.
Avoid Redirect Issues
Sometimes the cached DNS may lead to page redirects. Flushing the cache may avoid the redirects.
Fix Network Connectivity Issues
If you are experiencing network issues, flushing the DNS may help you clear any corrupted or outdated entries and fix the connectivity issue.
Enhance Your Privacy
Deleting the DNS cache helps remove the traces of your recently visited websites. It enhances your privacy.
Related: How to Fix DNS Server Not Responding Error on Windows 10/11, etc.
Fix “chrome://net-internals/#dns” Not Working
If “chrome://net-internals/#dns” is not working for flushing DNS on Chrome, you may take the steps below to see if they can help you troubleshoot the issue.
Fix 1. Update Chrome. Click the three-dot icon at the top-right corner and select Help > About Google Chrome to check for updates for Chrome and install the latest Chrome version on your device.
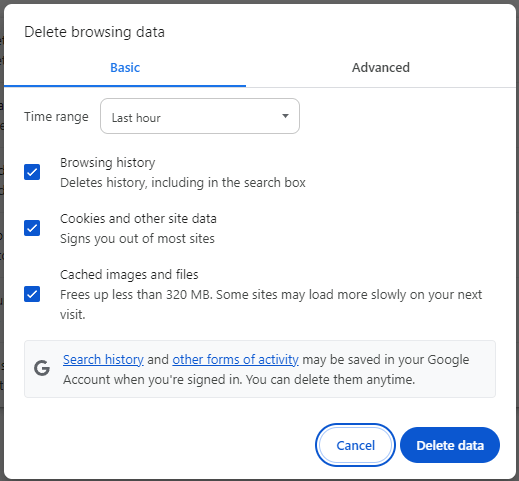
Fix 2. Clear Chrome cache and cookies. Enter “chrome://settings/clearBrowserData” in the address bar of Chrome, select the time range, select the types of data you want to clear, and click the “Clear Data” button.
Fix 3. Try to flush DNS on Chrome in Incognito Mode. Click the three-dot icon in the upper-right corner and select “New Incognito Window”. You can also press Ctrl + Shift + N to open an Incognito window in Chrome. Follow the steps above to clear the DNS cache of Chrome.
Fix 4. Reset Chrome settings. You can also reset your Chrome settings to default to see if it helps fix the issue. Enter “chrome://settings/reset” in the address bar and click “Restore settings to their original defaults”.
Fix 5. Disable extensions temporarily. Some extensions may interfere with Chrome’s internal URLs. You can enter “chrome://extensions/” in the address bar and disable extensions one by one. After that, try to use the “chrome://net-internals/#dns” URL to flush the Chrome DNS cache again.
Fix 6. Reinstall Chrome. If flushing the Chrome DNS cache doesn’t work, you may uninstall and reinstall Chrome.
Fix 7. Try other ways to flush DNS like flushing DNS on your device.
Related: Download Google Chrome for Windows 10/11 PC, Mac, Mobile
Difference Between Chrome DNS Cache and Browser Cache
Both the Chrome DNS cache and the browser cache aim to enhance the browsing experience, but they are different. They serve different purposes for Google Chrome. Below are the main differences between them.
Purpose
- DNS Cache: Focus on domain resolution. Store DNS (Domain Name System) information which translates domain names to the corresponding IP addresses. The DNS cache helps the browser fast resolve domain names and connect to the websites.
- Browser Cache: Focus on the fast retrieval of web resources. Store static data of websites like images, stylesheets, scripts, and HTML files. It makes the browser quickly load the frequently visited websites by avoiding downloading the same files repeatedly.
Content Type
- DNS Cache: Include the domain names and their associated IP addresses.
- Browser Cache: Include images, videos, CSS files, JavaScript files, etc. that are used to render web pages.
Management of the Cache
- DNS Cache: Can be flushed with “chrome://net-internals/#dns”.
- Browser Cache: Can be cleared via browser settings in the “Clear browsing data” window.
Duration of Storage
- DNS Cache: The time-to-live (TTL) of the cache entries determines how long the DNS cache will be stored.
- Browser Cache: The cache will be stored until it is cleared by the user or expires based on the cache settings set by the website.
Impact on Browsing
- DNS Cache: Determine whether Chrome can resolve domain names correctly and whether users can access websites.
- Browser Cache: Affect the loading speed of websites and the performance of web browsing. An overloaded browser cache may lead to slow performance and website display problems.
Bonus: How to Flush DNS in Other Browsers
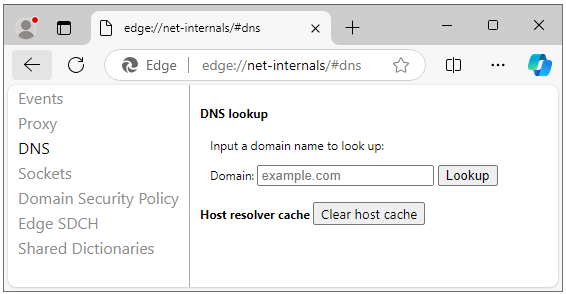
Clear DNS cache on Edge: Go to “edge://net-internals/#dns” in the address bar > Click “Clear host cache”.
Clear DNS cache on Safari: Click Safari > Preferences > Advanced > Show Develop menu in menu bar. Click the Develop menu and click “Empty Caches”.
Clear DNS cache on Firefox: Visit “about:networking#dns” > Click “Clear NDS Cache”.
Clear DNS cache on Opera: Go to “opera://net-internals/#dns” > Click “Clear host cache”.
Bottom Line
This post mainly introduces how to use “chrome://net-internals/#dns” to flush DNS on Google Chrome to help you fix site loading errors and improve your browsing experience. Some other information about Chrome DNS flushing is also included. Hope it helps.


