A DNS server is essential to translate domain names (like www.example.com) into IP addresses (like 192.0.2.3). The “DNS server not responding” error means that your device cannot communicate with the DNS (Domain Name System) server to resolve domain names into IP addresses. This error prevents you from accessing sites and other online services.
How Does DNS Servers Work?
The DNS server works as follows:
- DNS Request: After you enter a URL in your web browser and press Enter, your device sends a request to a DNS server to get the IP address associated with the domain name you type.
- DNS Server Response: After the DNS request, the DNS server will look up the IP address and send it back to your device.
- Open and Visit the Website: Then your device can use the IP address to create a connection to the web server that hosts the website. You can open and view the website now.
If the DNS server doesn’t respond and can’t complete the DNS resolution process, your device cannot get the IP address of the website. You can’t open and access the site. Your browser or operating system may display an error message saying that “DNS server not responding”.
Tip:
LightningX VPN – An ultra-fast, stable, secure, and reliable VPN for Windows, Mac, Android, iOS, TV, etc. You can use this VPN to unblock websites and access global content with ease. 2000+ servers in 50+ countries are provided. It also features IP address change, strong encryption technology, DNS leak protection, and more.
What Causes the “DNS Server Not Responding” Error?
This error can be caused by various factors, ranging from network issues to device configuration errors. Understanding the causes may help you better resolve the issue. Below are some common causes of this error.
- Your internet connection issues like unstable Wi-Fi or loose/damaged ethernet cable may cause this error.
- The DNS server you are trying to request may be crowded or temporarily down. Incorrect settings of the DNS server may prevent it from responding properly.
- Wrong network settings or outdated network drivers on your device may lead to the issue.
- Problems with your ISP (Internet Service Provider) DNS servers can cause the error.
- Sometimes security settings like firewall or antivirus software settings may block the DNS requests.
- A corrupted DNS cache of the browser or computer may be the culprit.
- Problems with the web browser like incorrect settings or corrupted data can cause DNS errors.
- Malware or virus infection may alter your network settings and block access to the DNS servers.
- Corrupted system files may affect your network functionality.
Fix DNS Server Not Responding on Windows 10/11 – 11 Tips
Based on the causes of the “DNS server not responding” error, you may try the troubleshooting tips below to fix the issue on Windows 10/11.
Fix 1. Check Your Current Internet Connection
- Check your ethernet cable or other network hardware to see if there are any physical damages.
- Disconnect your Wi-Fi or wired network and reconnect it.
- Make sure your device is well-connected to the network and has a strong signal.
Fix 2. Restart Your Router, Modem, and Computer
- Power off your router and modem and turn on them again. This will restart your network. Sometimes a simple restart can resolve the network connection issues.
- Restart your computer and try to access the website again.
Fix 3. Change to Another Network
You can also change to another Wi-Fi or network on your PC and try to open the website in your browser again.
Fix 4. Flush DNS Cache of Your Browser and Computer
If you see the “DNS server not responding” error when trying to access a website, you can try to flush the DNS cache to see if it helps you solve the problem.
Flush DNS on PC:
- Press Windows + R, type cmd, and press Ctrl + Shift + Enter to run Command Prompt as administrator on your Windows 10/11 computer.
- In Command Prompt, type ipconfig /flushdns, and press Enter.
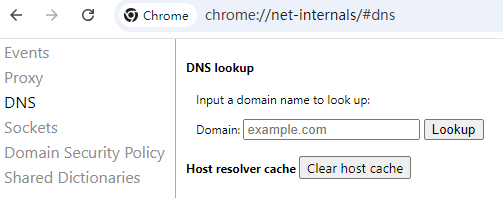
Flush DNS on Chrome:
- Open Google Chrome.
- Type chrome://net-internals/#dns in the address bar and press Enter.
- On Chrome’s DNS settings page, click the Clear Host Cache button to flush the DNS cache.
Fix 5. Change Your DNS Server
If the DNS server is not responding when you try to open a website in your browser, you can change your DNS server and try again.
- Right-click the network icon in the system tray on your PC and select “Open Network & Internet Settings”.
- Click “Change adapter options”.
- Right-click your current network connection and select “Properties”.
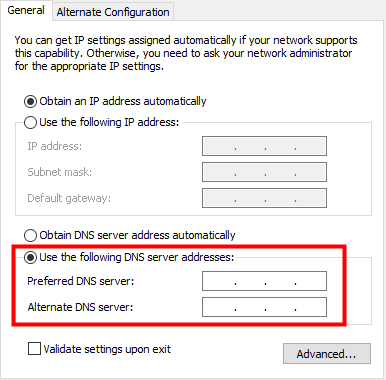
- Double-click “Internet Protocol Version 4 (TCP/IPv4)” to open the IPv4 settings.
- Select “Use the following DNS server addresses”.
- Use alternative free DNS servers like Google Public DNS (8.8.8.8 and 8.8.4.4) or Cloudflare’s DNS (1.1.1.1).
- Click “OK” to save the DNS server changes.
Fix 6. Change to Another Web Browser to Access the Site
Fix 7. Try to Visit the Site from a Different Device
Fix 8. Update Network Drivers on Your PC
Try to update your network drivers to see if it can fix the “DNS server not responding” error on Windows 10/11.
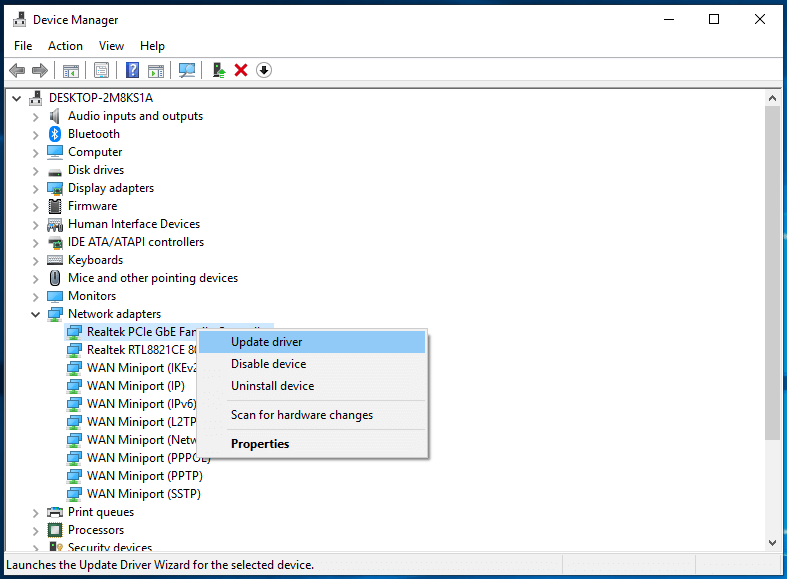
- Press Windows + X and select “Device Manager”.
- Expand the “Network adapters” option.
- Right-click your network adapter and select “Update driver”.
- Select “Search automatically for updated driver software” and it will search for the latest driver and install it on your PC.
Fix 9. Reset Network Settings on Windows 10/11
You can also reset your network settings on your PC to see if the “DNS server not responding” issue can be fixed.
Reset Network Settings with Windows Settings:
- Press Windows + I to open the Settings app on your PC.
- Click “Network & Internet”.
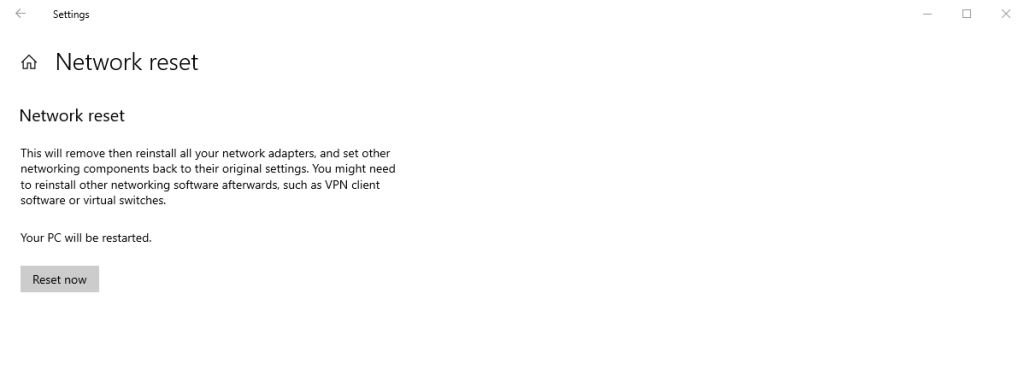
- On Windows 10, click “Network Reset”. On Windows 11, click “Advanced Network Settings”, and click “Network Reset” under the “More Settings” section.
- Click the “Reset Now” button and click “Yes” to reset your network settings to the default configurations.
Reset Network Settings with CMD:
Press Windows + R, type cmd, and press Ctrl + Shift + Enter to open Command Prompt.
Type the following command lines one by one and press Enter after each command.
- netsh winsock reset
- netsh int ip reset
- ipconfig /release
- ipconfig /renew
- ipconfig /flushdns
Note: Please be aware that all network adapters will be reinstalled, all network settings will be reset to their default states including IP address and DNS settings, all saved Wi-Fi networks and passwords will be removed, and any VPN or proxy settings will be removed as well. Therefore, you should think twice before you reset your network settings.
Fix 10. Disable Firewall or Antivirus Software Temporarily
Sometimes your firewall or security software may interfere with DNS and lead to the “DNS server not responding” error on Windows 10/11. Try to disable them temporarily to see if it resolves the issue.
Fix 11. Contact Your ISP
The DNS server problem may be caused by the ISP’s DNS server failures and network outages. You may contact your ISP to see if they can help you solve the problem.
How to Fix DNS Server Not Responding on Mac
To fix the DNS server issues on Mac, you can try the tips below.
Basic troubleshooting tips:
- Ensure your Mac is properly connected to the network.
- Restart your router and Mac computer.
- Change another network, browser, or device to access websites in your browser.
Change DNS server on Mac:
- Click Apple > System Settings.
- Click “Network”.
- Select your active network connection.
- Click “Advanced” and click “DNS”.
- Click “+” and add the DNS servers 8.8.8.8 and 8.8.4.4.
- Click “OK” and click “Apply”.
Flush DNS Cache on Mac:
- Click Spotlight Search on Mac.
- Search for “Terminal” to open Terminal.
- Type the sudo killall -HUP mDNSResponder and press Enter.
How to Fix DNS Server Not Responding on PS5/PS4
Basic troubleshooting tips:
- Check your network connection and make sure it is well-connected.
- Restart your router and PS5/PS4 console.
Change DNS server on PS5/PS4:
- Open Settings from the main menu on your PlayStation.
- Navigate to “Network” > “Set Up Internet Connection”.
- Select “Use Wi-Fi” or “Use a LAN Cable”.
- Select “Custom”.
- Set DNS settings to “Manual”.
- Enter the primary DNS: Enter Primary DNS: 8.8.8.8. Enter the secondary DNS: 8.8.4.4.
- Save the settings.
Fix DNS Server Not Responding Error on Xbox
Basic troubleshooting tips:
- Make sure you have a strong Wi-Fi signal and your Xbox is connected to the network.
- Restart your router and Xbox console.
Change DNS server on Xbox:
- Press the Xbox button and go to “Profile & System” > “Settings”.
- Go to “General” > “Network Settings”.
- Select “Advanced Settings” > “DNS Settings” > “Manual”.
- Change your DNS servers to 8.8.8.8 and 8.8.4.4.
How to Fix DNS Server Not Responding on Android
Basic troubleshooting tips:
- Restart your router, modem, and Android device.
Change DNS settings on Android:
- Open the Settings app on your Android device.
- Tap “Network & Internet” or “Connections”.
- Tap “Wi-Fi”.
- Select your connected Wi-Fi network and select “Modify Network” or “Advanced Settings”.
- Turn on “Advanced Options”.
- Change IP settings from DHCP to Static.
- Enter new DNS servers. Google DNS: Primary: 8.8.8.8, Secondary: 8.8.4.4. Cloudflare DNS: Primary: 1.1.1.1, Secondary: 1.0.0.1
- Save the changes and reconnect to your Wi-Fi network.
Bottom Line
This post aims to help you fix the “DNS server not responding” error on Windows 10/11, Mac, PS5/PS4, Xbox, Android, etc. Some feasible tips are provided. Hope it helps.
If you need a VPN for your computer or mobile, you can use LightningX VPN – a top cross-platform VPN tool.

