


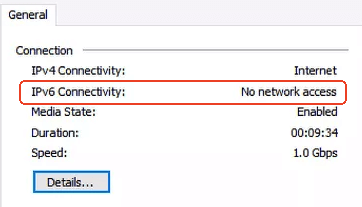
If you’re experiencing the “IPv6 No Network Access” error on Windows 11/10, it usually means your Windows system can’t establish a network connection using IPv6. This issue can be caused by various reasons, e.g., wrong network settings or configurations, network driver problems, etc. Below we provide some troubleshooting steps to help you fix the issue.
1. Restart Your Computer, Router, and Modem
Sometimes, a simple restart of your computer and router can fix network connection issues, including the “IPv6 No Network Access” problem. Just power off your computer, router, and modem, and restart them.
2. Check If IPv6 Is Enabled on Your PC
If IPv6 has no internet access on your Windows 11/10 PC, you can check if IPv6 is properly enabled. Follow the steps below to enable IPv6 on your PC.
- Press Windows + R, type control, and press Enter to open the Control Panel.
- Click Network and Internet > Network and Sharing Center.
- Click Change adapter settings on the left side.
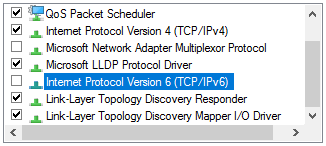
- Right-click on your active network adapter (Ethernet or Wi-Fi) and select Properties.
- Scroll down to find Internet Protocol Version 6 (TCP/IPv6). Ensure that this option is enabled.
- Click OK to save any changes and restart your PC.
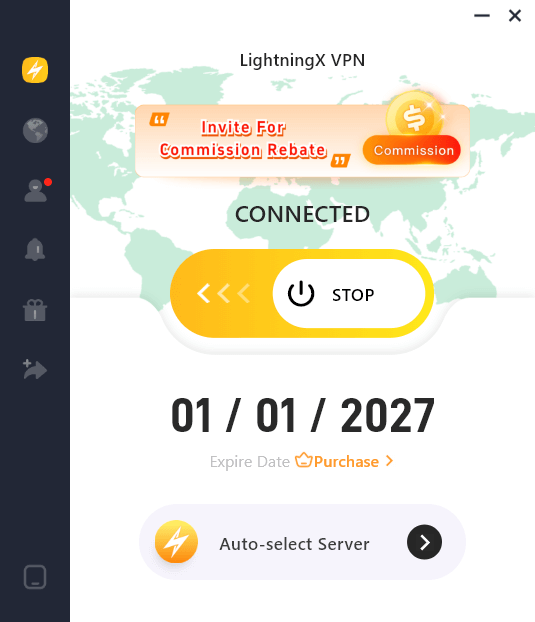
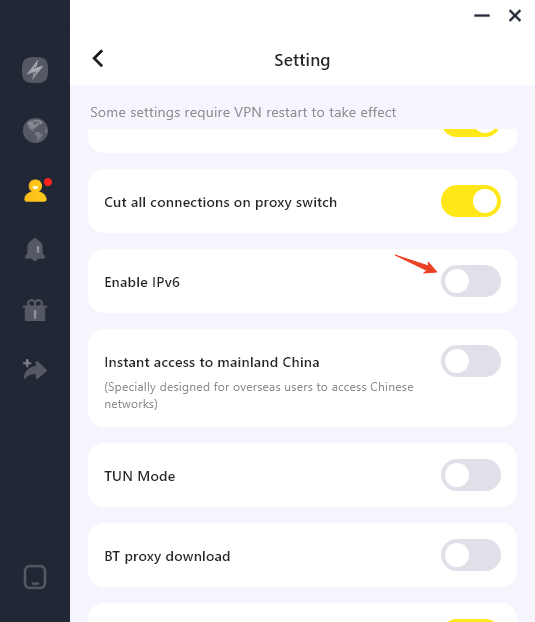
Alternatively, you can use LightningX VPN to enable IPv6 with one click.
LightningX VPN is a popular VPN for Windows, Mac, Android, iOS, Linux, TV, etc. It offers 2000+ servers in 70+ countries. This VPN helps you change your IP address to any location worldwide, hide your real IP, and easily enable IPv6 on your device. You can connect to a server in another country/location to easily get a virtual IP. Use this VPN to unblock global apps and websites.
This VPN uses strong encryption methods like AES-256, WireGuard, Shadowsocks, etc. to encrypt and protect all your online activities. It also follows a strict no-logs policy. You can maintain anonymity online.
- Download and install LightningX VPN on your PC. Launch it.
- Click “Start” and fast connect to a server. To change another server, click the “Mode and locations” icon on the left side.
- To enable IPv6 on your PC, click Mine > Setting, and toggle on the switch of “Enable IPv6”.
3. Disable and Re-enable IPv6 on Your PC
You can also try to disable and re-enable IPv6 to see if it helps fix the “IPv6 no network access” error.
- Follow the same steps above in Solution 2 to open the Properties window of your active network.
- Uncheck “Internet Protocol Version 6 (TCP/IPv6)” and click OK to disable IPv6. Restart your PC.
- After the restart, follow the same steps and re-check “Internet Protocol Version 6 (TCP/IPv6)” to enable IPv6 again.
4. Update Network Drivers on Your PC
Outdated or corrupted network drivers can cause IPv6 connectivity issues. You can update your network drivers by following the steps below.
- Press Windows + X and select Device Manager.
- In the Device Manager window, expand Network adapters.
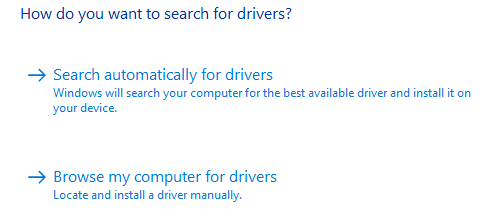
- Right-click your network adapter and select Update driver.
- Choose Search automatically for updated driver software.
- If a newer network driver is found, it will automatically install.
- Restart your computer to check if the “IPv6 no network access” issue is fixed.
5. Check Your Router Settings
Sometimes, your router might block IPv6 connectivity. Follow the steps below to check your router settings.
- Open a browser. Open your router’s admin page by typing its IP address (usually 192.168.1.1 or 192.168.0.1).
- Log into your router by using your admin credentials. Usually, you can check your router’s manual for the default login credentials if you haven’t changed it.
- On your router setting page, look for the IPv6 settings. Make sure IPv6 is enabled.
- Save the changes and restart your router.
6. Flush the DNS Cache on Your PC
Sometimes, a corrupted DNS cache may cause IP errors like the “IPv6 connectivity: no internet access” error. Follow the steps below to flush the DNS cache on your PC.
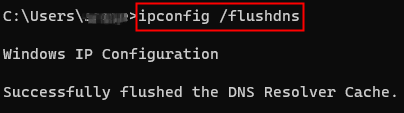
- Press Windows + R, type cmd, and press Ctrl + Shift + Enter to run Command Prompt as administrator.
- Type the following command: ipconfig /flushdns, and press Enter to flush DNS.
- Restart your computer to check if your IPv6 has connectivity now.
7. Temporarily Disable Windows Firewall or Antivirus
Sometimes, your firewall or antivirus software might block IPv6 traffic. Temporarily disable your firewall or antivirus and check if the “IPv6 no network access” issue is resolved. If it works, you might need to adjust your firewall settings to allow IPv6 traffic.
8. Reset TCP/IP Settings on Your PC
Sometimes, resetting the TCP/IP settings can help resolve network issues, including IPv6 connectivity problems.
- Follow the same operation in Solution 6 to open Command Prompt as administrator.
- Type the following command and press Enter: netsh int ip reset. This will reset your TCP/IP settings.
- Restart your computer to apply the changes.
9. Check for Windows Updates
Make sure your Windows operating system is up to date. Sometimes, Microsoft releases patches that can resolve network issues. Follow the steps below to update your Windows system.
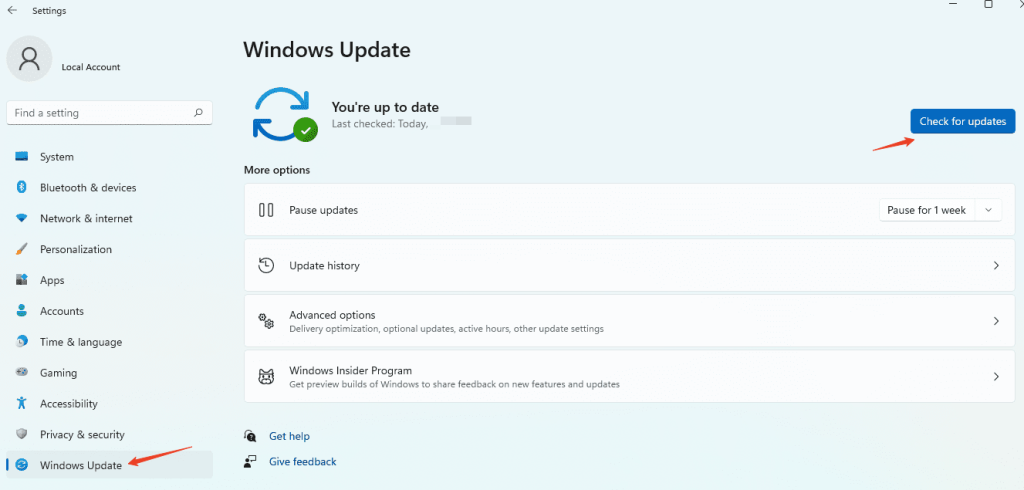
- Press Windows + I to open Windows Settings.
- Click Update & Security > Windows Update.
- Click “Check for updates” and install any available system updates.
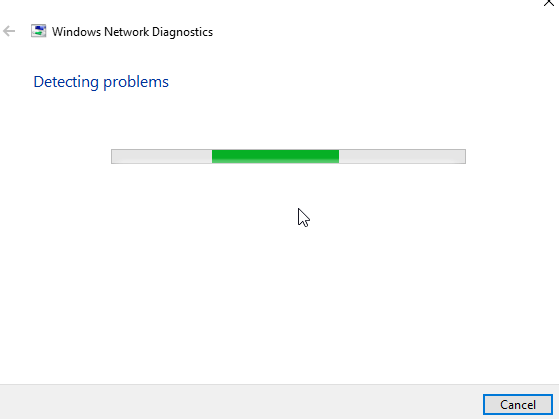
10. Run Windows Network Troubleshooter
Windows has a built-in troubleshooter tool that may help you check and fix network issues. Learn how to run Windows network troubleshooter to fix the “IPv6 no network access” issue.
- Press Windows + S, type “troubleshoot”, and select “Identify and repair network problems”.
- In the pop-up Windows Network Diagnostics window, select Next to check and solve possible network problems on your PC.
11. Perform a System Restore of Your PC
If you recently made changes to your system and started experiencing the “IPv6 no network access” problem, you can perform a system restore for your Windows 11/10 PC to see if the issue can be fixed.
- Press Windows + S, type System Restore, and select “Create a restore point”.
- In the System Properties window, click “System Restore”.
- Follow the on-screen instructions to restore your PC to an earlier state.
Note: Before you perform a system restore of your PC, you should back up your PC to avoid any data loss.
12. Contact Your ISP
If none of the above methods work, it’s possible that your Internet Service Provider (ISP) does not support IPv6 or there may be an issue with their network configuration. Contact your ISP for further assistance.
By following these steps, you should be able to fix the “IPv6 no network connectivity” issue on Windows 10/11.


