This article will assist in diagnosing and resolving general Steam download problems as well as connection issues.
Although there are several factors that can both cause and resolve these problems, this article only addresses the most prevalent and trustworthy ones.
What uses does this guide serve?
- A game refuses to download or update.
- I have an odd download speed graph.
- I’m downloading at an incredibly slow pace.
- A game is stalled at a particular percentage of download.
- A game update or installation error occurred.
- My download keeps crashing or running at a zero-byte rate.
- The error notice “Content Servers Unreachable” appears on Steam.
Preface
The terms Mbps and MB/s are not interchangeable.
While many consumers believe they should be receiving a faster download speed, the truth is that many are unaware of the distinction between megabits, also known as MBps or MB/s, and megabits, also known as Mbps or Mb/s.
125 kilobytes make up to 1 megabyte.
1 megabyte is 1000 kilobytes.
This implies that if you’re downloading at the fastest possible speed your connection can support—which is unlikely to happen—you should be receiving about 1.2 MB/s if you have a 10 Mbps connection.
Unlike other gaming clients, Steam downloads are unique.
Steam compresses game files for downloads, in contrast to other gaming clients. Download sizes as a result are significantly reduced, frequently by 30% to 60%.
This also explains why, when a game is asked to be installed, Steam displays a different size than when it is downloaded.
If your hardware can handle it, this means substantially less data transfer and faster download times overall, but it also means more work for your drive and CPU. When you use Steam to download games and software, this makes your computer work harder.
Wait before assuming there is a problem.
If a download abruptly stops, for example, at 100% downloaded, at 0 bytes downloaded out of X GB, or at any other point. This does not necessarily indicate that there is a problem that needs to be resolved right away. Occasionally, these things simply occur while your drive is processing the download (whether it be for scanning and processing incoming files, allocating space, unpacking and processing a finished download, etc.), and they usually go away after waiting for about 15 minutes. However, if you have a malfunctioning drive or CPU, this can occur more frequently and for longer periods; this is known as drive throttling and is covered in the section below this one.
Tip: There are two games on Steam that are notorious for causing these problems. They are Payday 2 and Path of Exile. If you are experiencing these problems in either of these games and not any other game, it is probably a file system issue and you will just need to wait it out. If you are not experiencing these problems with these two games, try Googling your problem and the name of the game to see if many other people are having the same problems with it.
Generally, the only option when drive throttling happens is to purchase a better drive (a faulty CPU is more seldom the cause of the problem).
The issues listed below should be given at least 15 minutes to resolve if they arise.
Await the estimate Steam provides if it indicates when it will be completed.
- When the download rate reaches 0, it stops.
- The beginning of a download takes a while.
- “Starting” or “Stopping” is where a download gets stuck.
- Abruptly, a download that originated from Y gets stuck at X.
- There is a download that is stuck at 100%.
- “First-time setup” processes are time-consuming.
Bad PC performance can throttle your download speed.
Since your PC has to uncompress and store data in real-time, old CPUs and slow drives can throttle or entirely stop your download.
Spotting this on Windows 10 is quite easy: Open the Task Manager and see if your drive and/or CPU is under heavy load when downloading.
This effect is even more apparent when you have anti-virus software or a firewall scanning the incoming packages. When they’re unable to scan the data at the rate it’s coming in, they will often just outright stop the download and only let Steam continue when they’re done. This can create sudden drops to 0 Bytes.
These are the examples of what it could look like:
Troubleshooting Steps
It can be aggravating to encounter a verification loop on your Steam Deck™ but there are actions you can do to troubleshoot and fix the problem.
#1. Restart your computer or Steam Deck.
An excellent place to start when troubleshooting is a computer and the Steam software restarts. This procedure resets applications, releases locks on files and resources that might be creating problems, and clears a variety of system states and caches.
Press the Steam button > Power, choose Restart, and your Steam Deck will restart.
#2. Verify the settings for Steam downloads.
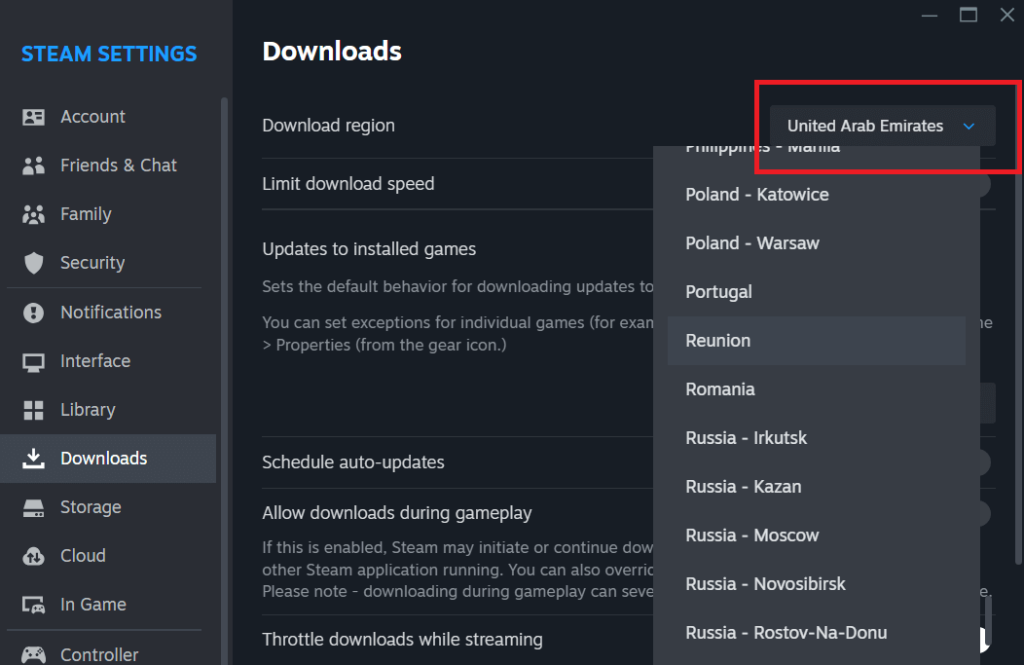
Verify that you have selected the appropriate download region, which is the closest nation, city, or state, and that no download limitations, such as bandwidth throttling, have been activated.
Under Settings > Downloads > Download Region and Download Restrictions, you can adjust your download region and examine other download limitations.
#3. Modify the download region.
You can resolve this issue by switching your download region to a nearby or foreign nation, even if you have the correct download region selected.
Once you’ve adjusted the download region, restart Steam, make sure the download area is still selected in your downloads settings, and then start the download again. Permit the download to continue for around five minutes. You can return it to the correct download region, which is the nearest nation, city, or state if that doesn’t resolve your issue.
This can resolve your problem since Steam’s download servers can occasionally become slow. These occurrences are typically brought on by significant game releases or events, which cause the servers to see a sharp spike in activity and usage that can result in slowdowns or server crashes.
#4. Launch Steam in administrator mode.
After completely shutting down Steam, open the Steam folder, right-click Steam.exe, and select “Run as administrator.”
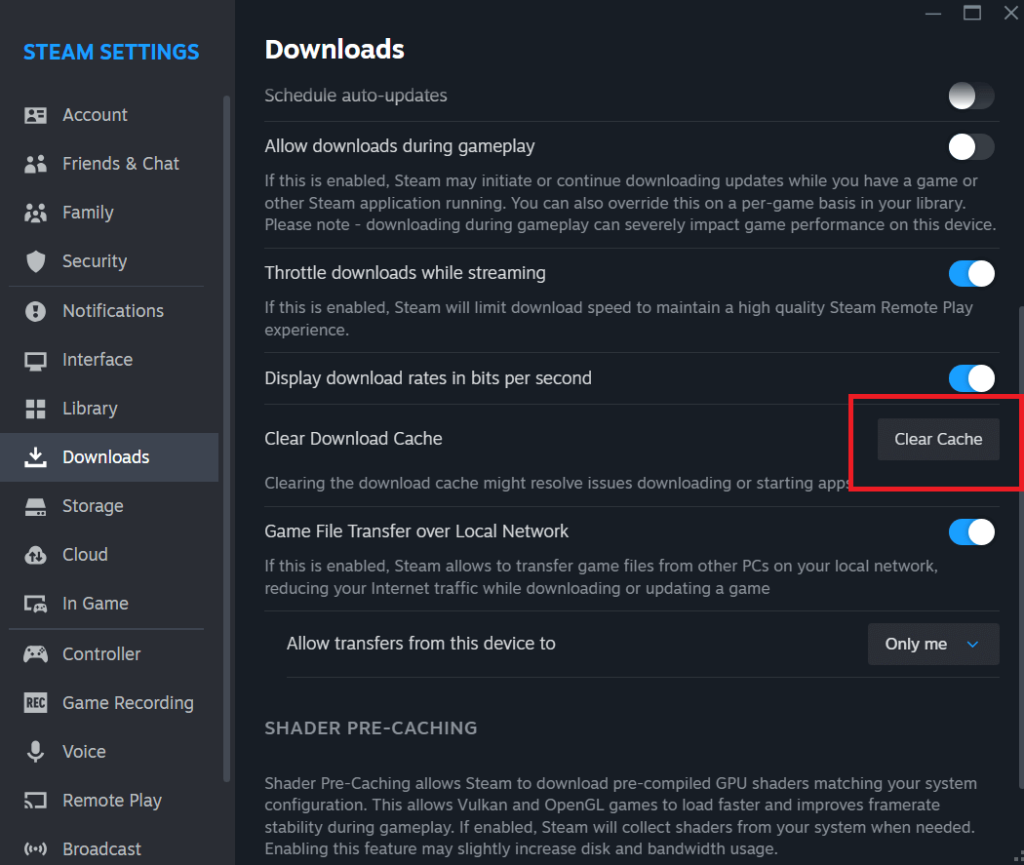
#5. Clear your download cache.
One of the most popular solutions for common download problems is to clear the download cache,
which you can do under Settings > Downloads > Clear Download Cache.
Note that doing so will reset the progress of any ongoing downloads to 0%. This step can be very helpful for obscure problems like corrupted files in the download cache.
#6. Permit Steam to pass across your firewall.
Problems with downloads may arise because your firewall is preventing Steam or Steam-related services and connections from connecting.
Filters or similar items placed on the network may cause download problems if you are on a public, business, or educational network. There is nothing you can do about this unless you have network administrator access.
Temporarily disable your firewall and check whether that solves the issue. If it did, try setting your firewall to allow or whitelist connections to and from Steam and related services.
#7. Disable your antivirus program for the time being.
The download may be blocked or experiencing other problems due to your anti-virus program, which may be running in addition to or instead of your firewall.
In order to determine whether those files are false positives, first search the quarantine for any files connected to Steam (just Google them). If not, try to resume the download by going to your antivirus settings and disabling it. You must add Steam and its associated services to your antivirus software’s whitelist if this resolves the problem.
There are too many anti-virus programs available to list how to deactivate or whitelist connections and processes on each one, so if you don’t know how to do either, you’ll have to Google it.
#8. Clean up the Steam configuration file.
To clean up the Steam configuration file, press the Windows Key + R on your keyboard, type steam://flushconfig into the Run box, and then press the OK button.
This will solve many issues related to Steam, not just download issues, and is a great tool to keep in mind for any other problems you might have with Steam in the future.
#9. Change LAN settings.
Sometimes Windows detects incorrect settings for your LAN adapter.
To fix this, open the Windows Control Panel, navigate to Network and Internet > Internet Options, select the Connections tab, click on LAN settings, and try downloading with Automatically detect settings disabled.
Restart Steam and try the problem again. If it still doesn’t work, try it with the setting enabled. If it still doesn’t work, try disabling the proxy option.
#11. Reset your network adapter.
This method, which is also referred to as a Winsock Reset, resets your network adapter and resolves certain connection and internet-related problems.
- Find “CMD” in the Windows menu, right-click it, and choose “Run as administrator” to launch CMD as an administrator.
- Enter and run the subsequent command: netsh winsock reset.
- Give your machine a restart.
#12. Update your DNS cache and renew your IP.
Networking problems are resolved by refreshing your DNS cache and renewing your IP.
As with the prior step, you must have CMD running as an administrator.
Enter the next commands one at a time, hitting Enter after each one, and wait until the previous command is complete.
There will be a brief interruption to your internet access.
- ipconfig /flushdns
- ipconfig /release
- ipconfig /renew
Give your machine a restart.
#13. Check your ISP and perform a speed test.
Your internet speed and dependability may fluctuate suddenly and sometimes significantly, unrelated to Steam, depending on your location and ISP.
Run an Ookla speed test [speedtest.net] or a Google speed test [speedtest.googlefiber.net], depending on which one you prefer, to see if your internet connection has changed.
You can also give your internet service provider a call to find out if any known problems exist and whether your internet speed has changed.
Request that they reset your internet connection if nothing has changed and they are not experiencing any problems.
In case you’re unclear about the ISP you’re using: You can see the ISP you are using with Ookla.
A few ISPs that have previously caused problems.
- Comcast Xfinity (You can disable Protected Browsing here [internet.xfinity.com], which partially interferes with Steam.).
- 012.net (Blocked Steam traffic).
- Bluewin (Firewall prevents Steam from the provider’s end; it needs to be disabled via the service portal of the provider).
- Dutch Telecom (blocked steam traffic).
- ISPFree (blocked Steam traffic).
- Micronet Broadband (Blocked Steam traffic).
- Certain open-air WiFi hotspots restrict Steam traffic.
#14. Steam launch configurations.
You can add launch options to Steam in order to compel specific settings. When a connection is shaky, forcing Steam to use a TCP connection can be quite beneficial.
To access the Shortcut tab,
create a shortcut to Steam by opening Properties. After everything that is now written in the Target text area, add the following:
#15. Enroll in the Steam Beta Program.
Bug fixes are frequently submitted to the Steam Beta Client by Valve before being released to the upcoming full Steam Client version.
Enrolling in the Steam Beta Client will guarantee that you don’t miss out on a possible solution to your issue.
To choose to participate in the Steam Beta Client, launch Steam, click Steam in the top-left corner, select Settings, select the Account tab, and then select Change… in the beta participation area.
If you have already opted into the Steam Beta client, consider opting out as occasionally a beta client upgrade may create problems; however, Valve usually fixes these problems rather quickly.
#16. Turn off and on again your network devices.
Resetting your modem and router to factory defaults enables them to reconnect to your internet service provider. It can fix a few problems with connections and the internet.
Please take note that if your modem or router has a battery backup, you will either need to remove the battery or use the modem’s reset button.
- Turn off every computer and other gadget that is connected to the modem and router, such as phones and game consoles.
- Switch off the router and modem and unplug them.
- Give the router and modem ten minutes without being plugged in.
- The modem and router should be plugged in, turned on, and given time to fully load up before the modem’s front panel connection lights indicate a stable connection. Based on the modem and router you are using, this could take up to five minutes.
- Restart your device or computer and try troubleshooting the problem.
#17. Turn off other devices and end any background apps.
Problems with downloads may arise from other programs or devices using up all of your internet resources.
One by one, end all background apps, check in with the download, and then wait ten to fifteen seconds before ending any more programs.
Disconnect or turn off any additional devices utilizing the same router or modem as you.
Turn off or disconnect these devices one at a time, checking in with the download between each one, just as you did with the applications.
To identify the specific application or device that may be causing the issue, you are shutting down programs and disconnecting devices one at a time.
In Windows 10, turning on Storage Sense is also advised. Programs like CCleaner are eliminated by Storage Sense since it performs the same function automatically, independently, and without the need for any other software.
#18. Make sure your app cache is clear.
Clearing the appcache is a popular solution for frequent download problems, and it can resolve download issues just like cleaning the download cache.
Close Steam, then go to the location of Steam’s installation. Eliminate the appcache directory. Launch Steam and try the problem once more.
#19. Verify the router’s settings.
Examine your router’s settings in more detail using its web interface. Check for any restricted IP addresses or ports, as well as any active filters (parental control, safe web, etc.).
Try switching to a less crowded channel and turning off Quality of Service.
Check the speed differential between 2.4 GHz and 5 GHz connections if you have a WiFi connection. Just perform a speed test on each connection to compare the results and see if there is a difference.
Better bandwidth speeds are available at a shorter range using 5 GHz.
Though it may cover a greater distance, 2.4 GHz has lower bandwidth speeds.
#20. Switch DNS servers.
A phone directory and a DNS server are comparable in certain ways. When you try to access a website, like http://store.steampowered.com, a DNS server will first determine what the real IP address of the server is.
Issues can arise because most routers (and other devices) use your ISP’s DNS server by default. Luckily pretty much all devices allow you to change the DNS server you are using:
- Choose the level of adjustment you want to do: Changing the server locally within your OS is easier, but it will only affect that particular device.
- Don’t change anything just yet. Note the current server addresses in case you need them.
- Select two addresses from below and set them as your new DNS servers.
- Remember the advice to Renew your IP and flush your DNS.
#21. Fix the Steam System.
Please try to repair the Steam service as these issues might occasionally be caused by a malfunction in the Steam system.
- Get off of Steam.
- Find “CMD” in the Start menu to launch CMD; then, right-click it and choose “Run as administrator.”
- Enter and run the subsequent command: “C:\Program Files (x86)\Steam\bin\SteamService.exe” /repair
- Open Steam and try the problem once more.
Note: It can take a few minutes for this command to complete and requires administrator access. Please use the right location in place of C:\Program Files (x86)\Steam if you installed Steam on a different path. You should be cautious when running commands since wrong commands may cause data loss.
#22. Install Steam again.
Your games won’t be uninstalled by this.
Everything in your Steam folder should be deleted, except for Steam.exe and the steamapps folder.
Keep the userdata folder in order to store any local save files and screenshots. If you would prefer not to download custom skins again, you can also store the skins folder.
Start Steam now, and give it some time to reinstall.
After Steam has been completely reinstalled and updated, if your games still don’t show up as installed in your library, just click the install button for each game, select the drive where your games are stored, and Steam will detect your current game files.
If you are concerned, you can choose to extract the files from the Steam folder and save them elsewhere in the interim rather than erasing them.
Note: After reinstalling, you will need to re-opt in if you were opted into the Steam Beta Client.
#23. Consider establishing a LightningX VPN connection.
These errors can occasionally be brought on by local problems, the blocking of specific content by your ISP (such as Steam), or specific problems (such as a content server becoming down).
You may see whether using a VPN resolves your problem.
Caution: Be careful not to get around any restrictions or buy games over a VPN. According to the Steam Subscriber Agreement, using a VPN for this purpose is forbidden and may result in account suspension. Additionally, confirm that these services are permitted in your nation.
#24. Examine your drive’s condition.
Analyzing the S.M.A.R.T. values your drive generated is the first step. Run the program after downloading the Crystal Disk Info Standard Edition. These values will be automatically read and interpreted by the program. If one or more of your drives have a Caution or Bad status, it signifies that there are problems with your drive and you should take note of the advice below.
Drive problems will typically result in random errors when writing or reading files in the early stages, which will impair performance. The biggest risk is that, although it’s hard to say when your drive might completely fail at any time. As soon as you can, replace the problematic drive and make a backup of your critical files to the cloud or an external drive.
Crystal Disk Mark [crystalmark.info] is the second test you should perform to see how well your drives are performing. You can find a variety of substitute programs at [datarecovery.wondershare.com]. Surprisingly, this issue is typically brought on by the user’s system disk failing to process and/or unpack the data that are being downloaded quickly enough. Stated differently, your internet may outperform your drive. This may be the result of a drive malfunction or error, or it may be the result of a sluggish or defective drive, typically brought on by age or low cost.
Searching up the drive you are using and seeing its quoted speeds is a good place to start. It is usual for SATA-based drives to be 10–50 megabytes under promised speeds, and for M.2 NVMe drives to be over 100 megabytes under advertised speeds. If Crystal Disk Mark indicates speeds that are not near the advertised rates, then you probably have a drive issue.
NVMe drives: Make sure the NVMe drive is inserted into an M.2 slot that supports NVMe if you’re using one. Certain motherboards feature M.2 slots that are limited to SATA speeds and do not enable NVMe. Please refer to the motherboard instructions to determine whether the M.2 slot you are using is compatible with NVMe drives.
#25. Verify your hardware and install the most recent drivers.
Diverse unexpected behaviors might arise from malfunctioning hardware or drivers. Periodically, both need to be checked and updated.
It’s crucial to update Windows, the BIOS, drivers, and firmware. It is highly likely that your system will have problems if it is overrun with out-of-date drivers and applications. These problems could be anything from performance problems to compatibility problems to security threats and anything in between.
BIOS upgrades improve compatibility, address significant security vulnerabilities, and, less frequently, bring upgraded or new functions to your motherboard.
We highly advise you to adhere to the driver update section of this wiki page, which we have posted over at /r/Steam. Everything significant is covered.
This MakeUseOf article [www.makeuseof.com] explains how to use Windows OS to examine your hardware for problems and malfunctions.
The steps to do a hardware test on Mac OS X are covered in this Apple Support article [support.apple.com].
RAM problems can result in a variety of problems, ranging from a few apps crashing often to your computer becoming totally unusable. RAM testing is a laborious procedure that can take many hours to complete, during which time your computer will not be available.
Refer to the RAM troubleshooting portion of this wiki article, which we have prepared at /r/Steam. It should be simple to follow as it provides extensive detail.
#26. Fix Windows system files.
Damaged or corrupted system files may also be the source of the problem. Using the steps listed below, your Windows installation will undergo a vital system file check, with any damaged or missing files being replaced:
Get off of Steam.
Find “CMD” in the Windows menu, right-click it, and choose “Run as administrator” to launch CMD as an administrator.
Enter the command below and hit Enter: DISM.exe /Online /Restorehealth /Cleanup-image
Hold off until it’s done.
Enter the command below and hit Enter: SFC/Scannow.
Please restart your computer after the procedure is finished, then open Steam and try the problem once more.
#27. Start Windows in Safe Mode.
When you boot your Windows computer into safe mode, it will only load the bare minimum of drivers and services required to function. All additional drivers, third-party apps, and even malware won’t start, allowing you to determine whether any of those factors is the root of the problem.
To enter Safe Mode while booting Windows 8 or 10:
- To open the Run box on your keyboard, simultaneously press the Windows Key and R. Type “msconfig” and select the OK button.
- Once the window for System Configuration appears, select the Boot tab. Tick the Safe boot box and choose Network under Boot choices.
- In the prompt that displays, click Apply and OK before selecting Restart.
Launch Steam after being booted into safe mode, then try the download problem once more.
You should scan your computer for malware, uninstall suspicious apps and software with system-level access, fix system files, try restoring to a previous point in time when you weren’t experiencing problems, or reinstall your operating system if the problem disappears when you’re in Safe Mode.
Reinstalling your operating system could be the easiest and fastest solution, depending on the circumstances.
Repetition of steps 1 and 2 is necessary to remove Safe Mode. Uncheck the Safe boot box this time, return to the General tab, and change Selective startup back to Normal startup.
#28. Start Mac OS X in safe mode.
In addition to turning off startup items and other unnecessary drivers and services, Mac OS X Safe Mode will also carry out the following troubleshooting actions automatically:
To enter Safe Mode when booting Mac OS X:
- After turning on your Mac, shut it down, then hit and hold the Shift key until the login screen shows up.
- You will be prompted to enter Safe Mode after logging into your account.
It is quite likely that the system’s automated troubleshooting procedures, which are outlined above, resolved the issue if it disappears in Safe Mode and disappears when you restart the computer normally.
If the problem disappears while you’re in Safe Mode but reappears when you restart the computer normally, you may have spyware or an incompatible program or driver that your computer launches automatically (Apple refers to these as “login items”).