


The flash drive is still an important storage tool today. It provides more security than cloud storage. However, when an unencrypted flash drive falls into the hands of someone with malicious intent, it is still like a lamb entering the lion’s den. That’s why we are talking about how to encrypt a flash drive. Keep reading and let your USB flash drive become more secure.
Two Main Methods of Flash Drive Encryption
To encrypt a flash drive, you can either employ encryption software or use a flash drive with pre-installed encryption.
Encryption Software
This is a flexible tool for encrypting flash drives, allowing users to select which encryption algorithm to employ. However, it requires manual configuration to initiate the encryption process, which may be challenging for most common users.
Both Windows and macOS come with built-in native encryption software, and users may also choose other third-party software.
Pre-installed Flash Drive
A flash drive with pre-installed encryption relies on a built-in chip for encryption and decryption. This chip is essentially a microprocessor with an encryption engine that integrates cryptographic algorithms, key management, and security logic directly into the USB drive, rendering its internal details completely invisible to the host computer.
However, the encryption feature of these flash drives cannot be reconfigured, resulting in limited flexibility. For instance, you cannot switch encryption algorithms, decide which files to encrypt or exclude, or adjust the encryption method using other software.
How to Encrypt a Flash Drive: Software Encryption
Way 1. Use BitLocker to Encrypt a Flash Drive on Windows PC
BitLocker is a built-in disk encryption tool available on Windows 7 Pro/Enterprise and later, providing 128-bit or 256-bit AES (including XTS-AES in newer versions) for full disk or volume encryption.
Here’s how to use BitLocker to encrypt your USB flash drive on Windows.
1. Plug an empty USB drive into your PC. You can transfer the original data of the USB drive to another place or directly wipe it.
2. Locate your USB drive in “File Explorer”.
3. Right-click on the drive and choose Turn BitLocker on.
4. After BitLocker opens, choose how you want to encrypt your USB drive: Use a password to unlock the drive or Use my smart card to unlock the device. The latter requires your drive to have a smart card. So, if you don’t have such a drive, choose password encryption, which is explained below.
5. Follow the on-screen requirements to create a strong password.
6. Choose a way to store the recovery key. This is important in case you forget your password.
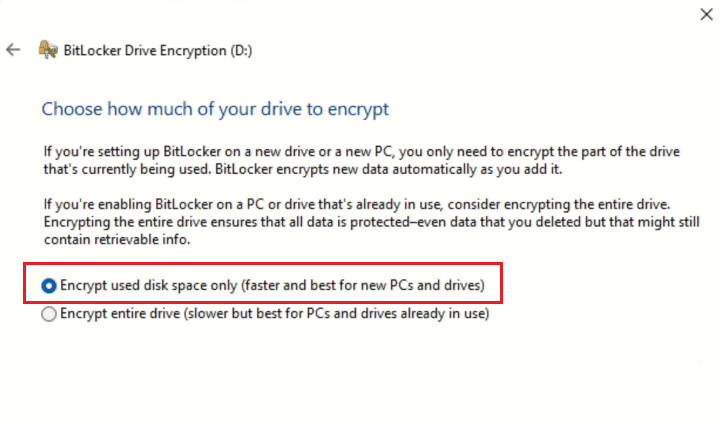
7. Since the data on your drive is deleted, choose Encrypt used disk space only for faster encryption. However, if the drive contains recoverable deleted files, it is safer to choose Encrypt entire drive.
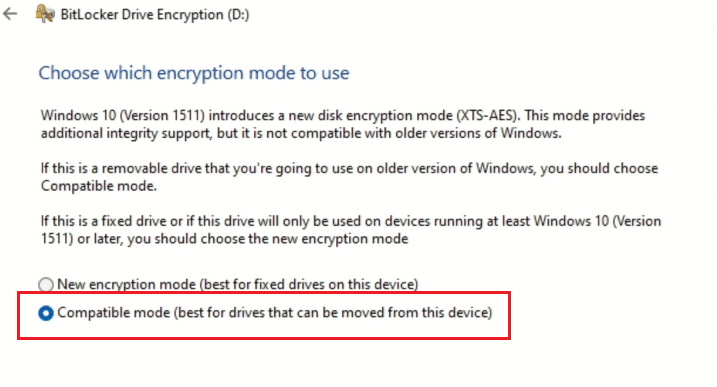
8. Choose an encryption mode, including New encryption mode or Compatible mode. The former means you can only unlock your drive on Windows 10 (Version 1511) or later. The latter means your encrypted flash drive is compatible with older versions of Windows.
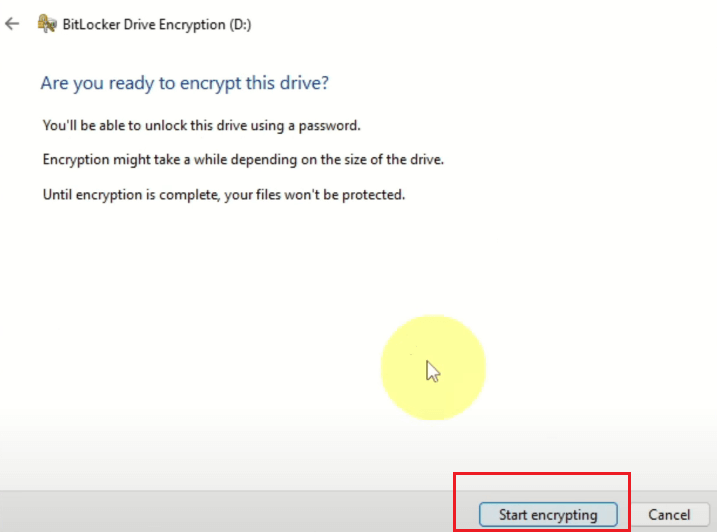
9. Choose Start encrypting at the bottom right to let the encryption process begin. The time depends on the size of your USB flash drive.
Way 2. Use Disk Utility to Encrypt a Flash Drive on Mac
Disk Utility is a built-in disk or partition management tool on macOS, which can be used for password-protecting a USB flash drive.
1. Back up your flash drive onto another device or drive.
2. Insert your flash drive into your Mac.
3. Open Finder > Disk Utility.
4. Right-click on your flash drive in the left menu and choose Erase.
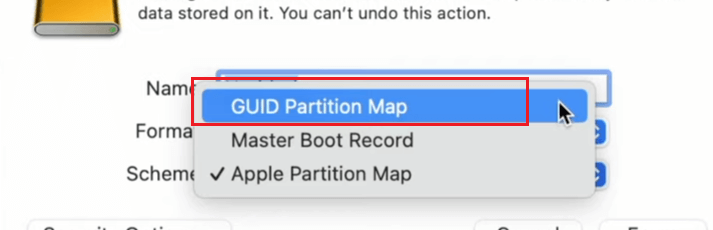
5. In the pop-up, select “Format” to MacOS extended (Journaled, encrypted) and “Scheme” to GUID Partition Map. You can also choose a name for the flash drive.
6. In the new window, create a strong password for protecting your USB drive. In case you forget the password, store it in a safe place that only you know.
7. Click “Choose” and wait for the encryption process to finish.
Way 3. Use Third-Party Software to Encrypt a Flash Drive
Aside from using the built-in tool on Windows and macOS, you can also download third-party software for encrypting the flash drive.
Veracrypt is a free open-source tool for encrypting a disk, compatible with Windows, macOS, and Linux. It is flexible to use, allowing you to choose encryption and algorithms. Here’s how to use the tool to encrypt your flash drive.
1. Insert an empty USB drive into your device.
2. Download Veracrypt and install it on the device. Find the version corresponding to your device model to download.
3. Open Veracrypt and expand the “Volumes” menu at the top.
4. Select Create New Volume > Encrypt a non-system partition/drive.
5. Click “Next” and choose Standard VeraCrypt volume.
6. Click Select Device > select your flash drive > “OK” > “Next”.
7. Since the flash drive is blank, choose Created encrypted volume. Otherwise, choose “Encrypt partition in place”.
8. Continuously click Next on the “Encryption Options” and “Volume Size” pages.
9. Create a strong password for your drive and click “Next”.
10. Choose if you want to store large files on your USB drive and click “Next”.
11. Move your mouse randomly on the Volume Format window until the bottom progress bar turns fully green.
12. Choose Format, and the encryption process will begin.
How to Choose a Secure Encrypted Flash Drive
If you prefer not to go through the complicated setup of encryption software, consider using a flash drive with built-in hardware encryption. It offers a plug-and-play experience while keeping your data protected.
The best encrypted flash drive should combine strong hardware encryption, broad compatibility, and convenient authentication, while meeting your storage and performance needs. Here are the key features to look for in one.
- Encryption Type: Look for hardware-based encryption drives (AES 256-bit is standard) and avoid drives that only rely on software encryption, as they may be less secure and slower.
- Compatibility: Some drives require proprietary software that may not run on every platform. Therefore, check the compatibility of the drive before purchasing it.
- Certification & Standards: Check for FIPS 140-2/140-3 certification if you need government-grade security.
- Capacity & Speed: Pick a capacity that fits your needs (e.g., 32GB, 128GB, 1TB).USB 3.1 or higher ensures faster data transfer, even with encryption overhead.
- Recovery Options: Look for data recovery or backup features (e.g., admin override, recovery key). This is important if you forget your password.
- Authentication Method: Choose a method that balances convenience and security, such as fingerprint, PIN pad on the drive, or password entry.
Other features, like durability and plug-and-play, can also be considered.
How to Decrypt a Flash Drive?
If you no longer want your flash drive to stay encrypted, you can remove the encryption using the same tool you used for setup. It’s often safer to use the original computer for decryption, since different operating systems may rely on different encryption methods or compatibility levels.
Additionally, before decrypting the flash drive, you still need to unlock it with your credentials and back up your files if necessary.
Use a VPN to Protect Your Online Data
In addition to encrypting the important files in your flash drive, your online information should also be protected. A VPN can hide your IP address, preventing strangers from tracking your device. However, not all VPNs are secure. You can choose a reliable VPN like LightningX VPN.
LightningX VPN’s encryption tunnel is highly protected by AES-256-GCM and ChaCha20-Poly1305 algorithms, allowing your traffic data to pass through securely. It also supports a zero-lag policy, promising not to collect user data.
Wrap Up
To encrypt a flash drive, you can directly purchase one with pre-installed encryption or launch the specific encryption software on your device. On specific Windows or Mac versions, you can use BitLocker or Disk Utility to do the encryption.
If you want to unlock the flash drive, simply use your password or other credentials. If you no longer want your flash drive to be encrypted, use the same tool for setup to do the decryption.


