


In this post, you will learn how to flush DNS on Windows 10/11, Mac, Android, iPhone/iPad, Google Chrome, etc. The step-by-step guides are included.
How to Flush DNS on Windows 10/11
You can use the flush DNS command in CMD to easily flush the cache on your Windows 10/11 computer. Check the simple steps below.
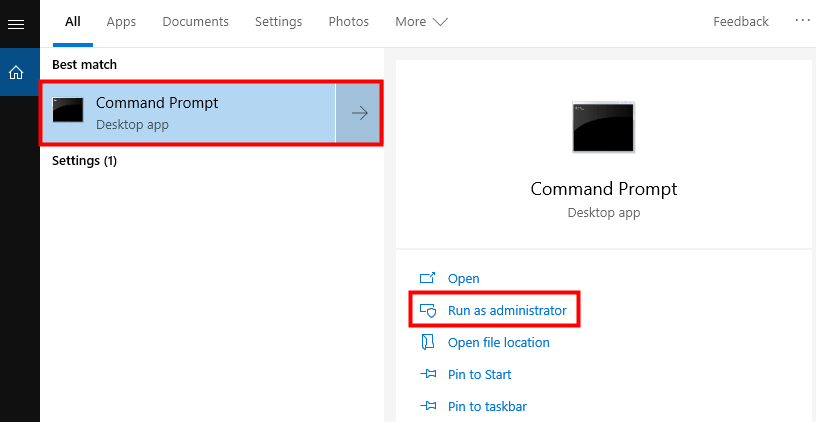
Step 1. Open Command Prompt
Press Windows + R, type cmd, and press Ctrl + Shift + Enter to run Command Prompt as administrator.
Alternatively, you can press Windows + S to open Windows Search, type cmd in the search box, right-click Command Prompt, and select Run as administrator.
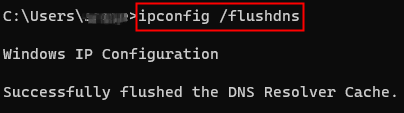
Step 2. Run the Flush DNS Command
In the Command Prompt window, type the command: ipconfig /flushdns. Press Enter to run the command.
After it finishes, you should see a message saying that the DNS Resolver Cache has been successfully flushed.
Tip: If you also want to renew your IP address along with flushing the NDS cache, you can type the following command lines in Command Prompt. This action sometimes also helps fix network problems.
- ipconfig /release
- ipconfig /renew
- ipconfig /flushdns
Related: Server DNS Address Could Not Be Found: 10 Fixes
How to Flush DNS Cache on Mac
To flush DNS on Mac, you can use the Terminal app. Check the steps below.
Step 1. Open Terminal on Mac
- Press Command + Space or click the Spotlight icon to open Spotlight on Mac.
- Type “Terminal”.
- Open the Terminal app.
Step 2. Type the Flush DNS Command
In the Terminal window, type the command: sudo dscacheutil -flushcache; sudo killall -HUP mDNSResponder. Press Enter to execute the command.
Enter your Mac computer’s password to confirm the action. It will start clearing the DNS cache on your Mac.
Tip:
To unblock websites and apps worldwide and change IP addresses, you can use LightningX VPN. This VPN offers 2000+ servers in 70+ countries. It is ultra-fast, stable, secure, and reliable. It uses strong encryption methods to encrypt your online data and privacy. Support Windows, Mac, Android, iOS, TV, Linux, Chrome, Firefox, Edge, etc.
How to Flush DNS on Google Chrome
If you have issues with site loading or meet some errors when visiting websites, e.g., ERR_CONNECTION_TIMED_OUT, DNS_PROBE_FINISHED_NXDOMAIN, etc., you may flush the browser’s DNS cache to see if it helps.
To flush Google Chrome’s DNS cache, you can follow the steps below.
Step 1. Open your Google Chrome browser. Enter “chrome://net-internals/#dns” in the address bar and press Enter.
Step 2. Click the “Clear host cache” button next to “Host resolver cache” to reset the DNS settings of Chrome.

Tip: The DNS cache is different from the browser cache. If you want to clear the Chrome browser’s cache, follow the steps below.
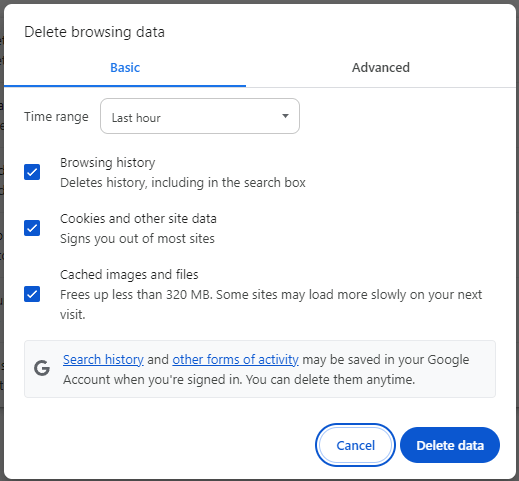
- You can click the three-dot icon at the top-right corner of Chrome and select “Deleting browsing data”. Alternatively, you can open Chrome and press Ctrl + Shift + Del keyword shortcut to open the window.
- Then select a time range and select what types of data you want to clear. To clear cache, cookies, and history, tick the “Browsing history”, “Cookies and other site data”, and “Cached images and files” options.
- Click the “Delete Data” button to remove the browser cache and cookies.
How to Flush DNS on Android Device
While Android devices don’t offer a direct method to delete the DNS cache, you can still try the ways below to realize the task.
Method 1. Restart your Android device.
Method 2. Turn on and turn off the “Airplane Mode”.
Method 3. Reconnect the network.
- Open Settings.
- Tap Wi-Fi.
- Tap the “i” icon next to your connected network.
- Select “Forgot This Network”.
- Go back to the Wi-Fi window, select your network, and enter the password to reconnect to it.
Method 4. Reset network settings.
- Tap Settings.
- Tap System.
- Tap “Reset options” or “Reset”.
- Tap “Reset network settings” or “Reset Wi-Fi, mobile & Bluetooth”.
- Tap “Reset settings” to confirm the action.
Note: Resetting network settings will remove all your saved Wi-Fi networks, paired Bluetooth devices, all mobile data settings, etc. You need to reconnect to your network and repair your Bluetooth devices.
How to Flush DNS Cache on iPhone/iPad
To clear the DNS cache on an iPhone or iPad, you have two methods.
Method 1. Restart your iPhone or iPad should clear the DNS.
Method 2. Turning Airplane Mode on and off should be able to flush the DNS cache.
- Tap Settings on your iPhone or iPad.
- Find “Airplane Mode” and turn it on.
- Then turn off “Airplane Mode”.
What Does Flushing DNS Do?
Flushing DNS will clear the DNS cache on your device, removing stored entries of previously accessed domain names and their IP addresses.
It ensures that your device fetches the most recent DNS records of websites.
It also clears corrupted or outdated DNS entries that may prevent you from accessing some websites or services.
Still, a cluttered DNS cache may slow down your browsing speed. Clearing it can speed up the loading times and improve your network efficiency.
Besides, it also helps reduce the risks of being tracked by the visited websites.
When Do You Need to Flush DNS on Your Device?
DNS, short for Domain Name System, is mainly used for translating domain names into IP addresses. It allows users to access websites or services on the internet without the need to remember the complex numerical IP addresses. DNS simplifies the users’ web navigation.
The DNS cache helps reduce the response time of users’ frequently visited websites. It also helps balance traffic across multiple servers to improve the website’s performance.
However, sometimes you may need to flush the DNS cache. Below are the common situations.
- If you can’t access a website because it has changed its IP address, you can clear the DNS cache to get the updated site information and regain access.
- Flushing DNS can help you troubleshoot network problems on your computer or mobile, especially when you are experiencing inconsistent network connections or slow load times.
- If the DNS cache is corrupted, it may lead to device errors or site access issues. You can flush the cache to fix the problem.
- Flushing the DNS cache will remove your traces of visited websites. It makes it harder for others to track you and this helps enhance your privacy.
- Too much DNS cache may slow down your device. Flushing it can help free up more space and improve device performance.
Related: How to Fix DNS Server Not Responding Error on Windows 10/11, etc.
Conclusion
This post introduces how to flush DNS on Windows 10/11, Mac, Android, iPhone, and Google, and explains the benefits of flushing the cache. Hope now you have a smoother online experience and better device performance.


