


When you browse online, you can see a lot of impressive gameplay clips. Do you want to share your game highlights and amazing gaming experiences like YouTubers? It’s very easy.
In this blog, we will recommend some free software and introduce how to record gameplay on a PC. Check this beginner-friendly tutorial and memorize your exciting moments without lagging or frame rate drop.
Best Software to Record Gameplay on PC
OBS Studio
It’s a free tool for video recording and live streaming. Compatible with Windows, macOS, and Linux, you can download it on its official site. OBS Studio not only ensures a real-time recording but also allows full control of audio. The user-friendly interface helps you manage all the scenes easily and make adjustments to your gameplay recording.
How to record gameplay on PC via OBS Studio:
Step 1. Launch the OBS Studio on your device.

To pursue the best performance for the video, it will inquire about your usage and configure the most appropriate settings based on your device’s hardware. If you want to change the purpose of the program, just go to Tools > Auto-Configuration Wizard.
Step 2. Create a source.
After the configuration, press the + icon under the Source section and rename the scene for better management. For capturing the gameplay on your PC, you can just select “Game Capture” and choose a mode.
Step 3. Modify the audio settings.
By default, OBS Studio will record the desktop audio and microphone. To make advanced adjustments, you can go to Settings > Audio.
Step 4. Get your first gameplay
All the preparations are ready, now you can go to the Control menu and tap “Start Recording”. When it is done, click “Stop Recording” and the video will automatically saved on your computer.
Steam Game Recording
To help users easily preserve their highlights, Steam has published the Game Recording feature. While enjoy the best open world games on Steam, you don’t need to open another third-party software to capture your movements. It supports replay, video clips, and even sharing them with your friends.
How to record gameplay on PC via Steam Game Recording
Step 1. Open your Steam Client
Launch the client on your computer and log in to your account.
Step 2. Turn on the Game Recording option.
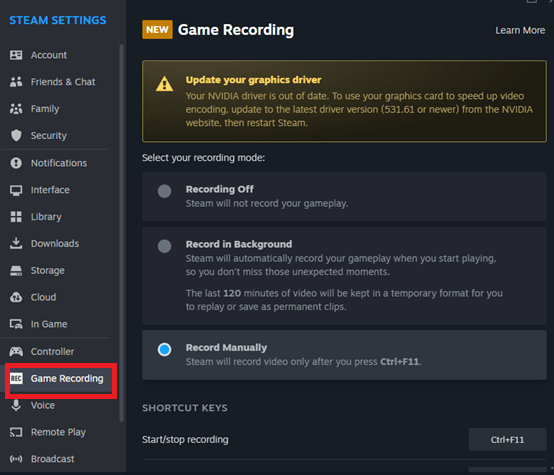
Click the Steam icon on the top-left corner and select “Settings”. Scroll down to find the Game Recording option, here you can choose two different modes for manually or automatically capturing your gameplay actions. If you just want to memorize certain moments, the manual record mode seems more flexible and easy to manage your records.
Step 3. Ready to record.
After selecting the appropriate mode, you can open your game and tap Ctrl + F11 to capture your gameplay.
Tip:
When you try to record gameplay, sometimes you might encounter the Steam no connection error. You can use LightningX VPN to bypass the geographical restrictions. It supports 50+ countries, allowing you to easily unblock inaccessible content.
Besides, LightningX VPN is perfect for online gaming. It can effectively reduce game ping and offer a lag-free experience. Even if you are connected to public WiFi, LightningX VPN will secure your data and keep you anonymous.
NVIDIA ShadowPlay
For NVIDIA GPU users, another easy way to record gameplay on a PC is to use the NVIDIA ShadowPlay. Perfect for gameplay recording and broadcast, it aims to capture high-quality videos and reduce FPS drops.
They can be up to 8K HDR at 30 frames per second or up to 4K HDR at 60 frames per second. Apart from that, the NVIDIA Highlights feature will automatically memorize your best moments. You can also record GIFs to share on social media.
How to record gameplay on PC with GeForce Experience:
Step 1. Log in to your NVIDIA account.
After installing the NVIDIA ShadowPlay, you need to log in to your own account via email address, WeChat, Apple ID, Facebook, or Discord account.
Step 2. Enable the gameplay recording option.
Press the gear icon next to your profile image and go to General > Settings. Scroll down and select “Desktop Capture” in the Privacy Control section.
Step 3. Customize the settings.
For convenience, you can enable some options in the Features section like in-game overplay. So you just need to press some shortcut keys while gaming. Additionally, you can also adjust the final video output in the “output format” section, including video quality or frame rate.
Step 4. Start to record.
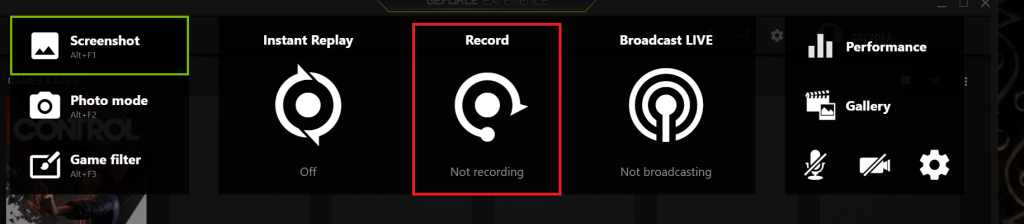
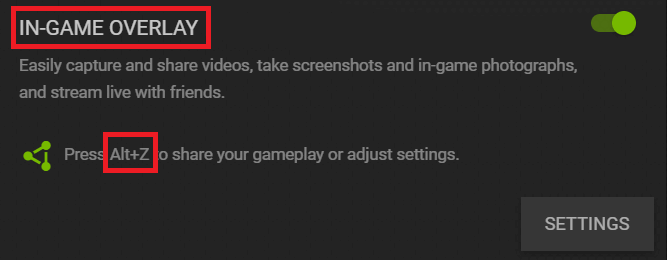
Back to the home page, you will see the supported games and apps. Select the game you want to play and press the Alt + Z key simultaneously to evoke the ShadowPlay navigation bar. Tap the record button or Alt + F9 key, it will start to capture your gameplay.
Xbox Game Bar
If you want to record gameplay on Windows 11/10, Xbox Game Bar will also be a good option. This built-in feature can satisfy your basic record needs. It supports screenshots and simple video editing.
How to record gameplay on PC via Xbox Game Bar
Step 1. Activate the Game Mode
To begin with, you need to go to Settings > Gaming, find the “Game Mode” and turn it on.
Step 2. Open your game
While you are playing a game, tap the Windows + G key to activate the game bar. Press “Start Recording” and will capture your gameplay. When the record ends, you can go to “See my captures” to watch the videos.
Conclusion
After reading this blog, you have learned more about how to record gameplay on a PC. Whether you are using Windows or Mac, try one of the solutions immediately to share your highlights with friends.


