


A proxy server acts as an intermediary between your device and the internet, helping to mask your real IP address from websites. However, many so-called “free proxies” found online are unreliable and may pose security risks, such as logging your data or injecting malicious content.
To avoid these issues, you can set up your own proxy server. This post will guide you through the process step by step, along with important considerations and additional details you should be aware of.
Things to Know Before Setting Up a Proxy Server
Unlike directly using a proxy website, there are two different ways to set up a proxy. One method is using a PAC (Proxy Auto-Configuration) file to quickly configure the proxy. PAC files are typically set up on devices by your school, company, or public institution.
By enabling the proxy settings on your device, the PAC file will be detected and activated. Of course, you can also have a technician write a PAC script file for you. The other method is to manually enter the proxy server’s IP address and port number to enable the proxy, which is suitable for simpler scenarios.
How to Set Up a Proxy Server on Windows 10/11
Here are two methods for setting up a proxy server on Windows.
1. Using the PAC file to Set Up a Proxy Server on Windows 10/11
Step 1. Press the Windows and I keys simultaneously to open the Windows settings.
Step 2. On Windows 10/11, click Settings > Network & Internet > Proxy.
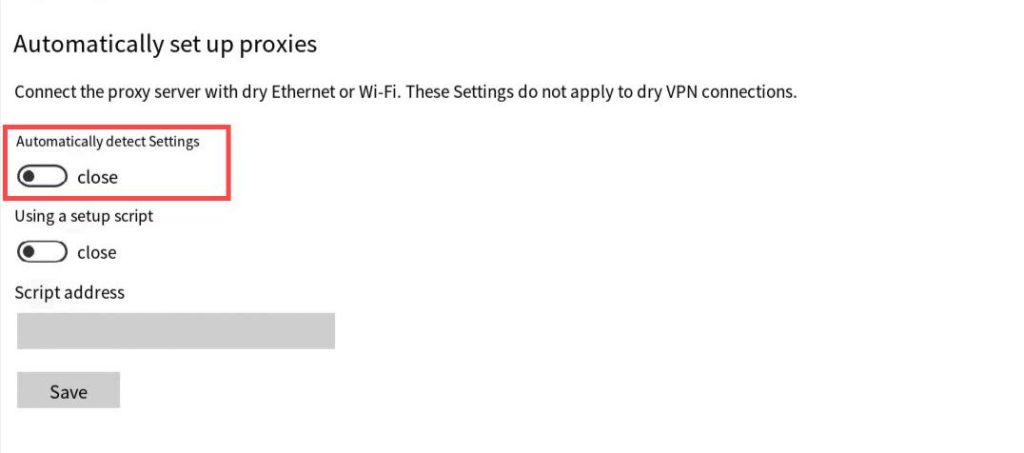
Step 3. On Windows 11, turn on “Automatically detect settings” under “Automatic proxy setup”.
On Windows 10, toggle on “Use a Proxy Server” and “Automatically detect settings”.
Step 4. Then, Windows will automatically detect the proxy server setup. It will tell you to enter the proxy server name. You can then follow the on-screen instructions.
Step 5. If Windows finds a PAC file, switch on the toggle to “Use Setup Script” in “Automatic proxy setup”.
Note: You can also use the script address of the PAC file to enable a proxy server on Windows. Just go to Settings > Network & internet > Proxy. Then, select “Set up” next to “Use setup script”. Turn on “Use setup script” in the “Edit setup script” dialog box, enter the script address, and select Save.
2. Use a Proxy Server Name or IP Address
You can also use the proxy server name or IP address to manually set up a proxy on Windows 10/11.
Step 1. Go to Settings on your Windows.
Step 2. Click “Settings” > “Network & Internet” > “Proxy”.
Step 3. On Windows 11, select “Set up” next to “Use a proxy server” under “Manual proxy setup”. On Windows 10, switch on “Use a proxy server” under “Manual proxy setup”.
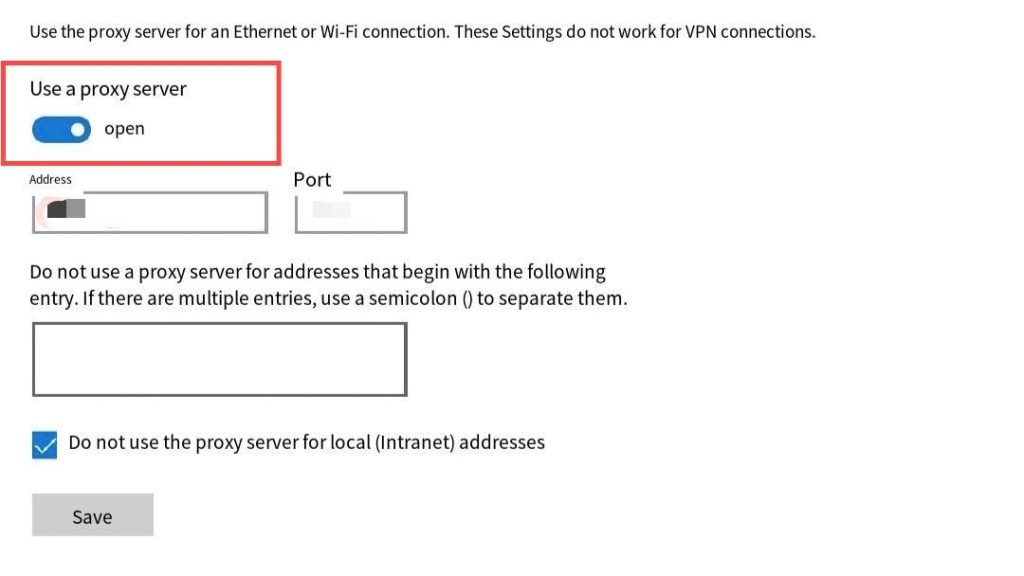
Step 4. Enter the proxy server name or IP address in the address box, and the port number in the Port box.
Step 5. If a password is asked, select the “Proxy server requires password” checkbox and enter the account name and password. On Windows 11, if you don’t want certain websites to use the proxy, enter the ending of the website address in the exception list (for example, *.contoso.com). For multiple websites, separate them with a semicolon.
Step 6. Select Save.
How to Set Up a Proxy on macOS
The steps below can be used essentially on macOS versions.
Step 1. Go to Apple menu > System Preferences.
Step 2. Click the Network icon.
Step 3. Choose the network type (Ethernet or Wi-Fi) you’re using.
Step 4. Click Advanced > Proxies.
Step 5. Select Auto Proxy Discovery to automatically adjust the proxy server settings. Click on Secure Web Proxy (HTTPS). Enter the proxy server address and its port number in the respective boxes.
Step 6. To use a PAC file, select “Automatic Proxy Configuration” and type the proxy address into the URL box.
Step 7. If a password is asked, select the “Proxy server requires password” checkbox and enter your account name and password in the respective boxes.
Step 8. Click OK to successfully set up the proxy server.
How to Set Up a Proxy Server on Android and iOS
Set Up a Proxy Server on Android
Step 1. Go to Settings on your Android and tap “Wi-Fi”. You’ll see a list of the Wi-Fi networks.
Step 2. Tap the Wi-Fi network you want to set up a proxy on.
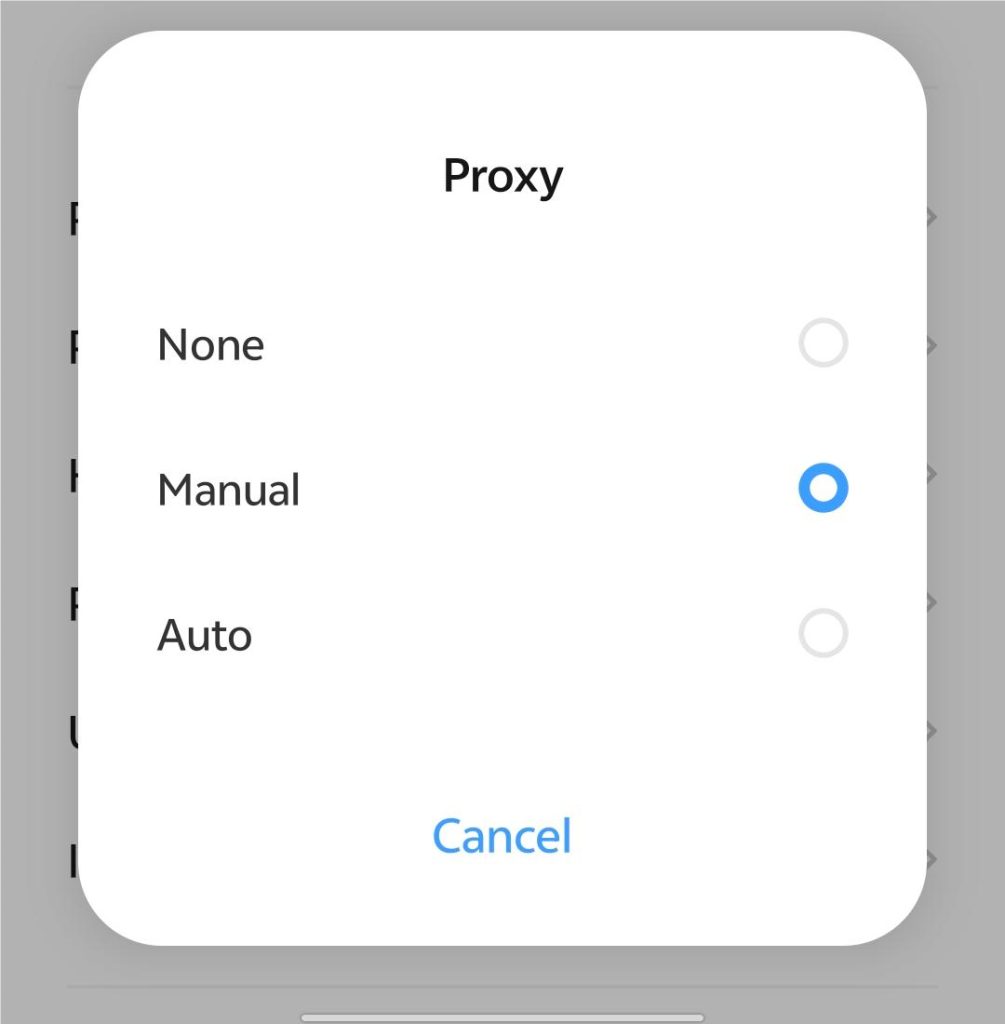
Step 3. Scroll down and tap “Proxy”.
Step 4. Select “Manual”.
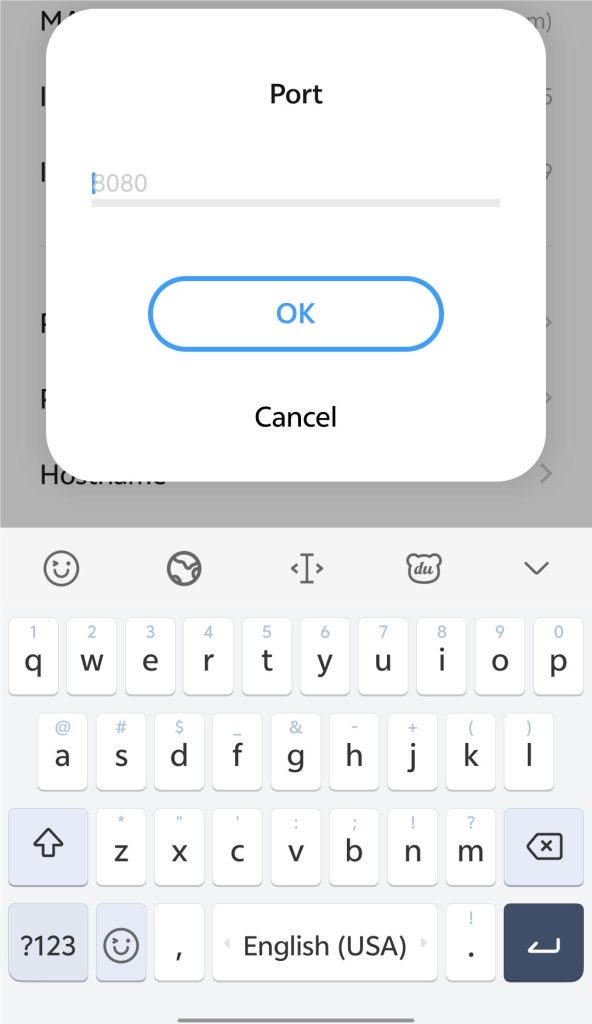
Step 5. Under Proxy, tap “Hostname” and “Port” and enter respective information. If you don’t want certain websites using the proxy, tap “URL not used” under “Port” and enter the URLs. Remember to tap “OK” after entering each piece of information.
Set Up a Proxy Server on iOS
Step 1. Go to Settings > Wi-Fi.
Step 2. Select the Wi-Fi connection that is working.
Step 3. Click “Configure Proxy” under HTTP proxy.
Step 4. Tap “Manual” to change the proxy settings. Then, enter the proxy’s name and port number. If asked, enter the password and authentication username. If you have WPAD (Web Proxy Auto-Discovery Protocol), tap Automatic to set up the proxy. If needed, enter the PAC file address. Now you can use the proxy on iOS devices.
How to Set Up a Proxy Server on PS4
Step 1. Go to Settings on your PS4, which looks like a briefcase on the bottom right of the main screen.
Step 2. Scroll down and tap on “Network”.
Step 3. Select “Connect to the Internet”.
Step 4. Choose the network type you’re using (Wi-Fi or LAN). Then, connect to a desired network.
Step 5. Select “Custom” to adjust the network settings.
Step 6. Choose “Automatic” under IP Address Settings.
Step 7. Click “Do Not Specify” under DHCP Host Name.
Step 8. Choose “Automatic” under MTU Settings.
Step 9. Select “Automatic” under DNS Settings.
Step 10. Click “Use” under “Proxy Server”.
Step 11. Enter the proxy address and port number.
Step 12. Click “Test Internet Connection” to complete the proxy setup on PS4.
Why Should You Set Up a Proxy Server
A proxy server acts as an intermediary between your device and the websites you access. Under normal circumstances, when you visit a website, your real IP address is visible to the destination server.
By using a proxy, you can mask your real IP address, which helps reduce IP-based tracking, bypass certain geo-restrictions, and access region-limited content. For example, a proxy can allow access to services like YouTube in regions or networks where availability is restricted.
While many free proxy services are available online, they often lack proper security and reliability. Some may log your activity, inject ads, or even be controlled by malicious actors.
If you unknowingly use a proxy operated by hackers, your data or device could be put at risk. Setting up your own proxy server helps mitigate these risks. Although it may require additional effort, it gives you greater control over privacy and security. In some cases, you may even obtain free configuration files or credentials, eliminating the need to purchase a commercial proxy service.
Best Alternative for Setting Up a Proxy
If you want to unlock geo-restrictions while hiding your IP address and encrypting your data, a VPN is superior to a proxy. A robust VPN (e.g., LightningX VPN) can maintain your original internet speed while keeping your internet traffic encrypted.
Why should you choose LightningX VPN as an alternative to a proxy?
It uses the AES-256-bit cipher to encrypt your internet traffic and keep your online data safe. Plus, it follows a strict no-logs policy, promising not to track or store your online activities. It covers 70+ countries with 2,000+ servers, giving you access to global content.
Conclusion
By checking the detailed steps listed above, you may now know how to set up a proxy server. However, a proxy is not the first choice for you to unlock geo-restrictions and protect privacy. You can use a good VPN to do this. Try LightningX VPN! It is super-fast and reliable.


