


Similar to other devices like Chromebooks and Windows PCs, Mac offers a split-screen mode for users to handle multiple tasks at the same time. Therefore, if you’re a student or office worker who owns a Mac, you can learn this tip to enhance your productivity. Today, we’ll introduce you to a guide on how to split screen on Mac, along with other important tips.
macOS Versions That Support Split Screen
The split-screen mode, also called Split View, was first introduced in macOS El Capitan (10.11, released in 2015).
These macOS versions support split screen:
- macOS Tahoe 26
- macOS Sequoia 15
- macOS Sonoma 14
- macOS Ventura 13
- macOS Monterey 12
- macOS Big Sur 11.0
- macOS Catalina 10.15
- macOS Mojave 10.14
Related: 4 Ways to Download and Install macOS Sequoia (15) on Your Mac
How to Split Screen on Mac: Opening Two Apps
Here’s how to enter Split View on different Mac models, such as MacBook Air, MacBook Pro, etc.
Way 1. How to Use the Green Dot to Split Screen on Mac
The green dot in the top-left corner of a Mac window is the Full-Screen button, which can also be used to enter the split-screen mode. Here’s how.
1. Open a browser or app window on your Mac.
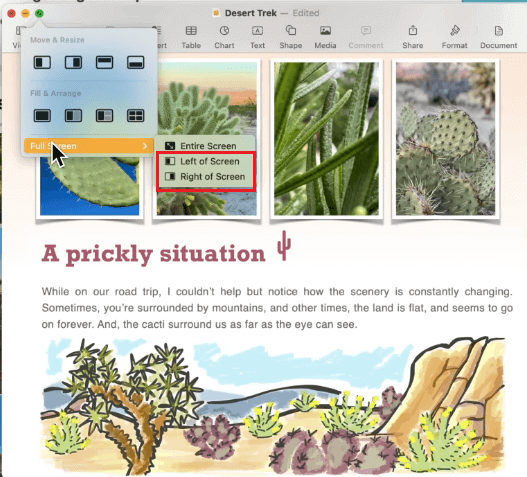
2. Hover over the green button on the top left of the window. A layout menu will pop out.
3. Select Full Screen from the menu.
4. Choose Left of Screen or Right of Screen to snap the window into one side of the screen. The other app windows that support Split View will appear.
5. Select an app window you want to use, and it will appear on the other side of the first window. Now, the two windows are in the split-screen mode on your Mac.
Way 2. How to Split Screen on Mac Using Mission Control
Another way to enter the split-screen mode on your Mac is by using Mission Control, which is similar to the Overview mode on Chromebooks and helps you manage multiple windows and desktops.
Here’s how to use Mission Control to split screen on your Mac.
1. Launch one of the apps in full-screen mode. You can do this by clicking the green Full-Screen button in the top-left corner of the app window.
2. Press Control + Up Arrow on your keyboard or swipe up with three or four fingers on a Trackpad / two fingers on a mouse. Mission Control will display all open windows and the Spaces bar at the top.
3. In Mission Control, drag a window from the desktop onto the thumbnail of the full-screen app in the Spaces bar at the top of your screen.
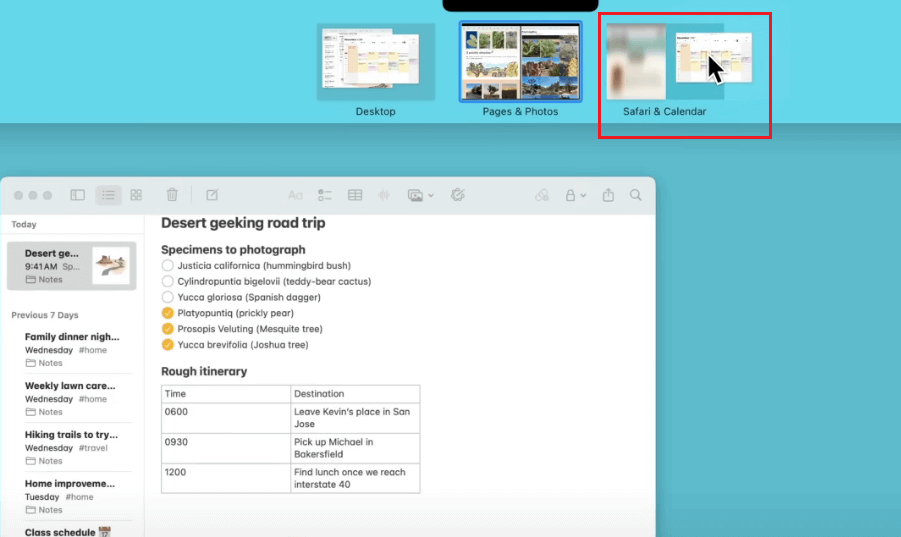
4. Click the thumbnail of these two windows combined. Now, you’ve done Split Screen on your Mac.
Related: How to Split Screen on Chromebook: A Step-by-Step Guide
How to Split Screen on Mac with the Same App?
The principle of macOS split screen is to display two full-screen windows side by side, whether they come from different apps or from multiple windows of the same app.
So, if you want to split windows from the same app, the key is to make sure they are separate windows rather than tabs or pages within a single window.
For browsers like Chrome or Safari, this means dragging a tab out to turn it into a new window.
For apps such as Word, opening different documents will automatically create separate windows.
Once the windows are independent, you can enter Split View with them the same way you would with two different apps. Here’s how:
- Click the green full-screen button on one window and choose Tile Window to Left/Right of Screen.
- On the other side, select the second window to fill the remaining space.
Now you can view and work with both windows at the same time, even though they’re from the same app. This is especially useful for comparing documents, referencing notes, or multitasking within one application.
How to Adjust Windows in Mac Split Screen
After you snap the two windows into split screen, try adjusting their sizes, places, or even replacing them to suit your needs. Here’s how.
1. To change the sides of the two windows, drag the toolbar at the top of one window to the other side.
2. To make a window larger or smaller, drag the separator bar between the two windows. To restore the windows to equal size, double-click on the separator bar.
3. If you want to switch a window to another in the split-screen mode, click the toolbar of this window, hover over the green dot, and select Replace Tiled Window. Then, choose the app you want to use.
Tip: For office workers using the Mac, their work data is important. Even though the Apple system is closed, defending against most malicious activities, it can’t block viruses and malware coming from the open internet. Therefore, you can use a VPN when browsing online.
LightningX VPN is one of the best VPNs for Mac thanks to its robust encryption and excellent performance. It uses the top-tier protocols and algorithms, and follows a strict no-logs policy.
How to Exit Split Screen on Mac
On Mac, split screen is basically two full-screen windows side by side. To exit split screen, just make one of the windows leave full-screen mode. You can do this in several ways; pick whichever is easiest for you.
- Press Control + Command + F while a window is active to exit split screen.
- Press F3 to open Mission Control, then drag a window from the top space back to the desktop.
- Click the green button at the top-left corner of a window to exit split screen.
- Press Esc once while a window is active.
Beyond these four methods, there are some advanced tricks to exit split screen quickly:
- Customize a keyboard shortcut for exiting full-screen in Settings > Keyboard > Keyboard Shortcuts.
- Use BetterTouchTool or Rectangle to bind the exit action to a trackpad gesture — swipe once and you’re out.
- Create a “one-click exit all Split View windows” script using Automator or Shortcuts to instantly boost your workflow.
How to Use External Monitors for a Split-Screen-Like Setup on Mac
If your Mac supports external monitors, you can place windows across multiple screens to work more efficiently. Here’s how:
- Connect your monitor to the Mac and make sure it’s awake.
- Open an app on the Mac and drag its window to the left or right edge of the screen, and see if it appears on the external monitor.
- Open another app on the Mac.
- On both devices, click the green dot on the top left of the window to enter the full-screen view.
This lets you view and multitask on multiple screens. Some Macs even support several monitors for more flexible window arrangements.
Further reading: How to Fix Split Keyboard on iPad: Easy Guide
Can’t Split Screen on Mac?
If you can’t split screen or snap windows on monitors, it might be caused by factors like an outdated macOS version or an incompatible app. Here are some fixes you can try.
Check your Mac version: Not all macOS versions support the split-screen view feature mentioned above. Updating to the latest version may resolve this issue.
Make sure the app supports Split View: Not all apps support the split-screen feature on Mac. If you see a message saying, “Not Available in This Split View”, it means the app is not compatible with the split-screen mode.
Turn on “Displays have separate Spaces”: If you want to put windows on multiple monitors, make sure the “Displays have separate Spaces” is enabled. You can open it in Apple menu > System Preferences > Mission Control.
Restart the Mac: Sometimes, a simple restart can clear system glitches and fix the split-screen issue on your Mac. Before shutting down your MacBook or Mac desktop, make sure all files are saved.
Contact Mac support: If none of the above methods can fix your problem, try seeking assistance from Apple support.
Wrap Up
In summary, to split screen on Mac, you can directly use the green dot on the top left of the windows, or open Mission Control to quickly locate the windows you want and let them get into the split-screen mode.
In split-screen, you can also adjust the window size and sides, and even replace them with other windows. Other fixes and tips are mentioned in this post.
Hope you can learn this trick successfully!


