


Do you know how to update the BIOS? The BIOS is the motherboard firmware that runs when your computer starts up. It initializes the hardware and helps the operating system load properly. As technology has evolved, traditional BIOS has largely been replaced by UEFI, a more advanced firmware system with similar core functions.
In some cases, updating the BIOS can improve system stability, enhance hardware compatibility, or fix issues such as boot errors or unrecognized devices. However, a BIOS update cannot replace graphics or audio driver updates, and the process should always be handled with care.
In this article, we use the term “BIOS” to refer to both BIOS and UEFI, and walk you through the steps to safely update your BIOS.
Tip: LightningX VPN is a powerful VPN tool for protecting your ASUS and MSI PC. It has the most secure protocols, like WireGuard and Shadowsocks, to block malware and ads. Also, you can choose 2,000+ server nodes in 70+ countries, including the US, Brazil, Argentina, etc. Come and get the one-day free trial!
Preparing to Update the BIOS
Before updating the BIOS, it is recommended to complete the following preparations to minimize risks and ensure a smooth update process.
Back Up Important Data
While BIOS updates typically do not affect data on your hard drive, it is advisable to back up important files to the cloud or a USB flash drive beforehand as a precaution.
Check Current BIOS Version
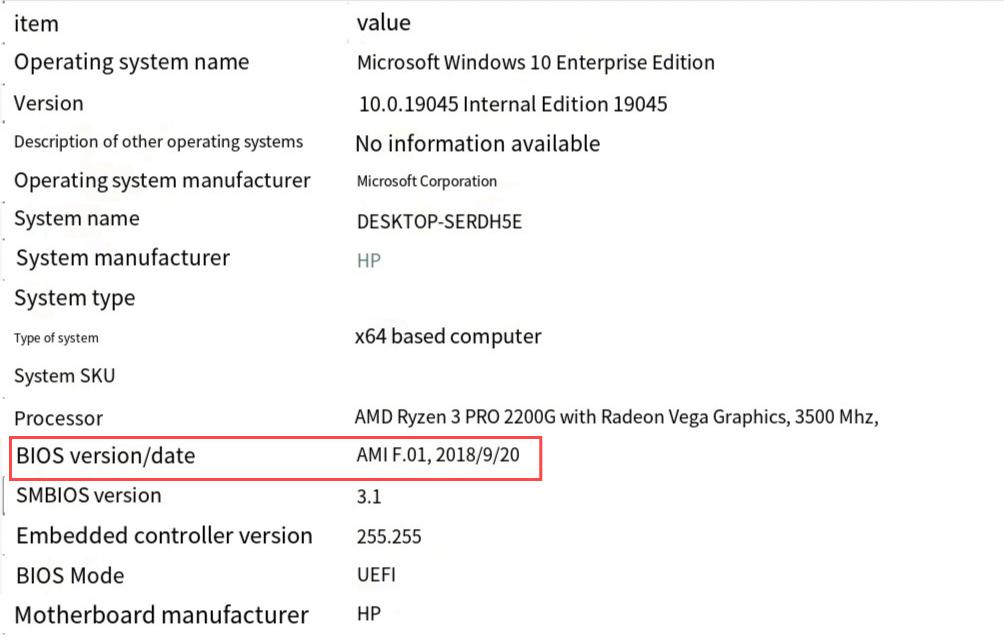
Before updating, verify your current BIOS version and confirm if an updated version is available. Follow these steps:
- Press Win + R simultaneously to open the Run dialog box.
- Type msinfo32 in the Run dialog box and press Enter.
- In the System Information window, locate the BIOS Version/Date and Motherboard Manufacturer.
Next, visit the official website of your motherboard or computer manufacturer:
- Search your browser for “manufacturer name + Support”.
- For pre-built PCs or laptops, enter your computer model or serial number; for custom-built PCs, search directly by motherboard model.
- Navigate to the drivers or support page, locate the latest BIOS version, and download it following official instructions (some motherboards may require saving to a USB flash drive).
Note: Do not confuse the monitor model with the computer host model. For self-assembled computers, use the motherboard model as the reference.
Ensure a Stable Power Supply
During the BIOS update process, a power interruption may prevent the motherboard from booting normally. Therefore, ensure a stable power supply throughout the update. For laptops, connect the power adapter; for desktops, avoid power outages or unexpected shutdowns.
How to Update BIOS on Windows 11/10
After confirming your computer model, motherboard manufacturer, and current BIOS version, you can manually update the BIOS using a USB flash drive. Compared to Windows-based update tools, this method is generally considered more stable but involves relatively complex steps.
Here’s how to update BIOS using a USB flash drive.
Step 1: Verify the current BIOS version (refer to the methods described earlier).
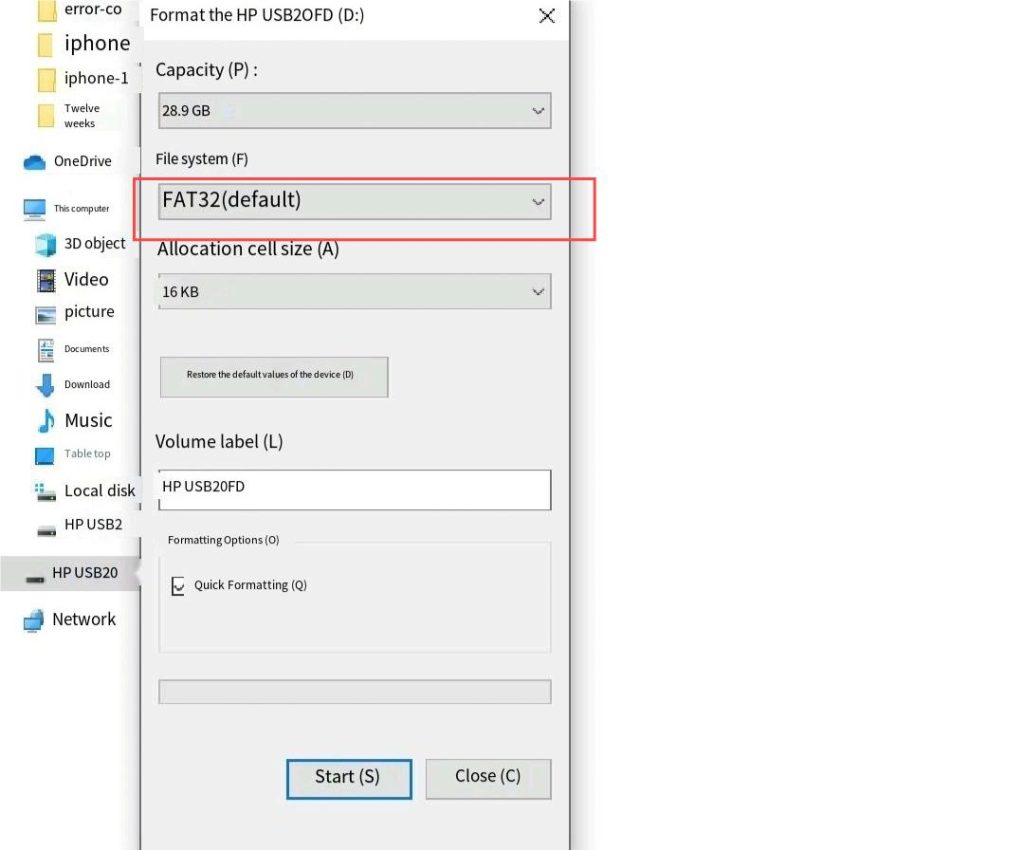
Step 2: Prepare a USB flash drive and format it to the FAT32 file system. Before formatting, back up any important data stored on the drive.
To format the USB drive on your computer: Locate the USB drive in “My Computer,” right-click it, and select “Format.” Then choose FAT32 from the dropdown menu.
Step 3: Visit the official website of your motherboard or computer manufacturer. Navigate to the support page and download the latest BIOS file that exactly matches your motherboard model. If necessary, extract the file first, then copy the BIOS file to the root directory of the USB flash drive.
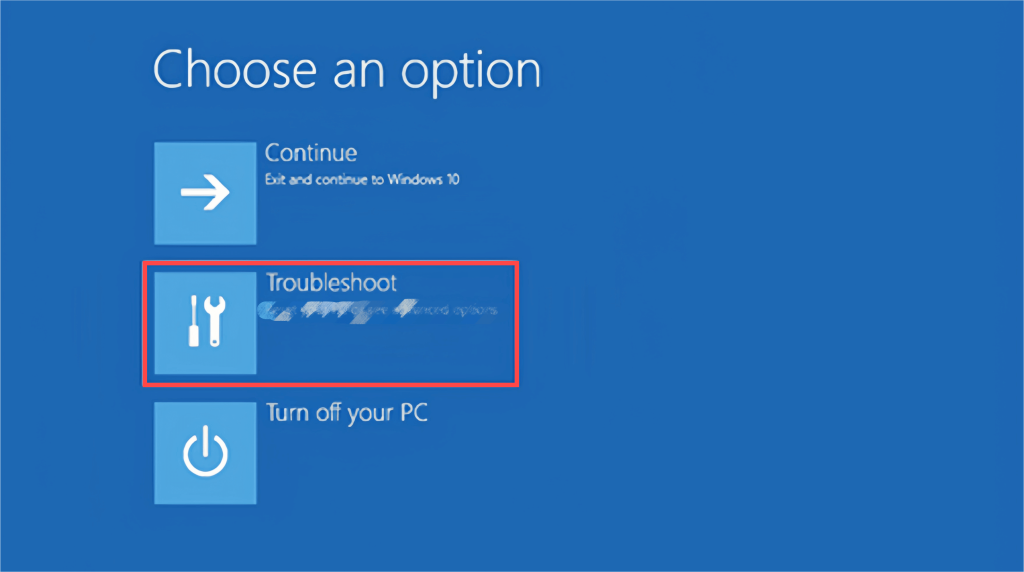
Step 4: Restart your computer and enter the UEFI/BIOS setup interface.
In Windows, you can click Start > Power > Hold down the Shift key and select “Restart”, then navigate to Troubleshoot > Advanced options > UEFI Firmware Settings > Restart.
Step 5: In the BIOS menu, locate the motherboard’s built-in BIOS update utility (name varies by manufacturer, e.g., EZ Flash, M-Flash, Q-Flash) and select the BIOS file from the USB flash drive.
Step 6: Confirm the update and wait for the process to complete. Do not shut down the computer or disconnect the power during the update.
Note: BIOS updates typically take only a few minutes. If the update process abnormally freezes, refer to the motherboard’s official documentation. Additionally, the actual BIOS menu and update tool may vary by motherboard manufacturer; always follow the official instructions.
How to Update BIOS on ASUS and MSI Computers
If your computer uses an ASUS or MSI motherboard, follow the corresponding method below to update the BIOS. The BIOS interface may vary slightly by model; refer to the actual display.
ASUS
If your ASUS motherboard supports ASUS EZ Flash 3, follow these steps to update the BIOS:
- Visit the ASUS official website support page to download the latest BIOS file that exactly matches your motherboard model. Copy it to an empty USB flash drive.
- Restart your computer. Press the Delete key when the ASUS logo appears to enter the BIOS menu.
- Press F7 to switch to “Advanced Mode”.
- Click the “Tool” tab and select ASUS EZ Flash 3 Utility.
- Select the USB flash drive containing the BIOS file and choose the corresponding BIOS file.
- Click “Yes” to confirm the update.
- After double-checking the BIOS information, click “Yes” to begin the update.
Note: Ensure a stable power supply during the update. Do not shut down the computer or interrupt the power supply.
MSI
If you are using an MSI motherboard, you can update the BIOS via the M-FLASH function:
- Visit the MSI official website to download the latest BIOS file corresponding to your motherboard model. Copy it to an empty USB flash drive.
- Restart your computer and repeatedly press the Delete key when the MSI logo appears to enter the BIOS menu.
- In the BIOS interface, click M-FLASH in the lower-left corner.
- Click “Yes” to enter M-FLASH mode; the system will automatically restart.
- Select the latest BIOS file from the USB flash drive and press Enter to confirm.
- Click “Yes” to begin the update.
Note: Do not disconnect power or force shutdown during the BIOS update process.
Pros and Cons of BIOS Updates
Updating the BIOS offers benefits but also carries certain risks. Consider the following points before deciding whether to proceed.
Benefits
- Enhanced Hardware Compatibility: When upgrading to a new CPU, memory, or other hardware, older BIOS versions may fail to recognize these components correctly. Updating the BIOS enhances hardware compatibility and ensures proper system operation.
- Improved System Stability: In some cases, a BIOS update can fix known motherboard firmware issues, reducing boot failures or system instability.
Risks
- Improper Operation May Cause Boot Failure: Power loss, forced shutdown, or using an incorrect BIOS file during the update process may render the motherboard unbootable. In severe cases, repair or replacement may be required.
- Data Loss During Preparation: While the update itself typically doesn’t affect system data, the USB flash drive may require formatting during preparation. Data stored on it could be lost if not backed up beforehand.
- Potential Compatibility or Stability Issues Post-Update: New BIOS versions may occasionally introduce problems, especially if the system was functioning normally before. Microsoft also advises against updating BIOS unnecessarily if your computer isn’t experiencing issues.
Conclusion
Through this article, you have learned the fundamental methods for updating the BIOS on Windows systems and on ASUS and MSI motherboards.
BIOS updates are not mandatory and are generally recommended only when encountering hardware compatibility issues or when explicitly advised by the manufacturer. If abnormalities occur after updating, prioritize consulting the motherboard manufacturer’s official documentation or seeking professional support. Not all motherboards support downgrading BIOS versions, so carefully evaluate before proceeding.


