


Did you suddenly see the words “SOS” or “SOS Only” on your iPhone? It’s a little scary, right? Why would your phone be in SOS mode? Or worse, why is my iPhone stuck in Emergency SOS mode?
“SOS” mode doesn’t mean your phone is broken. It just means your iPhone can’t connect to your carrier’s network, but it can still make emergency calls. It’s a built-in safety feature.
In this guide, we’ll explain what Emergency SOS mode means, why your iPhone is stuck in that SOS mode, and how to quickly fix it.
What Is Emergency SOS Mode on iPhone?

Emergency SOS mode is a safety feature built into the iPhone that helps you quickly contact 911 or local emergency services when you get into trouble. You can trigger this feature by pressing the side button 5 times quickly or holding down the side button and volume button at the same time.
Even if your phone says “SOS” or “No Service,” it will try to call emergency services using any available network. If you have an iPhone 14 or later, it will send a message via satellite even if there’s no signal at all.
It will also share your location with emergency responders and automatically notify your emergency contacts so they know where you are and that you need help.
Why Is My Phone on SOS Mode?
If your iPhone says “SOS” or “SOS Only,” it means your phone can’t connect to your carrier’s network, but you can still make emergency calls.
Here are some common reasons this happens:
- Poor Signal: You might be in an area with weak or no service, like a basement, elevator, or remote location.
- Network Issues: Your carrier could be having outages or doing maintenance in your area.
- SIM Card Problems: Your SIM might be damaged, dirty, or not inserted properly.
- Software Glitch: A software bug or an incomplete update can trigger SOS mode.
- Incorrect network settings: Incorrect network settings may prevent your phone from connecting to the carrier network.
- Wi-Fi or VPN Conflicts: Some network tools, like VPNs, can interfere with your connection.
- Jailbreaking: If you’ve modified your iPhone’s system, it might cause the iPhone to say “SOS Only.”
To avoid VPN-induced network issues, we recommend using a lightweight VPN like LightningX VPN. It minimizes connection issues, provides stable and fast networks across 2000+ servers in 50+ countries, and protects your privacy without interfering with your mobile network. It as the best VPN on iPhone, you must should try!
7 Ways to Fix iPhone Stuck on SOS Mode
If your iPhone is stuck in SOS or “SOS Only” mode, it means it can’t connect to your carrier’s network. Here’s how to fix it:
1. Check Your Network Connection
The first reason an iPhone is stuck in SOS mode is that there’s no network. Follow these steps to check if your network connection is working:
- Make sure you’re in an area with cell service.
- Turning Airplane Mode on, wait 10–15 seconds, then turn it off.
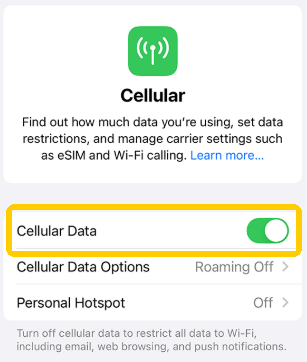
- Go to Settings > Cellular, and make sure Cellular Data is turned on.
2. Restart Your iPhone
If your phone is still on SOS, restarting the phone may solve the problem.
- For iPhone X and later: Quickly press and release the Volume Up button, quickly press and release the Volume Down button, and finally, press and hold the Side button until you see the Apple logo.
- For older iPhone models: Press and hold the Home and Power buttons until the Apple logo appears.
3. Remove and Reinsert Your SIM Card
If restarting the phone does not fix it, it may be that the SIM card is not recognized by the iPhone due to the wrong position. Please try re-placing the SIM card.
- Turn off your phone.
- Use a SIM tool or paper clip to pop out the SIM tray.
- Take out the SIM, check it, clean it if needed, and put it back in.
- Turn your iPhone back on.
Read more: What Is SIM Swapping? How to Prevent It?
4. Reset Network Settings
If your iPhone still says “SOS”, here are some network settings you can try:
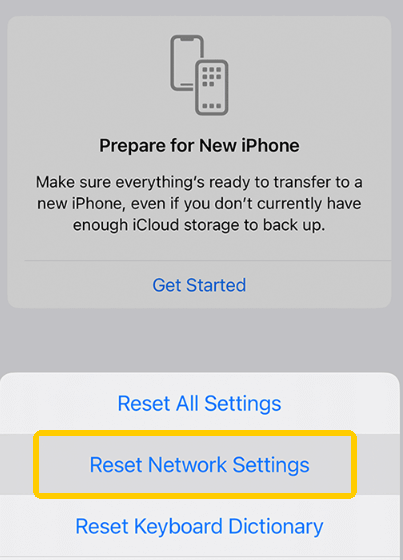
- Reset network settings: Go to Settings > General > Transfer or Reset iPhone > Reset > Reset Network Settings.
- Switching off 5G: Go to Settings > Cellular > Cellular Data Options, then change your network setting from 5G to LTE.
5. Update Your iPhone and Carrier Settings
Outdated phone systems or Carrier versions may affect networks. Please try to update them.
- Update iPhone: Go to Settings > General > Software Update to check for iOS updates.
- Carrier updates: Go to Settings > General > About. If one’s available, you’ll get a prompt.
6. Use Recovery Mode

If nothing else works and your iPhone is still stuck in SOS mode, you can try recovery mode.
What you need:
- A computer (Mac or Windows)
- A Lightning cable to connect your iPhone to
- The latest version of iTunes
How to do it:
1. Plug your iPhone into your Mac or PC using its charging cable.
2. Put your iPhone into recovery mode.
- iPhone 8 or later (including iPhone SE 2nd/3rd generation):
- Press and release the Volume Up button.
- Press and release the Volume Down button.
- Press and hold the Side button until you see the recovery mode screen (the cable pointing toward your computer or iTunes logo).
- Don’t release when you see the Apple logo and keep holding until the recovery mode screen appears.
- iPhone 7 / 7 Plus:
- Press and hold the Volume Down and Side buttons at the same time.
- Keep holding them until you see the recovery mode screen.
- iPhone 6s or earlier:
- Press and hold the Home and Top (or Side) buttons at the same time.
- Keep holding them down until you see the recovery mode screen.
3. Once your iPhone is in recovery mode, your computer should display a message similar to this:
“There was a problem with your iPhone that requires it to be updated or restored.”
4. Click Update first. This will reinstall iOS without erasing your data.
If Update doesn’t fix the problem, you can repeat the steps above and select Restore. If the download or restore process takes longer than 15 minutes, your iPhone may exit Recovery Mode. If this happens, just repeat the steps above.
7. Contact the official support
When you try the above fixes but still don’t work, contact your carrier or Apple support.
- Contact your carrier: Contact your carrier to check if any account issues or outages in your area may be affecting your service.
- Visit Apple Support: If the problem persists, contact Apple Support for further assistance.
By walking through these steps, you can fix your iPhone stuck in SOS mode and get back online.
FAQ about iPhone stuck on SOS Mode
1. Why is my iPhone suddenly showing SOS?
If your iPhone shows “SOS,” your device can’t connect to the regular cellular network, but you can still make emergency calls such as 911.
Common reasons include poor signal or network outages, a possible loose, damaged, or dirty SIM card, a software glitch, or limited service by your carrier.
2. How do you turn off the SOS setting on iPhone?
You can’t completely turn off the Emergency SOS feature on your iPhone, but you can disable shortcuts that accidentally trigger it. Here’s how:
- Open Settings → Go to Emergency SOS → Turn off “Call with Hold and Release” → Turn off “Call with 5 Presses”
- If you’re using an iPhone 14 or later, you can also turn off “Call After a Hard Crash” to prevent accidental calls after a hard crash.
With these options turned off, your iPhone won’t be able to call emergency services unless you do it manually.
3. What happens if you accidentally call emergency SOS on iPhone?
When you activate Emergency SOS, your iPhone starts counting down before calling 911. When the countdown ends, the call automatically connects.
You can cancel the call: You can stop the call by releasing the side button or volume button during the countdown. If the call connects, don’t hang up and explain to the dispatcher that it was an accident.
If you want to avoid this, just turn off the Emergency SOS shortcut.


