Have you received a message like “can’t connect to this network”? There are multiple reasons for network connectivity failures. You can check your hardware or adjust your network settings, etc. If you’re confused and don’t know where to start, don’t panic! This blog will provide a practical guide. It will take you step by step to troubleshoot the problem and connect to the network smoothly.
Why You Can’t Connect to This Network?
- Your Wi-Fi router may not work properly due to hardware failure, overheating, or internal setup issues. This may result in the device being unable to establish a network connection.
- The Wi-Fi password you entered may be incorrect. You need to double-check if you entered the right Wi-Fi password on your device. Sometimes you may forget your password. You can use some password finders to find your WiFi password.
- An IP conflict can prevent you from properly acquiring a network address. It will cause you can’t connect to this network.
- Incompatibility between devices and network bands can cause connection failure. For example, if your device is too old, it may only support the 2.4 GHz band.
- The device’s network driver or operating system may be wrong or outdated, resulting in an inability to connect to Wi-Fi.
- Firewall or security software may block your network connections. Try temporarily disabling them to see if that resolves the issue.
Related: How to Share WiFi Password on iPhone, Android, PC, Mac
How to Fix the “Can’t Connect to This Network” Error?
Reboot Your Devices
When there is a glitch in your device, it can be quickly resolved by restarting it. This is a simple method that many people can do.
- Try turning off your computer or mobile device, wait for a few seconds, and then turn it back on to see if you can restore your internet connection.
- Routers sometimes have problems because they run for a long time. You can unplug your router, wait for about 30 seconds, and then plug it back in. The router will reboot and resume normal operation. Usually, wait for a few minutes for the router to complete the startup process before trying the internet connection.
Check Wi-Fi Connection
The Wi-Fi feature may be accidentally turned off if you don’t operate it properly. Double-check that Wi-Fi is enabled on your device. On Windows and Mac, you can use the Wi-Fi switch with a function key (e.g., Fn + F2) or the Wi-Fi switch in System Settings. For smartphones, the Wi-Fi switch can usually be found in the settings.
Related: WiFi Keeps Disconnecting? – How to Fix Internet Connection
Change Your VPN
A VPN is used to create an encrypted network connection. If you can’t connect to this network, there may be a problem with your VPN configuration or server. Attempt to restart the VPN service or replace it with a more stable VPN. Here we recommend LightningX VPN.
- Unlimited access: Access global resources without bandwidth or speed limitations.
- Secure Internet connection: 2,000+ servers in 50+ countries. You can enjoy a reliable and fast Internet connection.
- Privacy protection: Hide your IP address and keep your online activities private.
- High speed and stability: Experience fast connections for video calls, online gaming, and file transfers.
Switch the Airplane Mode On & Off
When you turn on Airplane Mode, any network connections relying on wireless communication features are interrupted. If you cannot connect to the network, you can try turning Airplane Mode on and then off.
Disconnect and Reconnect Wi-Fi
Have you successfully connected to Wi-Fi but still can’t connect to this network? Find the network you want to connect to in the Wi-Fi settings and select “Forget” the network. Then, select the network again and enter the correct password to reconnect. This can sometimes solve minor problems with network connections.
Update Your Network Adapter
On Windows:
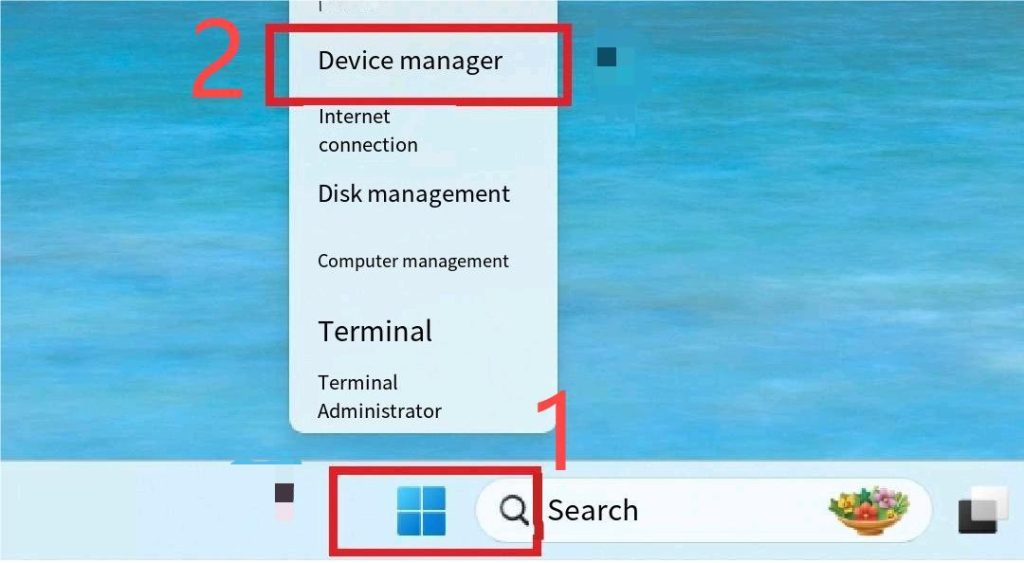
- Open “Device Manager” and locate the “Network Adapters” item.
- Right-click on the network adapter you are using and select the “Update Driver” option.
- The system will automatically search for updates and install the latest drivers, which can help solve network connection problems caused by outdated drivers.
On macOS: Network drivers for macOS are usually maintained through system updates. Go to “Software Update” in “System Preferences” to check if there are available updates and install them.
Verify Signal Interference
Make sure your device is close enough to the router to get a stronger signal. If you’re at a distance, the signal may be weaker, causing connection problems. Make sure there aren’t too many electronic devices interfering with your Wi-Fi signal. Electronic devices such as microwaves and cordless phones can interfere with Wi-Fi signals. Try to place your devices as far away from these sources of interference as possible.
Check IP Configuration
Make sure your device is set to obtain an IP address automatically. If the IP address is not configured correctly, it may not be able to connect to the network.
On Windows:
- Go to “Network and Sharing Center”.
- Select “Change Adapter Settings”.
- Click on your network connection and select “Properties”.
- Then you should find “Internet Protocol Version 4 (TCP/IPv4)”. Make sure it is set to Obtain an IP address automatically.
On macOS:
- Go to “Network” in “System Preferences”, and select your network connection.
- Click the “Advanced” button, and then check the “TCP/IP” option.
- Select the “TCP/IP” option, and make sure “Configure IPv4” is set to “Use DHCP”.
Confirm SSID and Password
Ensure the network name (SSID) and password you entered are correct. An incorrect password or network name may cause the connection to fail.
Reset Network Settings
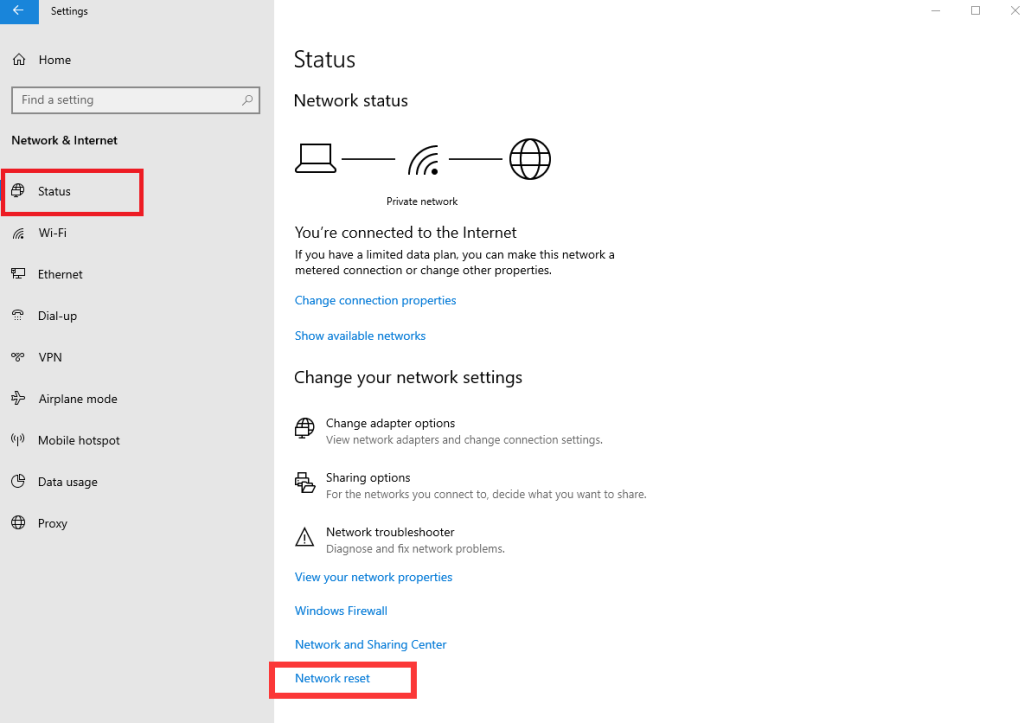
On Windows: Go to “Settings” > “Network and Internet” > “Status”, and find the “Reset network” option. Click on it and the system will reset all network adapters and restore the default settings. This helps you resolve connectivity issues caused by configuration problems.
On macOS: Go to “Network” in “System Preferences”, select your network connection, and click the “minus” button to remove it. Then, click the plus button to re-add it. This will refresh the network settings.
Check for Software Conflicts
Sometimes, antivirus software or firewalls can block your network connections. Try temporarily disabling these security programs to see if that solves the problem. If you can connect after disabling, you will need to adjust the settings of these programs to allow network connection.
Advanced Troubleshooting
Command Prompt (Windows): Open a command prompt as an administrator and run the following command to refresh the network settings:
- ipconfig /release: Releases the current IP address.
- ipconfig /renew: Request a new IP address.
- ipconfig /flushdns: Flush the DNS cache to resolve connection errors due to DNS problems.
Run the Network Troubleshooter (Windows):
- Pressthe“Win + I”to open the Windows Settings app.
- Navigate to “System” > “Troubleshoot” > “Other troubleshooter”.
- You will see the “Network & Internet” option. Click on the “Run” button Next to it. It will automatically detect and try to fix the network problem.
If the problem persists after trying these steps, you may need to contact technical support. You can also consider whether you need to replace the hardware device.
Fix “Can’t Connect to This Network” Error – FAQs
Why can’t my device connect to this network?
Your device cannot connect to a Wi-Fi network for various reasons. These include your password may have been entered incorrectly, a weak Wi-Fi signal, an error in the router settings, a malfunctioning device’s wireless function, or Airplane Mode is on.
Why does my device show “can’t connect to this network”?
It may be due to your network problem, device issue, or connection issue between them. You can check to see if the network is working, and verify your device’s network settings.
Conclusion
The problem of “cannot connect to this network” can usually be solved by simple measures. By staying patient and troubleshooting step by step, you can quickly restore your network connection and continue to surf the Internet smoothly.


