


You need to create an Apple ID account to use Apple devices and services like the App Store, Apple Music, etc. Whether you’re setting up a new Apple device or want to create a separate account for a specific use, you can check the step-by-step guide below on how to create a new Apple ID via various methods.
How to Create an Apple ID on Your iPhone/iPad
If you have an iPhone or iPad, you can directly create an Apple ID on the iOS device.
Step 1: Open the Settings App on Your iPhone/iPad
Tap on the Settings app. It is usually located on the home screen.
Step 2: Tap “Sign in to your iPhone”
At the top of the Settings screen, Tap the “Sign in to your iPhone (or iPad)” option.
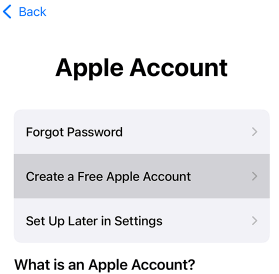
Step 3: Tap “Don’t have an Apple ID or forgot it?”
If you don’t have an Apple ID yet, tap “Don’t have an Apple ID or forgot it?” or “Forgot password or don’t have an Apple Account?”. This will guide you to the Apple ID account creation screen.
Step 4: Tap “Create Apple ID”
Tap “Create Apple ID” or “Create a Free Apple Account”, then you will be asked to enter your name, birth date, and email address.
Step 5: Enter Your Account Information
- Name: Your first and last name.
- Birthdate: Your birth date.
- Email Address: You can either use an existing email address or create a new iCloud email address.
Tip: In mainland China, it may be required to provide a +86 phone number to create an Apple account. You may change your App Store country/region to another country that doesn’t require it.
Step 6: Create a Password for the Apple ID Account
The password is required to be at least eight characters long, containing a mix of upper and lowercase letters and numbers. Enter a strong password for the account.
Step 7: Choose Security Questions
Then you will be asked to select and answer three security questions. It can help you recover your Apple ID account if you forget your password or need to verify your identity in the future.
Step 8: Agree to Apple’s Terms and Conditions
After entering all the required information, agree to Apple’s Terms and Conditions and Privacy Policy.
Step 9: Account Verification
To complete your Apple ID creation, Apple will send a verification code to the email address you provided. Check your email inbox and enter the verification code.
Step 10: Set Up iCloud and Additional Apple Services
After verification, you’ll be asked to set up iCloud, which will sync your data across Apple devices. You can also choose if you want to enable Apple services like Find My iPhone, Apple Pay, iMessage, etc.
Your Apple ID is now ready to use on your iPhone or iPad. You can sign in to the App Store, iCloud, Apple Music, and other Apple services now.
To add security to your account, Apple recommends setting up two-factor authentication to protect your Apple ID and all associated services. You can set it on the Apple ID settings screen.
You may also add a payment method to your Apple ID to buy apps, subscriptions, and other content from the App Store or iTunes Store. This can be done in the “Payment & Shipping” section on your Apple ID settings screen.
Also read: Can’t Create an Apple ID at This Time? [10 Fixes]
How to Create an Apple ID Account on a Mac
If you have a Mac, creating an Apple ID is easy by following the steps below.
Step 1: Open the System Settings on Your Mac
Click on the Apple logo on the top-left corner of the Mac screen and select “System Settings” from the dropdown menu.
Step 2: Click the “Sign In” Option
In the System Settings window, click the “Sign In” button.
Step 3: Select “Create Apple ID”
On the Apple ID sign-in page, click “Create Apple ID”.
Step 4: Enter Your Account Information
Enter your full name, date of birth, email address, and password. Make sure to use a strong password.
Step 5: Set Up Security Questions
Choose three security questions and provide answers. These will be used to recover your account if needed.
Step 6: Agree to Apple’s Terms and Conditions
Step 7: Verify Your Email Address
Apple will send a verification email to the email address you provided. Open the email and enter the verification code.
Step 8: Set Up iCloud and Other Apple Services
Once verified, you can set up iCloud, Apple Pay, Find My Mac, and other services.
You can now log into your Apple ID on your Mac and start using Apple apps and services.
Also read: Face ID Not Working on Your iPhone? Try These 10 Easy Fixes!
How to Create an Apple ID Account on the Web
If you don’t have an Apple device and want to create an Apple ID, you can do it from a browser. Check the steps below.
Step 1: Visit the Apple ID Website
Open a web browser on your device like a Windows computer and visit the https://appleid.apple.com/ website.
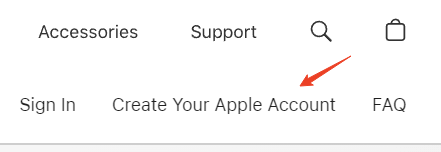
Step 2: Click “Create Your Apple Account”
In the upper-right corner of the homepage, click the “Create Your Apple Account” link.
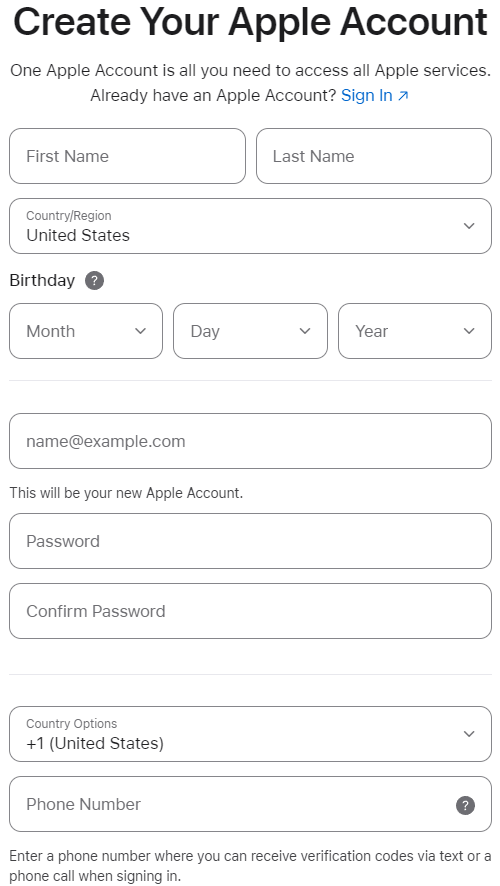
Step 3: Enter Your Account Details
Fill out the necessary information, including your first name, last name, country/region, email address, and password.
Step 4: Agree to Terms and Conditions
Review and agree to Apple’s Terms and Conditions. Enter the captcha code and click Continue.
Step 5: Verify Your Email
Apple will send a verification code to your email. Check your inbox and enter the code to verify your email address.
Now you’ve created an Apple account, you can use it to sign in to the App Store, iCloud, and other Apple services directly from a web browser or on other devices.
Related: Fix “Can’t Sign into Apple ID” or “Apple ID Not Working”
How to Create an Apple ID in Another Country
Creating an Apple ID in another country is relatively simple, but there are a few important steps to follow, especially if you want to access content specific to that region. Check the step-by-step guide on how to create an Apple ID in another country.
Step 1: Select and Use a VPN
A VPN masks your real IP address and gives you a virtual IP from a different country. It makes you appear as if you are in that country and lets you access specific content or services that are available in that region.
If you’re creating an Apple ID and want to set your Apple account country to a different location, using a VPN might be helpful.
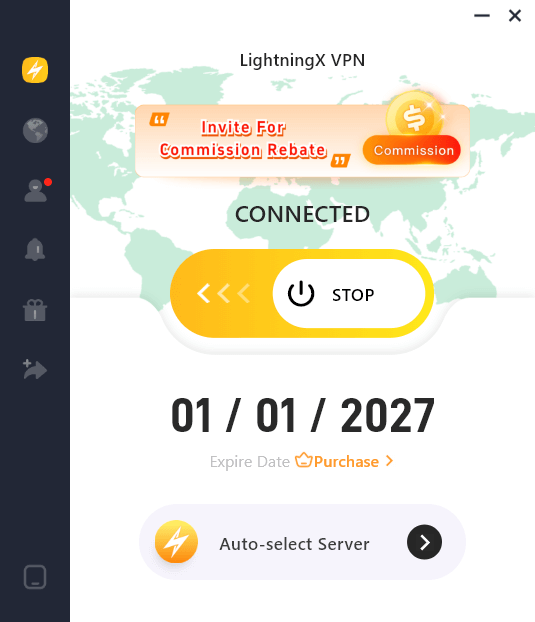
You can use LightningX VPN, a popular VPN for Windows, Mac, Android, iOS, TV, Linux, etc. It offers 2000+ servers in 50+ countries. It also features strong encryption, a strict no-logs policy, fast speed, stability, safety, and more.
- Download and install LightningX VPN on your computer or mobile device. Launch it.
- Connect to a VPN server in the country (like the US) where you want to set your Apple ID. You can click the “Mode and Locations” icon in the left sidebar to check all the available servers.
Step 2: Access the Apple ID Website or App Store
- After connecting to the VPN, visit the Apple ID creation page in a browser or open the App Store on your device.
- Open the Apple ID sign-up screen. Select country/region and set it to the country that matches the location of the VPN server you’re using.
Step 3: Create Apple ID
- Fill out the necessary details (name, email, password, security questions, etc.).
- If you’re asked for payment information, you can select “None” (if available) as the payment option to skip it or use a method that works for the region.
Step 4: Verify Your Email Address
After entering your details, Apple will send a verification email to the email address you provided. Check your inbox and verify the Apple ID.
Step 5: Use the Apple ID in the New Region
Once you’ve created the Apple ID in the new country, you can download apps, movies, music, and other content from the country’s App Store. However, please note that your purchases made in one country may be restricted when switching to another country.
Related: How to Delete Apple ID (Apple Account): Step-by-Step Guide
Why Do You Need an Apple ID/Apple Account?
- Access to Apple Services: The Apple ID is essential for accessing various Apple services like iCloud, App Store, iTunes Store, Apple Music, Apple TV+, iMessage, FaceTime, etc.
- Sync Your Data: Apple ID helps sync all your photos, notes, contacts, calendars, reminders, and apps across all your Apple devices (iPhone, iPad, Mac, etc.).
- Subscriptions and Purchases: An Apple ID is required to buy apps, music, movies, subscriptions, etc. It keeps your billing information secure and allows you to easily manage your purchases in the App Store.
- Find My iPhone: The “Find My iPhone” feature requires an Apple ID to help you locate your iPhone in case it gets lost.
Conclusion
Creating a new Apple ID is an essential task to enjoy all of Apple’s features and services. Whether you’re setting up a new iPhone/iPad/Mac or creating a new Apple account from a web browser, the step-by-step guide above helps you easily realize the task. Remember to keep your Apple ID credentials secure and set up two-factor authentication for extra protection.


