Apple released its new macOS – macOS Sequoia – on September 16, 2024. Users who want to experience the new features of this new macOS version can download and install macOS Sequoia now.
However, if you are not satisfied with macOS Sequoia and regret upgrading to the Mac OS, you can downgrade macOS Sequoia to Sonoma if you want. Below we introduce three ways to help you with the downgrade. Check the details below.
Downgrade macOS Sequoia to Sonoma with Recovery Mode
Important notice: It’s highly advised to back up your Mac first before using the methods below to downgrade macOS Sequoia to macOS Sonoma to avoid data loss. Related guide from Apple’s official website: Back up your Mac with Time Machine.
You may revert to macOS 14 by reinstalling your macOS. This will give your Mac a fresh restart. Check the steps below.
Step 1. Boot your Mac into recovery mode.
- Click Apple > Restart to restart your Mac computer.
- Immediately press the Shift + Option + Command + R keyboard shortcut to enter into macOS Recovery screen.
Step 2. Reinstall macOS for your Mac
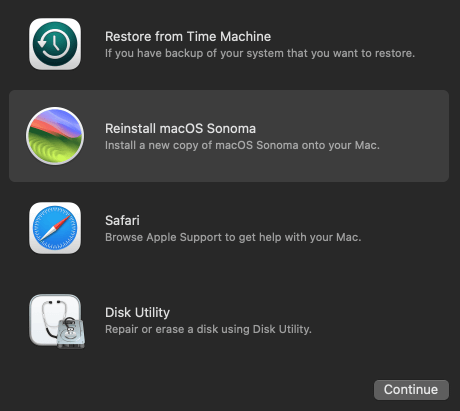
- After you get into the Recovery Mode, click the “Reinstall macOS Sonoma” option.
- Click the “Continue” button and follow the on-screen instructions to install macOS Sonoma on your Mac.
Tip: This method only works for Intel-based Macs.
Revert macOS Sequoia to Sonoma with Time Machine
Another way to let you downgrade to macOS Sonoma is to use Time Machine. Check the steps below.
Step 1. Boot your Mac from the Time Machine backup drive.
Connect the external hard drive that contains your Time Machine backups to your Mac computer. You may need to use a USB adapter.
Step 2. Boot your Mac into the Recovery Mode screen.
- Click Apple > Restart to restart your Mac.
- For Intel-based Macs, press and hold the Command + R keyboard shortcut immediately once you see the Apple logo at the start. For Apple Silicon Macs, press and hold the Power button to enter the startup options screen, click Options > Continue. These operations will take you into the Recovery Mode.
Step 3. Restore Mac from Time Machine Backup
- After you enter the macOS Recovery screen, select the “Restore from Time Machine” option. Click Continue.
- Select the target Time Machine backup drive you connected and click Continue.
- Select the Time Machine backup you want to restore. You can choose the most recent one (macOS 14) since it may have the latest information before you upgrade from Sonoma to macOS Sequoia.
- Click “Restore” to downgrade macOS Sequoia to Sonoma.
Tip: This way works on condition that you have used Time Machine to make some backups of your macOS Sonoma system before upgrading to macOS Sequoia.
Downgrade macOS Sequoia to Sonoma with Bootable Installer
The third way to help you revert macOS Sequoia to macOS Sonoma is to use the macOS bootable installer. This will perform a clean install of macOS Sonoma, so remember to back up your Mac first.
Step 1. Prepare a USB for the macOS installer.
- Connect a blank USB drive (at least 32GB) to your Mac. You may need to use a USB adapter. Rename the USB drive as “Sonoma Installer”.
- Click the “Spotlight” icon in the upper-right corner.
- Search for “Disk Utility” in the Spotlight Search box and open Disk Utility on your Mac.
- In Disk Utility, select the blank USB from the left panel.
- Click the “Erase” button.
- Select the “Mac OS Extended (Journaled)” format.
- Click the “Erase” button to start formatting the USB.
Step 2. Download the macOS Sonoma installer.
- Click the App Store icon on your Mac to open the App Store.
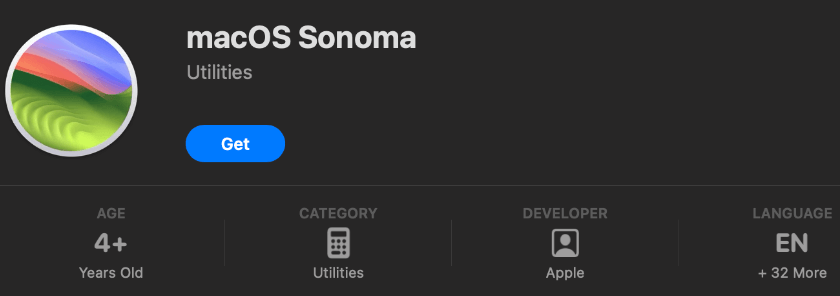
- Search for “macOS Sonoma” in the App Store.
- Click “Get” to download the macOS Sonoma installer to your Mac.
Step 3. Create a macOS Sonoma USB bootable installer.
- Open Spotlight Search again.
- Search for “Terminal” via Spotlight Search. Open the Terminal app.
- In the Terminal window, type the command: sudo /Applications/Install\ macOS\ Sonoma.app/Contents/Resources/createinstallmedia –volume /Volumes/Sonoma\ Installer. Press Enter to start creating the macOS Sonoma USB installer.
Step 4. Clean install macOS Sonoma on your Mac
- Then you can click Apple > System Settings > General > Startup Disk.
- Select the Sonoma bootable USB drive as the startup disk.
- Click “Restart” to reboot your Mac into Recovery Mode.
- Select “Reinstall macOS” and click “Continue” to follow the on-screen instructions to install macOS Sonoma on your Mac.
Bonus Tip: Best VPN for Mac (Fast, Stable, Secure)
If you are looking for a good VPN for your Mac, you may try LightningX VPN.
LightningX VPN is an ultra-fast, stable, secure, and cheap VPN service. It offers 2000+ servers in 70+ countries. You can use this VPN to bypass geo-restrictions and access global content, websites, and apps, including YouTube, Facebook, Twitter, Instagram, Netflix, Disney+, HBO, Hulu, Steam, Discord, ChatGPT, and more.
LightningX VPN is available for macOS, Windows, Android, iOS, Apple TV, and Android TV, Linux, Chrome, Firefox, Edge.
Downgrade macOS Sequoia to Sonoma – FAQs
Q. macOS Sequoia vs macOS Sonoma, which one is better?
macOS Sequoia comes with more new features than Sonoma. The new features include Apple Intelligence, iPhone Mirroring, better productivity tools, Window tiling, better performance, etc.
Therefore, we can’t say which one is better, but it is worth trying the new features. However, if you like macOS Sonoma, you can stay with it.
Q. Should I upgrade to macOS Sequoia?
If you like macOS Sequoia, you can upgrade to this new macOS to experience its new features.
Q. How to downgrade macOS 15 to 14 without losing data?
To revert macOS Sequoia to Sonoma, you should back up important data on your Mac first. You can copy important files to an external hard drive or sync data to iCloud. This post provides 3 ways to help you with the macOS downgrade, you can check the above guide.


