


Setting up a VPN on your device can encrypt your internet traffic and protect your privacy and security. More importantly, a VPN enables access to content and services that may be blocked or unavailable in your region, such as streaming platforms, social media, etc.
Here comes the question: How to set up a VPN? This post provides step-by-step guides to help you easily set up a VPN on PC, Mac, Android, iPhone/iPad.
How to Set Up a VPN for Free on Windows
Method 1. Download and Install a Free VPN App
Step 1. Select a reliable VPN provider.
LightningX VPN is one of the most popular free VPNs for PC/ Mac/iPhone/Android/Linux/TV/Chrome/Firefox/Edge.
It allows you to easily access any platform and browse any website worldwide. Hide your IP address to let you browse the Internet anonymously and protect your online privacy.
Provide 2000+ servers in 70+ countries (3 free servers). Fast speed, stable, and simple to use.
Step 2. Download and set up LightningX VPN on your PC.
Download and install LightningX VPN on your device. Run the installer and follow the on-screen instructions to complete the installation.
Step 3. Connect to the VPN.
Click “Start” to connect to the VPN.
Or click “Mode and Locations” and select the server you want to connect to, usually based on your desired browsing location (e.g., a server in the US if you want to access US-based content).
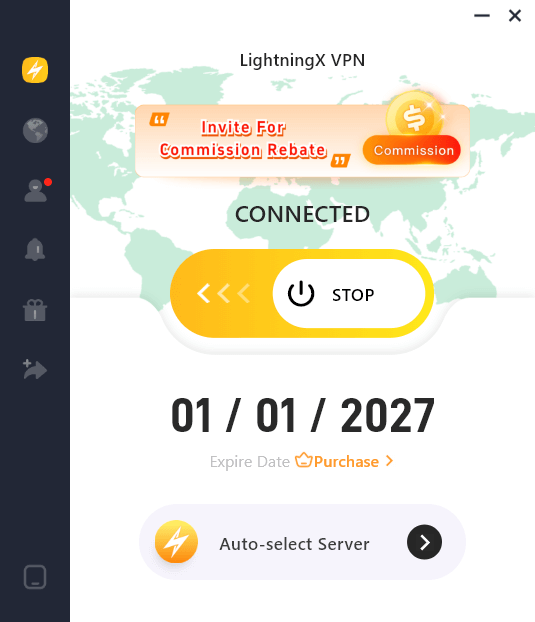
Once you’ve chosen a server, you’ll be automatically connected to the VPN. Your internet connection will now be routed through the VPN server, and your real IP address will be masked.
Method 2. How to Manually Set Up a VPN on PC
Step 1. Get the server address, username, password, and VPN type (like IKEv2, IPSec, or L2TP) from your VPN provider.
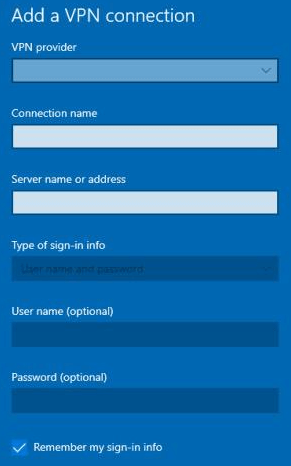
Step 2. Open the VPN settings on your PC. Click Start > Settings > Network & Internet > VPN > Add a VPN Connection.

Step 3. Fill in the VPN details.
In this window, you’ll need to enter the following information:
- VPN provider: Choose Windows (built-in) from the drop-down list.
- Connection name: Give your connection a name (e.g., “My VPN”).
- Server name or address: Enter the server address provided by your VPN provider (e.g., vpn.example.com or an IP address).
- VPN type: Choose the type of VPN your provider uses. Common options include:
- PPTP: Point-to-Point Tunneling Protocol (older, less secure).
- L2TP/IPsec: Layer 2 Tunneling Protocol with IPsec encryption.
- SSTP: Secure Socket Tunneling Protocol.
- IKEv2: Internet Key Exchange version 2 (recommended for security).
- Type of sign-in info: Choose either Username and password, Smart card, or another option based on your VPN provider’s requirements.
- Username: Enter the username provided by your VPN service.
- Password: Enter your VPN password.
Step 4. Save and connect to the VPN.
- After filling in all the required information, click Save to store the connection settings.
- To connect to the VPN, click on the newly created VPN connection under the VPN section in the Settings app, and click Connect.
Tip: To turn off the VPN, go back to the VPN settings, select the active VPN connection, and click Disconnect.
How to Set Up a VPN for Free on Mac
Method 1. Download and Install a Free VPN App on Mac
Step 1. Choose a VPN for Mac
Choose a free VPN service that suits your needs. LightningX VPN is a top choice known for its high speed, stability, and strong privacy protection.
Step 2. Download and Install the VPN App
Visit LightningX VPN’s official website or click the download button above to download the macOS version of the VPN.
Open the downloaded file, and follow the instructions to install the VPN app on your Mac.
Step 3. Select a Server Location to Connect
Launch the VPN software and click “Start” to connect to the VPN.
To change the VPN server, click the “Mode and Locations” icon in the left sidebar. Choose a preferred VPN server from the list to connect.
Once connected, you will see a notification or a symbol (like a VPN icon) in the Dock or Menu Bar.
Method 2. Maunnaly Set Up a VPN on Mac from System Settings
Step 1. Gather the Necessary VPN Information
Before you begin, you need the following details from your VPN provider:
- Server address: The IP address or domain name of the VPN server.
- VPN Type: The protocol your VPN uses (e.g., IKEv2, L2TP, PPTP, or Cisco IPSec).
- Username and Password: Your login credentials for the VPN.
Step 2. Open System Settings
- Click the Apple menu in the top-left corner of your screen and select System Settings.
- In the System Settings window, click Network.
Step 3. Add a New VPN Connection
- On the left-hand sidebar, click the + (plus) button to add a new connection.
- A new dialog box will appear. Select VPN from the “Interface” dropdown.
- From the “VPN Type” dropdown, select the VPN protocol provided by your VPN provider (e.g., IKEv2, L2TP, PPTP, or Cisco IPSec).
- Give your VPN connection a name in the Service Name field (e.g., “Work VPN”).
Step 4. Enter VPN Server Information
- Server Address: Enter the VPN server’s address provided by your VPN service (e.g., vpn.example.com).
- Account Name: Enter your VPN username.
Step 5. Configure Authentication Settings
- Authentication Settings: Click the Authentication Settings button and enter your VPN password (or shared secret/key, depending on the VPN protocol).
- For some VPN types, such as L2TP/IPsec, you may also need to enter an additional Shared Secret or Certificate depending on your VPN provider’s configuration.
Step 6: Advanced Settings (Optional)
- Click on the Advanced button to configure additional settings like DNS servers or enable options like Send all traffic over VPN connection (if needed).
Step 7. Apply the Settings
- After entering all the necessary information, click OK to close the authentication settings window.
- Then click Apply to save the new VPN connection.
Step 8. Connect to the VPN
- To connect, select the newly created VPN connection from the left-hand sidebar and click Connect.
- Once connected, you should see a VPN icon in your menu bar indicating that the VPN is active.
Tip: To disconnect, click the Disconnect button in the Network preferences window. Alternatively, you can also click the VPN icon in the menu bar and select Disconnect.
How to Set Up a VPN for Free on iPhone/iPad
Method 1. Install a VPN App on iPhone/iPad
Step 1. Open the App Store on your iPhone/iPad and search for a free VPN that suits your needs, e.g., LightningX VPN. Download and install this free VPN for iPhone.
Step 2. Launch the VPN after installation. Tap “Start” to connect to the VPN.
If you want to access content available only in a specific country, select a server in that country. Tap the “Mode and Locations” icon and choose the server location that suits your needs.
Method 2. Manually Add a VPN on iPhone
Step 1. Get the required VPN information: server address, VPN type, username, and password.
Step 2. Open the Settings app on your iPhone or iPad.
Step 3. Tap General > VPN & Device Management > VPN > Add VPN Configuration.
Step 4. Enter VPN details: VPN type, description, server, username, and password.
Step 5. Save the VPN information. Toggle the VPN switch on in the VPN settings. Your iPhone or iPad will now connect to the VPN using the details you entered.
How to Set Up a VPN for Free on Android
Method 1. Install a VPN App on Android
Step 1. Visit the Google Play Store on your device and search for a free VPN for Android. For instance, search for “LightningX VPN” in the Play Store.
Step 2. Download and install the VPN app on your Android device. Launch it.
Step 3. Tap “Mode and Locations” and browse through the list of available servers and select one to connect to.
Method 2. Set Up a VPN on Android Manually
Step 1. Before you manually configure your VPN, you’ll need the following details from your VPN provider: server address, VPN type, username and password, and encryption method (if applicable).
Step 2. Click Settings > Network & Internet > VPN > Add VPN.
Step 3. Enter VPN details. These details vary based on your VPN provider and the protocol you’re using.
Step 4. Save the VPN configuration. Return to the VPN screen in the settings. Tap the VPN connection you just created. Enter your username and password if prompted, then tap Connect.
Conclusion
With the increasing need for privacy and security online, a VPN is an essential tool for safeguarding your data. This post provides detailed step-by-step guides for how to set up a VPN on PC, Mac, Android, or iPhone/iPad. Hope it helps.


