


Managing files on iPhone can be a challenge for many users, especially with the growing need for storage space and the variety of apps that handle different file types. Whether you’re dealing with photos, documents, music, or app data, keeping everything organized and easy to access is essential.
In this comprehensive guide, we’ll explore how to manage files on your iPhone effectively, covering tips and tools for better file organization. This will ensure you make the most of your iPhone’s file system and boost your productivity.
How to Use the Files App to Manage Files on iPhone
The Files app on iPhone is the heart of file management. It functions as a central hub where you can access, organize, and search all the files stored on your device, iCloud, or other cloud services. Here’s how to make the most out of it.
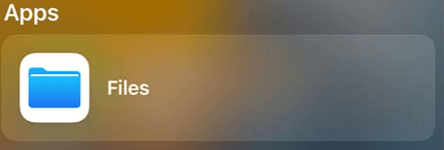
1. Open the Files App on Your iPhone
- Find and tap the Files app icon (a blue folder icon) on your Home screen.
- Swipe down on the Home screen and type “Files” in the search bar, then tap the app from the search results.
- You can also activate Siri and say “Open Files app” to open it.
2. Access Files on iPhone in the Files App
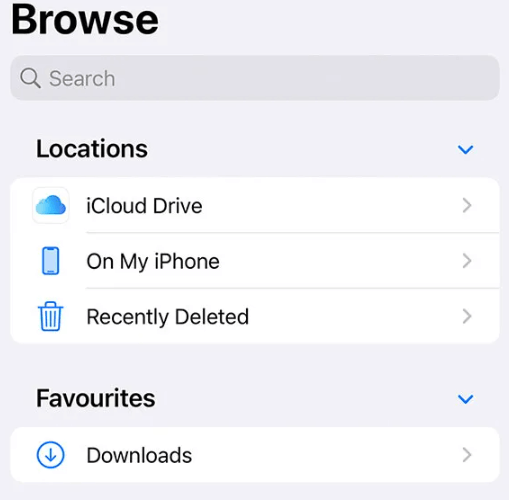
When you open the Files app, you’ll see two main tabs: Browse and Recents.
Browse shows you a directory view, similar to a file explorer on a computer. Here, you can access files stored on your iPhone, in iCloud, or in third-party cloud services like Google Drive or Dropbox.
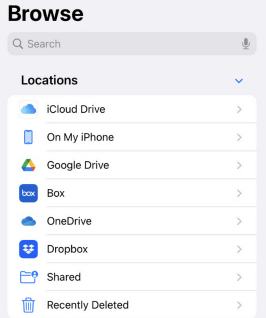
Recents shows you files that you’ve recently opened or modified, allowing you to quickly return to documents you’re working on.
You can easily search for specific files by using the search bar at the top, filtering results by file type or location.
3. Organize Your Files in Folders
The Files app allows you to create folders to organize documents. Tap New Folder in the browse view, name it according to your organizational scheme, and start moving files into it. You can create folders within folders for even more organization.
This is especially useful for grouping related files like photos, presentations, spreadsheets, and PDFs. Keeping things organized this way prevents clutter and helps you quickly find files later.
4. Managing Files on Your iPhone
Once your files are in the Files app, you can easily manage them in the following ways.
Moving Files
- Tap and hold the file you want to move.
- Tap Move from the options that appear.
- Select the destination folder or location (e.g., iCloud Drive, On My iPhone).
- Tap Move to complete the action.
Renaming Files
- Tap and hold the file you want to rename.
- Tap Rename.
- Enter a new name for the file and tap Done.
Deleting Files
- Tap and hold the file you want to delete.
- Select Delete from the options.
- The file is moved to the Recently Deleted folder, where it will stay for 30 days before being permanently deleted. You can go to Browse > Recently Deleted to recover or permanently delete the file.
5. Tagging Files for Better Organization
A handy feature in the Files app is File Tagging. You can assign colored tags to files to categorize them visually. For example, you can use blue tags for work-related files, red tags for personal files, and green tags for documents that need to be reviewed. This feature helps with quick sorting and adds a layer of visual organization to your files.
How to Tag a File:
- Tap and hold the file you want to tag.
- Select Tags from the options that appear.
- Choose an existing tag or create a new one by selecting Add New Tag.
- Tap Done to apply the tag.
6. Searching for Files on iPhone
The search function in the Files app is robust and allows you to find files quickly by name, type, or other criteria.
How to Search for Files:
- Tap the Search bar at the top of the Files app.
- Enter keywords related to the file (e.g., file name or file type).
- Files matching your search will appear in the results.
You can also filter results by file type (such as PDFs or Word documents) by tapping on Filter after initiating the search.
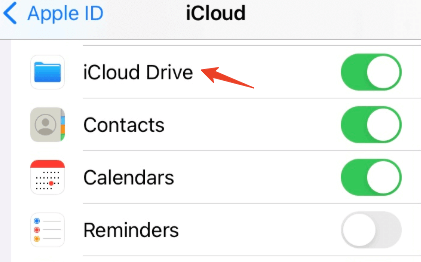
7. Using iCloud Drive for Cloud Storage
iCloud Drive is Apple’s cloud storage solution that allows you to sync files across all your Apple devices. This means that any file you store on iCloud Drive is accessible from your iPhone, iPad, Mac, or even Windows PCs through the iCloud app, as long as you’re signed in with the same Apple ID.
How to Enable iCloud Drive on Your iPhone:
- Tap Settings > [your name] > iCloud > iCloud Drive.
- Turn on the switch for iCloud Drive and ensure that apps that store documents in iCloud are selected.
Once enabled, files saved to iCloud Drive can be accessed through the Files app. It’s an excellent way to ensure that important files are always available, even if you run out of local storage space.
8. Link Third-Party Cloud Services
If you use services like Google Drive, Dropbox, or OneDrive, you can also manage files from these services within the Files app. By linking your third-party accounts to the Files app, you can easily view and manage all your files in one place, regardless of where they are stored.
To link a cloud service:
- Open the Files app.
- Tap Browse and select Edit in the top-right corner.
- Tap the + icon to add a cloud service, then follow the prompts to log into your account.
- Once added, you’ll be able to view and manage files from that service directly within the Files app.
This is an ideal solution for users who rely on multiple cloud services for their file storage needs.
Tip:
You can use LightningX VPN to protect your online privacy and secure your connection while accessing files in the cloud storage services. It helps encrypt file transfer and sharing, secure remote file access, bypass geographical restrictions, and prevent data leaks while managing files on your iPhone. LightningX VPN offers 2000+ servers in 70+ countries. Support iPhone/iPad, Android, Mac, Windows, Apple TV, Android TV, Linux, Chrome, Firefox, Edge, etc.
9. Previewing and Sharing Files on iPhone
You can preview most file types directly within the Files app, including documents, images, and PDFs. Additionally, you can share these files via email, messaging apps, or social media.
How to Preview a File:
- Tap on the file you want to preview.
- For documents, images, and videos, the file will open in a preview mode.
- For other files (e.g., ZIP archives), the Files app may offer an option to extract or open the file in a compatible app.
How to Share a File:
- Tap and hold the file you want to share.
- Select Share from the options.
- Choose the sharing method (e.g., AirDrop, Mail, Message) to share the file.
Also read: Common iPhone 16 (Pro/Pro Max) Problems and How to Fix Them
How to Save Files on iPhone
Saving files to your iPhone depends on the type of content and the app you’re using. Here’s how you can save different types of files.
1. Save Files from the Web (Safari)
When you download a file from Safari, it will be automatically saved to the Downloads folder in the Files app.
Steps: After downloading, tap on the Download icon in Safari’s top-right corner, then select the file to view it. You can then tap Share to save it to a folder in the Files app.
2. Save Email Attachments
Attachments from your emails can be saved directly to the Files app.
Steps: Open the email, tap on the attachment, then tap Share. Choose Save to Files and select a folder to save the file.
3. Save Photos and Videos
Photos and videos are automatically saved to the Photos app, but you can also move them to the Files app for better organization.
Steps: Open the Photos app, select the photo or video, tap Share, then choose Save to Files.
4. Save Files from Other Apps (e.g., Notes, Google Drive, Dropbox)
Most apps that allow file storage, like Google Drive or Dropbox, let you save files to the Files app.
Steps: Open the app (e.g., Google Drive), tap on the file you want to save, tap the Share icon, and select Save to Files.
How to Find Saved or Downloaded Files on iPhone
Finding saved or downloaded files on your iPhone can be easy once you know where to look. The Files app is the primary place where all documents, photos, videos, and other files are saved. If you’ve downloaded or saved a file from an app, email, or cloud service, it will likely be accessible via the Files app or a related app like Photos or Mail.
Steps to Find Saved or Downloaded Files on iPhone:
1. Open the Files app:
- Locate the Files app (blue folder icon) on your Home screen and tap to open it.
- Tap the Browse tab at the bottom to view locations where your files are stored (iCloud Drive, On My iPhone, etc.). To find downloads on this device, look for the Downloads folder, where most downloaded files from Safari or other apps are saved.
2. Use the Search Bar:
- Tap the Search bar at the top of the Files app.
- Type the name of the file or a keyword related to it to find it quickly.
3. Check Recent Files:
Under the Recents tab in the Files app, you’ll see all recently opened files, making it easier to locate files you’ve used recently.
4. Check Specific Locations:
- Under Browse, check locations like On My iPhone or iCloud Drive to see files from specific sources.
- If you have third-party cloud services linked (like Google Drive or Dropbox), you can check those as well.
- If you downloaded a media file (e.g., photo, video), it might be saved in the Photos app instead.
- If you downloaded an email attachment, it could be saved in the Mail app or Files app, depending on the action you took.
Also read: Fix “Can’t Download Apps on iPhone” – 10 Ways
Tips for Freeing Up Storage Space on iPhone
Managing files on iPhone isn’t just about organization. It’s also about maintaining optimal storage space. Here are some tips to help you free up space and keep your iPhone running smoothly.
1. Delete Unused Files and Apps
Regularly check for files and apps you no longer need. Use the Settings app to review storage usage under Settings > General > iPhone Storage. Here, you’ll see a list of apps and how much storage they’re using. You can offload or delete apps that aren’t being used frequently.
2. Offload Unused Apps
If you’re hesitant to delete apps you rarely use, consider offloading them. This option keeps the app icon on your home screen but removes the app’s data. If you ever need it again, you can easily re-download it without losing any data.
How to Enable Automatic App Offloading:
- Open Settings on your iPhone.
- Tap General.
- Select iPhone Storage.
- Scroll down to find the Offload Unused Apps option.
- Toggle the switch to turn it on.
How to Offload Apps Manually:
- Open Settings on your iPhone.
- Tap General.
- Select iPhone Storage.
- You will see a list of all your apps, along with how much storage each one uses. Scroll down to find the app you want to offload.
- Tap on the app you want to offload.
- Tap Offload App.
- Confirm your choice by tapping Offload App again.
3. Clear Cache Files on iPhone
Some apps accumulate cache files over time, which can take up unnecessary space. Unfortunately, iOS doesn’t have a built-in tool for clearing app caches, but you can delete and reinstall apps to clear their cache or use third-party apps that offer cache management features.
Related: How to Clear Cookies on iPhone 16/15/14: Step-by-Step Guide
4. Back Up iPhone Files to Cloud Storage
By storing files in the cloud, you free up local storage space on your iPhone. iCloud, Google Drive, and Dropbox are all good options for cloud backups. With iCloud, you can also automatically back up your photos and videos.
5. Use the “Optimize iPhone Storage” Feature for Photos
Apple’s Optimize iPhone Storage feature helps you save space by keeping full-resolution photos and videos in iCloud and only storing lightweight versions on your device. To enable it, go to Settings > Photos and select Optimize iPhone Storage.
Troubleshooting Common File Management Issues on iPhone
Managing files on iPhone is mostly straightforward, but some issues can arise. Here are a few common problems and how to fix them:
- Cannot Open Files in the Files App: Ensure that the file is in a supported format. For unsupported file types, you may need to download a third-party app that can handle them. (Related: How to Open Unknown File)
- Files Not Syncing Across Devices: Double-check your iCloud settings and ensure that you have a stable internet connection. Sometimes, restarting the device can resolve syncing issues.
- Running Out of Storage: If you’re constantly running out of storage, consider deleting or offloading apps, clearing cache files, or using an external storage device like a USB drive with an iPhone adapter.
Conclusion
Efficient file management on your iPhone is essential for keeping your device organized and running smoothly. By utilizing the Files app, iCloud, and third-party cloud storage options, you can easily organize, access, and free up space on your device. Regularly managing files on your iPhone ensures that your iPhone runs smoothly, whether for work, entertainment, or personal tasks. With these tips in this post, you’ll be able to control your digital life well on your iPhone.


