


In this post, you can learn how to enable IPv6 on various devices including Windows, Mac, Android, iOS, Linux, Xbox One, smart TVs, etc. The steps are slightly different depending on the device and operating system you use. Check the details below.
How to Enable IPv6 on Windows 11/10
Enable IPv6 on Windows from Control Panel
- Press Windows + R, type “control” in the Run dialog, and press Enter to open Control Panel on your Windows computer.
- Click Network and Internet > Network and Sharing Center.
- Click “Change adapter settings” in the left sidebar.
- Right-click your current network and select “Properties”.
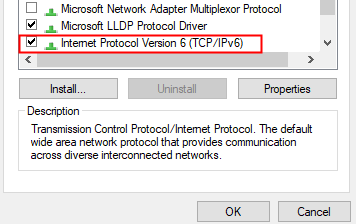
- In the Properties window, find and check the “Internet Protocol Version 6 (TCP/IPv6)” option. Click OK to save the settings.
Use LightningX VPN to Enable IPv6
You can also use LightningX VPN to enable IPv6 on your computer or mobile device.
LightningX VPN is a top VPN for Windows, macOS, Linux, Android, iOS, TV, etc. It offers 2000+ servers in 50+ countries and lets you easily change your IP address to another country to access geo-restricted content and apps.
It also includes an “Enable IPv6” feature to let you easily turn on or off IPv6 for your device. This feature helps you set the protocol type for DNS resolution. Turning “Enable IPv6” off means only using IPv4 on your device while turning this feature on means using both IPv4 and IPv6 resolution.
If your network supports IPv6, enabling this feature can help improve the network access speed. If your network is unstable or the internet access is restricted after turning on this feature, you should disable IPv6.
- Download and install LightningX VPN on your computer or mobile device.
- Launch LightningX VPN and click “Start” to connect to the fastest server automatically.
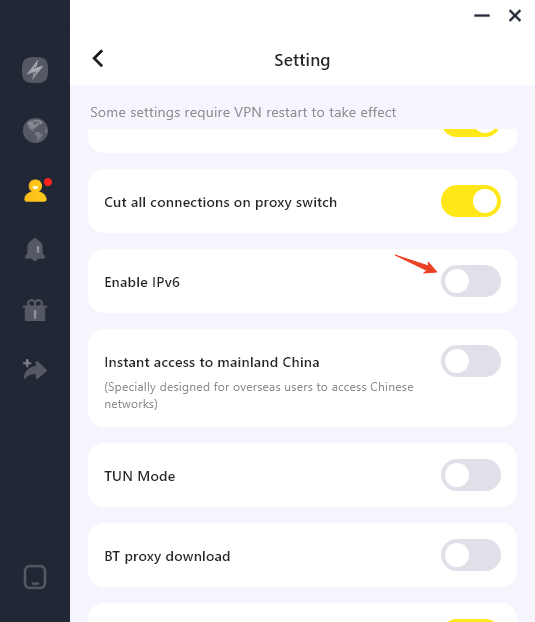
- Click “Mine” in the left sidebar and select “Setting”.
- Toggle on the “Enable IPv6” feature to turn on IPv6 for your device with one click.
Tip: Before you enable IPv6, make sure your internet service provider supports IPv6. After enabling IPv6, you can use an online IPv6 test tool to verify if your device is successfully receiving an IPv6 address.
How to Turn on IPv6 on Mac
- Click Apple > System Settings.
- Click Network in the left panel.
- Select your active network connection from the left panel.
- Click the “Advanced” button in the right window.
- Click the “TCP/IP” tab, and make sure “Configure IPv6” is set to “Automatically”.
- Click OK and Apply to save the changes and activate IPv6 on your Mac.
Related: How to Fix IPv6 No Network Access Error on Windows 11/10
How to Enable IPv6 on Android
- Open the Settings app on your Android phone or tablet.
- Tap Network & Internet and tap Wi-Fi.
- Select your active network.
- Tap “Advanced” and ensure IPv6 is enabled.
How to Enable IPv6 on iPhone/iPad
- Open the Settings app on your iOS device.
- Tap Wi-Fi.
- Tap the “i” icon next to your active Wi-Fi network.
- Check if IPv6 is enabled, if not, turn it on.
Tip: In general, you don’t need to manually enable IPv6 on Android or iPhone/iPad. If your network supports IPv6, your device will automatically obtain an IPv6 address.
How to Enable IPv6 on Router
- Open a browser on your computer or mobile. Enter the router’s IP address, commonly 192.168.1.1 or 192.168.0.1.
- Log into your router account with your router’s admin username and password.
- Next, click Internet, WAN, or Advanced Settings.
- Find the IPv6 or IPv6 Settings and enable it.
- Save the settings and restart your router to make the changes take effect.
Related: How to Generate a Random IP Address for Your Device – 2 Ways
How to Enable IPv6 on Xbox One/PlayStation
Xbox One:
- Go to Settings > Network > Network Settings.
- Under the Advanced Settings, make sure IPv6 is enabled. It is usually enabled by default.
PlayStation:
- Go to Settings > Network > Set Up Internet Connection.
- Select Wi-Fi or LAN Cable.
- Check if IPv6 is set to “Auto” under the “Advanced Settings”.
How to Enable IPv6 on Smart TVs or Home Assistants
Most smart devices have IPv6 enabled by default, provided that your router supports IPv6 and is configured right. To manually activate IPv6 on smart TVs, etc. ensure your router has IPv6 enabled, and most devices on your network will automatically get IPv6 addresses.
How to Enable IPv6 on Linux
Most modern Linux distributions have IPv6 enabled by default. If you want, you can manually check and enable it by following the steps below.
- Press Ctrl + Alt + T to open the terminal window on Linux.
- Type the command “ifconfig” to check the current status of your network to check if IPv6 is enabled.
- Type the command “sudo nano /etc/sysctl.conf” to access the system configuration file.
- Add the following two lines to the end of the system configuration file: net.ipv6.conf.all.disable_ipv6 = 0, net.ipv6.conf.default.disable_ipv6 = 0.
- Type the command “sudo sysctl -p” to apply the changes to enable IPv6 on Linux.
Note: You should use command lines carefully since wrong commands may cause permanent data loss.
Should I Enable IPv6?
Whether you should enable IPv6 depends on your specific needs. Check when you can enable IPv6 and when you should not enable it below.
Enable IPv6:
If your ISP, router, and device support IPv6, you should enable it to take advantage of the larger address space, better performance, and future-proofing benefits of IPv6.
The IPsec (Internet Protocol Security) feature and some other security features are mandatory in IPv6. Therefore, enabling IPv6 ensures better encryption and more secure communication between devices.
Not enable IPv6:
If your ISP or network doesn’t support IPv6, you should not turn on IPv6 since it may cause network configuration errors like IP configuration failure. However, most modern ISPs support IPv6.
If you use an old, outdated router that doesn’t support IPv6, it’s best to leave IPv6 disabled.
Conclusion
In general, for most modern home and business networks, enabling IPv6 is recommended to take advantage of its benefits like improved network performance and larger IP address space.
By following the step-by-step guides above, you can easily enable IPv6 on your computer or mobile device.


