Generally, the “Unidentified Network No Internet” error appears in Windows when there is no internet access. This issue might be annoying, especially if you need to use the internet to work, study, or deal with other essential tasks right away. Fortunately, this post will discuss the possible causes of this error and present 9 solutions to fix it. Check the following troubleshooting guide carefully.
What Is the “Unidentified Network No Internet” Error?
The “Unidentified Network No Internet” error is a common issue in Windows. It means your computer or device has no internet connection. Additionally, this error may also arise when your computer detects a network connection but cannot identify it correctly.
The physical connection such as Ethernet or Wi-Fi signal is working, however, your network configuration or connection path is incorrect. This can prevent internet access properly. Furthermore, you may find that your browser can’t load web pages or some apps are unable to connect to the server.
Common Causes of Unidentified Network No Internet
- The devices can’t get a valid IP address from the router or DHCP server may cause an unidentified network. For example, the DNS server not responding or your device is being configured as a static IP.
- Network adapters and drivers may be outdated, incompatible, and corrupted.
- The router and modem may need to be restarted to clear temporary faults.
- Firewalls or security software may interfere with the normal network connection.
- Damaged network cables, faulty router ports, or broken computer network interfaces may cause no internet connection issues.
- Manually configured network settings including the DNS server address and default gateway may be incorrect.
How to Fix the “Unidentified Network No Internet” Issue?
Method 1: Restart Devices (Computer and Router)
To fix the “unidentified network no internet” error, you need to check your devices first. Sometimes, your computer may accumulate too many caches, preventing your network connect correctly. Besides, the router may have caches or configuration problems, resulting in such a network issue.
If you want to resolve the issue quickly, you can unplug the computer and router’s power cable. Wait three to five minutes and plug it back in.
Method 2: Disable Antivirus Software Temporarily
Antivirus software may intercept network connections or modify network settings to protect the system from threats. If the antivirus software is faulty or misconfigured, it may block normal network activity. When troubleshooting Ethernet unidentified network problems, reducing the disruption of your antivirus software can help to fix errors more quickly.
- Right-click on the Start icon and select “Task Manager”.
- In the “Processes” tab, find the process of your antivirus software.
- Select the process and click the “End Task” button.
Before disabling the antivirus software, make sure your system is free from known security threats. After disabling it, please re-enable it as soon as possible if needed.
Tip:
To encrypt data and protect your computer from malware. You can use LightningX VPN. It has advanced and strict encryption protocols such as Shadowsocks, Vless, and WireGuard to protect your online security. It also masks your real IP address, preventing your online activities from being tracked. Furthermore, LightningX VPN helps you bypass geo-restrictions to access various streaming services including Hulu, Disney Plau, HBO Max, Netflix, etc.
Method 3: Turn Off Airplane Mode
Airplane mode may interfere with wireless communication features. The Wi-Fi and your mobile data connection will be unavailable. Therefore, turning off it re-enables the Wi-Fi adapter and other wireless features. Your device can rescan and connect to a valid network, thus resolving the Ethernet unidentified network error. Follow the below steps:
Click the Internet icon on the right-bottom corner of your computer’s screen or press Windows A to open Action Center. Then, find the Airplane Mode icon and check its status. If it is on, you need to click it to turn off.
Method 4: Update Network Drivers
Outdated network drivers may not be compatible with your new system or devices. Here is how to check and update your drivers.
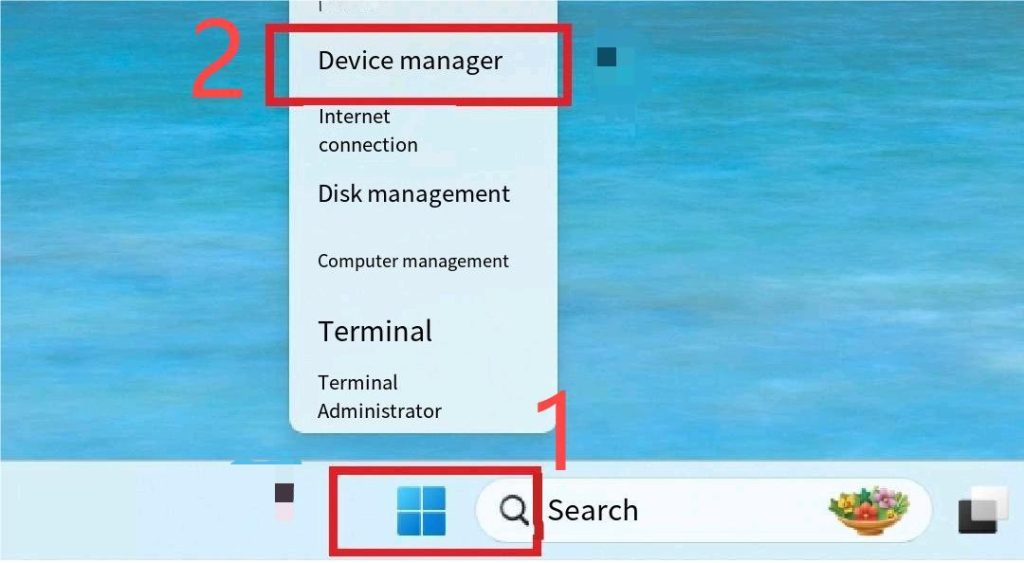
Step 1: You can open “Device Manager” by right-clicking the “Start” menu and selecting “Device Manager”, or by typing “Device Manager” in the search bar.

Step 2: In the Device Manager, locate and expand the “Network Adapters” category.
Step 3: Select the network adapter you want to update, right-click on it and select “Update Driver”. A pop-up box notes two options: “Search automatically for updated driver software” and “Browse my computer for driver software”.
Note: The first selection means Windows will automatically search your computer for the best available driver and install it on your device. In contrast, the second option requires a manual search.
Step 4: If Windows finds a new driver, it will install it automatically after clicking on the Update option. If your device already has the best driver installed, an informational prompt will appear.
Alternatively, you can visit the manufacturer’s website to download the latest drivers according to your network adapter model. The detailed steps are in this article: How to Update Drivers on PC: Easy and Quick Guide.
Method 5: Release and Renew Your IP Address
If your device uses the same IP address as another device, this may cause network connectivity issues. For this reason, Releasing and updating the IP address can resolve this conflict. Also, if the network configuration has changed (e.g. a DHCP server update), this fix allows your device to acquire new network settings.
- To open Command Prompt, search “cmd” in the start menu, right-click it, and choose “Run as administrator”.
- In the box, type “ipconfig /release” cmd and press the Enter key.
- The IP address starts to release. After this, type “ipconfig /renew”. This cmd will force your computer to obtain a new IP address from the router.
Method 6: Change DNS Server
Change the DNS server to one that is faster and closer to your geographic location. This increases resolution speed and improves network stability. In addition, trusted DNS servers can reduce interference from ISPs or malware.
To change the DNS server, you can choose “Network & Internet” in the settings. Then, select your active connection. Choose Properties, then click the “Edit” button next to the DNS server assignment section. Next, change Automatic (DHCP) to Manual in the drop-down menu and turn on Internet Protocol Version 4 (TCP/IPv4). Enter Preferred DNS (e.g.,8.8.8.8) and Alternate DNS (e.g.,8.8.4.4). Click Save to apply the changes.
Method 7: Run a Windows/Network Troubleshooter
Running Windows’ built-in Internet Troubleshooter can quickly detect connection problems and resolve them automatically.
- Click on the Strat menu and select the Settings icon or press Window + I to open it.
- Select the System in the left column, then scroll down and tap Troubleshoot > Other troubleshooters.
- Find “Network & Internet” and click the “Run” button next to start troubleshooting.
Method 8: Reset TCP/IP Settings
The TCP/IP stack is a fundamental part of your network settings. Resetting it usually re-initializes the TCP/IP protocol, flushes the DNS cache, clears misconfigurations that may be causing no internet problem, etc.
- Press “Windows + R” and type cmd. Then, choose “Run as administrator”.
- Type netsh int ip reset or netsh winsock rese and press Enter.
- Once the reset is complete, reboot your computer to apply the changes.
Method 9: Disable IPv6
IPv6 is advanced, however, some older devices or software may not fully support it. In some cases, the network may switch between IPv6 and IPv4, causing connection delays. If you are having problems with your device’s network connectivity, disabling IPv6 may help resolve the problem.
Recap
This post has outlined 9 solutions to fix the “unidentified network no internet” error. You can troubleshoot using the easiest restart method first. Then, move to more advanced fixes gradually. Hope this guide is effective in helping you get the network back immediately.


