


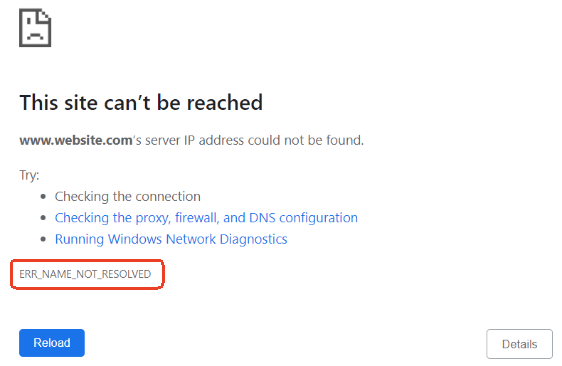
The “ERR_NAME_NOT_RESOLVED” error is a common issue encountered by internet users when they try to visit a website. This error usually appears when your browser cannot resolve a website’s domain name. It means that your computer or device can’t find the website’s server, which prevents you from accessing it.
In this post, we will explore various methods to resolve this error, providing detailed step-by-step instructions to help you fix it quickly and effectively.
What Is the “ERR_NAME_NOT_RESOLVED” Error?
Before diving into the solutions, it’s important to understand what causes the “ERR_NAME_NOT_RESOLVED” error.
This error occurs when the DNS (Domain Name System) cannot find the IP address associated with the website’s domain name. The DNS is like a phonebook for the internet, translating domain names (e.g., www.example.com) into machine-readable IP addresses. When the DNS can’t find the correct address, you see the “ERR_NAME_NOT_RESOLVED” message.
This issue can occur for various reasons, such as a misconfigured DNS server, network problems, or issues with your device’s settings. Fortunately, there are several ways to troubleshoot and fix this problem. Check the details below.
How to Fix the “ERR_NAME_NOT_RESOLVED” Error
1. Check Your Internet Connection
A poor or intermittent internet connection can cause the “ERR_NAME_NOT_RESOLVED” error. The first step is to ensure that your internet connection is stable.
- Restart Your Router: Turn off your router for 30 seconds, then turn it back on. This can often solve connectivity issues.
- Test Your Connection: Open a new tab and try visiting other websites. If they load properly, the issue may be specific to the website you were trying to visit.
- Use a Wired Connection: If you’re on Wi-Fi, try switching to a wired Ethernet connection. This eliminates potential Wi-Fi-related issues.
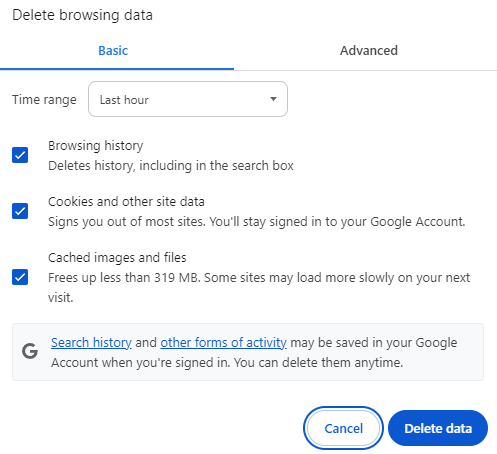
2. Clear Your Browser Cache and Cookies
Outdated or corrupted browser cache and cookies can interfere with your connection to websites and lead to DNS-related errors like “ERR_NAME_NOT_RESOLVED”.
Google Chrome:
- Open Chrome and click on the three vertical dots in the top-right corner.
- Click “Delete browsing data”.
- In the “Time range” dropdown menu, select “All time”.
- Check the boxes for “Cookies and other site data” and “Cached images and files”.
- Click “Clear data” to clear cache and cookies on Chrome.
Mozilla Firefox:
- Click on the menu button (three horizontal lines) in the top-right corner.
- Go to “Options” > “Privacy & Security”.
- Scroll down to the “Cookies and Site Data” section and click “Clear Data”.
- Select both “Cookies” and “Cache” and click “Clear”.
Microsoft Edge:
- Click on the three dots in the upper-right corner and go to “Settings”.
- Under “Privacy, search, and services,” click “Choose what to clear”.
- Select “Cookies, site data” and “Cached images and files,” then click “Clear”.
After clearing the cache and cookies, restart your browser and check if the ERR_NAME_NOT_RESOLVED error is resolved.
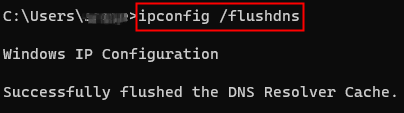
3. Flush DNS Cache
Flushing the DNS cache can help resolve the “ERR_NAME_NOT_RESOLVED” error, as it removes outdated or corrupted DNS information stored on your device.
Steps to Flush DNS Cache on Windows:
- Press Windows + R to open the Run dialog.
- Type “cmd” and press Enter to open the Command Prompt.
- In the Command Prompt, type the following command and press Enter: ipconfig /flushdns. You should see a message saying “Successfully flushed the DNS Resolver Cache”.
Steps to Flush DNS Cache on macOS:
- Open Terminal on Mac by navigating to Applications > Utilities > Terminal.
- Type the following command and press Enter: sudo killall -HUP mDNSResponder. You may be prompted to enter your Mac’s password.
Flushing the DNS cache will remove any stored DNS data, forcing your system to fetch the most up-to-date information.
Related: How to Fix ERR_CONNECTION_RESET Error in Chrome [10 Ways]
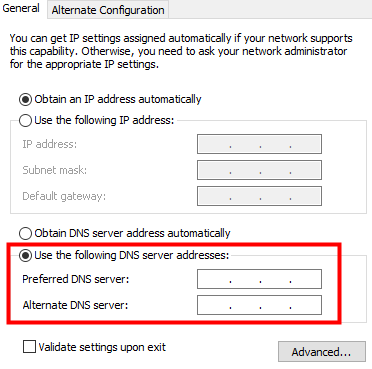
4. Change Your DNS Server
By default, your device uses the DNS servers provided by your Internet Service Provider (ISP). However, sometimes these DNS servers can experience downtime or become slow, leading to the “ERR_NAME_NOT_RESOLVED” error. Switching to a public DNS server, such as Google DNS or Cloudflare DNS, may help resolve this issue.
Steps to Change DNS on Windows:
- Open the Control Panel and click “Network and Sharing Center”.
- Click “Change adapter settings”.
- Right-click on your active network connection and select “Properties”.
- In the Properties window, click on “Internet Protocol Version 4 (TCP/IPv4)” and click “Properties”.
- Select “Use the following DNS server addresses” and enter the following:
- Preferred DNS server: 8.8.8.8 (Google DNS)
- Alternate DNS server: 8.8.4.4 (Google DNS)
- Click “OK” to save the changes.
Steps to Change DNS on macOS:
- Click Apple > System Settings and click “Network”.
- Select your active network connection (Wi-Fi or Ethernet) and click “Advanced”.
- Go to the “DNS” tab and click the “+” button to add a new DNS server.
- Add the following DNS servers:
- Preferred DNS server: 8.8.8.8 (Google DNS)
- Alternate DNS server: 8.8.4.4 (Google DNS)
- Click “OK” and then “Apply.”
Once the changes are made, restart your browser and try accessing the website again.
5. Disable VPN and Proxy Settings
If you are using a VPN or proxy server, it can sometimes interfere with your DNS settings, causing the “ERR_NAME_NOT_RESOLVED” error. Disabling these services can help restore your connection.
Steps to Disable VPN:
- Open your VPN application and disconnect the VPN service.
- Alternatively, go to the system tray, right-click on the VPN icon, and select “Close VPN” or “Exit”.
Steps to Disable Proxy on Windows:
- Open the “Settings” menu and go to “Network & Internet.”
- Click on “Proxy” and ensure the “Use a proxy server” option is turned off.
Once the VPN or proxy is disabled, check if the website loads correctly.
Tip:
LightningX VPN – A fast, stable, and secure VPN for Windows, Mac, Android, iOS, TV, Linux, Chrome, Firefox, Edge, etc. It offers 2000+ servers in 70+ countries. Use this VPN to access global websites, apps, and services. It also helps you hide your IP address to let you browse the internet anonymously.
6. Temporarily Disable Antivirus or Firewall
Sometimes, antivirus software or firewalls may block DNS requests, leading to the “ERR_NAME_NOT_RESOLVED” error. Try temporarily disabling them to see if the issue can be resolved.
- Open your antivirus or firewall software.
- Disable the real-time protection or firewall temporarily.
- Check if the error persists after disabling the software.
Note: Always remember to re-enable your antivirus or firewall after testing.
7. Reset TCP/IP Stack (Windows Only)
Resetting the TCP/IP stack can help fix any corrupted or misconfigured network settings that may be causing DNS issues.
- Press Windows + R, type cmd, and select “Run as administrator” to open Command Prompt as administrator.
- Type the following command and press Enter: netsh int ip reset.
- Restart your computer.
8. Restart Your Computer
If none of the above solutions work, restarting your computer can sometimes help reset network settings and clear temporary issues. Restarting can refresh your network connection and resolve some DNS problems like the “ERR_NAME_NOT_RESOLVED” error.
- Save any open work and close applications.
- Click on the “Start” menu (Windows) or “Apple” menu (macOS).
- Select “Restart” and wait for your computer to reboot.
Bottom Line
The “ERR_NAME_NOT_RESOLVED” error can be frustrating when trying to visit websites, but with the right approach, it can be fixed quickly. By following the steps outlined in this guide, you can troubleshoot and resolve this error effectively and regain access to your favorite websites.


